background image

 Installing the VoIP Loudspeaker Amplifier

VoIP Loudspeaker Amplifier Operations Guide

930106A

CyberData Corporation

15

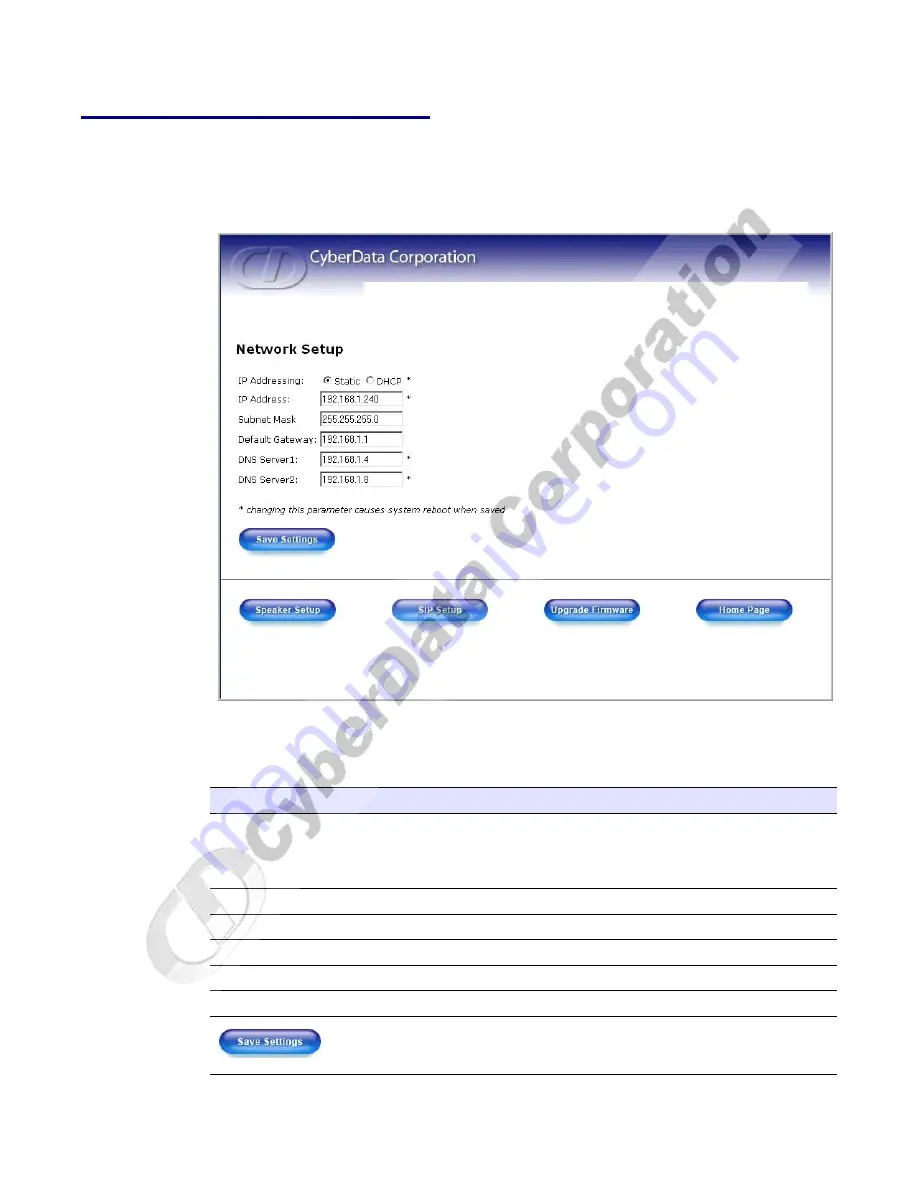
2.3.2 Configure the Network Parameters 

1. Click the 

Network Setup

 button to open the 

Network Setup

 page (

Figure 2-10

).

Figure 2-10. Network Setup Page

2. On the 

Network Setup

 page, enter values for the parameters indicated in 

Table 2-9

.

Table 2-9. Network Setup Parameters  

Web Page Item

Description

IP Addressing*

Select either 

DHCP


IP Addressing

 or 

Static IP Addressing 

by 

marking the appropriate radio button. If you select 

Static

,


configure 

the remaining parameters indicated in 

Table 2-9

. If you select 

DHCP

go to 

Step 3

.

IP Address*

Enter the static IP address.

Subnet Mask

Enter the Subnet Mask address.

Default Gateway

Enter the Default Gateway address.

DNS Server 1*

Enter the DNS Server 1 address.

DNS Server 2*

Enter the DNS Server 2 address.

Click on this button to save your configuration settings. Changing a 
parameter that has an asterisk next to it will cause a system reboot 
when saved.

VoIP Loudspeaker Amplifier


Summary of Contents for 010861 930106A

Page 1: ...VoIP Loudspeaker Amplifier Operations Guide PoE Part 010861 930106A ...

Page 2: ...se of this manual or such products software firmware and or hardware CyberData Corporation reserves the right to make changes without notice to this manual and to any such product software firmware and or hardware OPEN SOURCE STATEMENT Certain software components included in CyberData products are subject to the GNU General Public License GPL and Lesser GNU General Public License LGPL open source ...

Page 3: ...CyberData Corporation 930106A VoIP Loudspeaker Amplifier Operations Guide Revision History Revision Date Released Description of Changes A 11 06 06 This is the first release of this manual ...

Page 4: ...CyberData Corporation 930106A VoIP Loudspeaker Amplifier Operations Guide ...

Page 5: ...e Volume 11 2 2 6 Adjust the Volume 12 2 3 Configure the Loudspeaker Amplifier Parameters 13 2 3 1 Log in to the Configuration Home Page 13 2 3 2 Configure the Network Parameters 15 2 3 3 Set up the Loudspeaker Amplifier 17 2 3 4 Configure the SIP Parameters 18 2 4 Upgrade the Firmware and Reboot the Loudspeaker Amplifier 21 2 4 1 Reboot the Loudspeaker Amplifier 23 2 5 Restore the Factory Default...

Page 6: ...CyberData Corporation 930106A VoIP Loudspeaker Amplifier Operations Guide Contents ii ...

Page 7: ...IP to broadcast messages over your public address system The small footprint and low height makes this an ideal loudspeaker amplifier to discreetly mount almost anywhere 1 1 Typical System Installation Figure 1 illustrates how the VoIP Loudspeaker Amplifier PoE is normally installed as part of a public address system Figure 1 Public Address System Generic PoE Hub Server VoIP Phone 1 2 3 4 5 6 VoIP...

Page 8: ...es Web based firmware upgrades of the latest loudspeaker amplifier capabilities RTP RTP AVP Audio Video Profile Audio Encodings PCMU G 711 mu law PCMA G 711 A law Packet Time 20 ms 1 4 Supported SIP Servers The following link contains information on how to configure the loudspeaker amplifier for the supported SIP servers http www CyberData net support voip SIP RFC 3261 compatible Dual Speed 10 100...

Page 9: ...rporation 3 1 5 Product Specifications Category Specification Sensitivity 96dB 1W 1M S P Level Output 8 W PoE 16 W with internal power supply Port Baud Rate 10 100 Mbps Power Requirement 802 3af compliant Protocol SIP RFC 3261 Part Number 010859 Dimensions 14 x 10 x 4 Weight 4 4 lbs ...

Page 10: ...CyberData Corporation 930106A VoIP Loudspeaker Amplifier Operations Guide Product Overview 4 ...

Page 11: ... List Table 2 1 illustrates the parts for each loudspeaker amplifier and includes a kit for mounting Table 2 1 Parts List Quantity Part Name Illustration 1 Loudspeaker Amplifier Assembly 1 Installation Quick Reference Guide 1 Loudspeaker Amplifier Mounting Accessory Kit part 070057A which includes 3 x 8 x 1 1 4 truss head screws ...

Page 12: ...ry set default values indicated in Table 2 2 2 2 1 Loudspeaker Amplifier Components Figure 2 1 shows the components of the loudspeaker amplifier PoE Figure 2 1 Loudspeaker Amplifier Components PoE Table 2 2 Factory Default Settings Parameter Factory Default Setting IP Addressing static IP Address 192 168 3 10 Web Access Username admin Web Access Password admin Subnet Mask 255 255 255 0 Default Gat...

Page 13: ...component locations Figure 2 2 Jumper Locations See Table 2 3 and Table 2 4 for the jumper settings Table 2 3 Jumper Settings Low Power 802 3af Compliant Default Jumper Setting JP7 OFF Low Power 21V JP8 OFF Low Power 21V JP9 Position B Low Power Table 2 4 Jumper Settings High Power Non PoE Compliant Jumper Setting JP7 ON High Power 21V JP8 ON High Power 21V JP9 Position A High Power JP9 JP8 JP7 ...

Page 14: ...talling the VoIP Loudspeaker Amplifier 8 2 2 3 Connect the Loudspeaker Amplifier Figure 2 3 illustrates how to connect the VoIP Loudspeaker Amplifier PoE Figure 2 3 Connect a Loudspeaker 8 Ohms 8 Ohms Optional 2 Speaker Configuration Standard 1 Speaker Configuration Ethernet Hub ...

Page 15: ...ith a good quality speaker cable that is limited to 25 feet in length Table 2 5 Loudspeaker Amplifier Connections Connection Connection Details Location Loudspeaker Use two binding posts for up to 0 083 inch diameter loudspeaker wire VoIP paging amplifier Ethernet Use a RJ 45 cable VoIP paging amplifier ACa a Consult a licensed electrician for local electrical code requirements For a phase connect...

Page 16: ...ifier is in the high power mode Status Green After supplying power to the loudspeaker amplifier 1 The green Status LED illuminates after approximately five seconds to indicate the start of the firmware verification and load process 2 After approximately 15 seconds the Status LED begins to blink at one second intervals to indicate the start of the firmware boot process 3 After approximately 35 seco...

Page 17: ...nction Management RTFM switch Figure 2 7 on the loudspeaker amplifier face to announce and confirm the loudspeaker amplifier s IP Address test that the audio is working and check the volume Figure 2 7 RTFM Switch To announce a loudspeaker amplifier s current IP address 1 Press and hold the RTFM switch until it beeps after one second Activity Green The Activity LED blinks to indicate network traffi...

Page 18: ...amplifier volume 2 2 6 Adjust the Volume To adjust the loudspeaker amplifier volume turn the Volume dial Figure 2 8 on the loudspeaker amplifier face Figure 2 8 Volume Control Caution Equipment Caution Pressing and holding the RTFM switch for longer than 20 seconds will restore the loudspeaker amplifier to the factory default settings See Section 2 5 Restore the Factory Default Settings Volume con...

Page 19: ...udspeaker amplifier attach the loudspeaker amplifiers to the network one at a time to avoid IP address conflicts 2 3 1 Log in to the Configuration Home Page 1 Open your browser to the speaker IP address For the initial configuration of the speaker open your browser to the default IP address http 192 168 3 10 Note Make sure that the PC is on the same IP network as the loudspeaker amplifier 2 When p...

Page 20: ...b Page Item Description Serial Device serial number Ethernet Address Device ethernet address IP Addressing Shows the current IP addressing setting DHCP or static IP Address Shows the current IP address Subnet Mask Shows the current subnet mask address Default Gateway Shows the current default gateway address Link to the Speaker Setup page Link to the Network Setup page Link to the SIP Setup page L...

Page 21: ... Addressing Select either DHCP IP Addressing or Static IP Addressing by marking the appropriate radio button If you select Static configure the remaining parameters indicated in Table 2 9 If you select DHCP go to Step 3 IP Address Enter the static IP address Subnet Mask Enter the Subnet Mask address Default Gateway Enter the Default Gateway address DNS Server 1 Enter the DNS Server 1 address DNS S...

Page 22: ...hanged parameters and reboots the speaker if appropriate 4 Connect the speaker to the target network 5 From a system on the same network as the speaker open a browser with the new IP address of the speaker Link to the Speaker Setup page Link to the SIP Setup page Link to the Upgrade Firmware page Link to the Home page Table 2 9 Network Setup Parameters continued Web Page Item Description ...

Page 23: ...cess Username Use this field to change the Web Access Username Change Web Access Password Use this field to change the Web Access Password Re enter New Password Use this field to re enter a new password Speaker Tone Before Paging Enable Disable the speaker tone beep before each page Speaker Tone After Initialization Enable Disable the speaker tone beep after the system startup Click on this button...

Page 24: ...ure the SIP Parameters 1 Click SIP Setup to open the SIP Setup page Figure 2 12 Note For specific server configurations go to the following URL http www CyberData net support voip Link to the Network Setup page Link to the SIP Setup page Link to the Upgrade Firmware page Link to the Home Page page Table 2 10 Loudspeaker Amplifier Setup Parameters continued Web Page Item Description ...

Page 25: ...Installing the VoIP Loudspeaker Amplifier VoIP Loudspeaker Amplifier Operations Guide 930106A CyberData Corporation 19 Figure 2 12 SIP Setup Page VoIP Loudspeaker Amplifier ...

Page 26: ... User ID Enter the SIP User ID up to 30 alphanumeric characters Authenticate ID Enter the Authenticate ID up to 30 alphanumeric characters Authenticate Password Enter the Authenticate Password up to 30 alphanumeric characters SIP Registration Enable Disable SIP Registration Unregister on Reboot Select Yes to automatically unregister the paging amplifier when it is rebooted Select No to keep the pa...

Page 27: ...atest speaker firmware from the CyberData website www CyberData net support voip 3 Unzip the speaker version file This file may contain the following Kernel firmware file xxx image xxx xxx bin Application firmware file xxx romdisk xxx xxx img Release notes 4 Copy the firmware files to be upgraded to the appropriate TFTP server directory c tftp root for Windows tftpboot for Linux 5 Log in to the sp...

Page 28: ...he speaker will automatically reboot when the upload is complete When the countdown finishes the Firmware Upgrade page will refresh The uploaded firmware filename should be displayed in the system configuration indicating successful upload and reboot 10 Repeat steps 8 and 9 if you are uploading the Kernel and Application files For example Application filename 201 romdisk spk sip img Table 2 12 sho...

Page 29: ...4 Use the Reboot System section on the right side of the page Load new firmware to Partition 1 Enter the TFTP Server IP address New Filename Enter the new file name for the kernel or application firmware file that you are uploading Click on this button to automatically upload the selected firmware and reboot the system Link to the Speaker Setup page Link to the Network Setup page Link to go to the...

Page 30: ...IP Loudspeaker Amplifier Operations Guide Installing the VoIP Loudspeaker Amplifier 24 Figure 2 14 Reboot System Section 2 Click Reboot A normal restart will occur as per the Status LED section of Table 2 6 VoIP Loudspeaker Amplifier ...

Page 31: ...oudspeaker amplifier configuration will remain unchanged To restore these parameters to the factory default settings 1 Press and hold the RTFM switch for 20 seconds 2 The loudspeaker amplifier will beep after one second Continue to hold the switch until the loudspeaker amplifier beeps again after 20 seconds 3 Release the switch The following occurs A voice message announces that the factory defaul...

Page 32: ...CyberData Corporation 930106A VoIP Loudspeaker Amplifier Operations Guide Installing the VoIP Loudspeaker Amplifier 26 ...

Page 33: ...peaker amplifier was designed for indoor use Mounting it on the external part of a building will require additional hardware for weatherproofing cabling access and lightning suppression Consult a certified electrician for details See Figure 3 1 to mount the enclosure Note For mounting use the three 8 SHEET METAL SCREWS to secure the enclosure Table 3 14 Wall Mounting Components Part of the Accesso...

Page 34: ...CyberData Corporation 930106A VoIP Loudspeaker Amplifier Operations Guide Mounting the Enclosure 28 Figure 3 1 Loudspeaker Amplifier Enclosure Assembly ...

Page 35: ...t contains the files to be uploaded For example in tftpd l s tftpboot your_directory_name 4 0 2 In a Windows Environment You can find several options online for setting up a Windows TFTP server This example explains how to use the Solarwinds freeware TFTP server which you can download at http www CyberData net support voip To set up a TFTP server on Windows 1 Install and start the software 2 Selec...

Page 36: ...CyberData Corporation 930106A VoIP Loudspeaker Amplifier Operations Guide Setting up a TFTP Server 30 ...

Page 37: ...den Road Monterey CA 93940 USA www CyberData net Phone 800 CYBERDATA 800 292 3732 Fax 831 373 4193 Sales Sales 831 373 2601 Extension 334 Technical Support Phone 831 373 2601 Extension 333 Email support CyberData net Returned Materials Authorization To return the product contact the CyberData Returned Materials Authorization RMA department at Phone 831 373 2601 Extension 136 Email RMA CyberData ne...

Page 38: ... the product free of charge This warranty includes all parts and labor If the product is out of warranty and fails a flat rate repair charge of one half the product purchase price will be assessed Repair costs for products that are in warranty but damaged by improper modifications or abuse will be charged at the out of warranty rate Products returned to CyberData both in and out of warranty are sh...

Page 39: ...eaker amplifier settings 33 subnet mask 6 13 25 username and password 6 13 25 web login username and password 13 default gateway 6 13 15 25 default IP settings 13 default login address 13 default loudspeaker amplifier settings 25 DHCP Client 2 DHCP IP addressing 15 dimensions 3 DNS server 15 E enclosure mounting 27 expiration time for SIP server lease 20 F factory default settings 25 firmware upgr...

Page 40: ...uct configuring 13 mounting 27 parts list 5 product features 2 product overview product features 2 product specifications 3 supported protocols 2 supported SIP servers 2 typical system installation 1 product specifications 3 protocols supported 2 R reboot 23 25 registration and expiration SIP server lease 20 remote SIP port 20 reset test function management switch 11 resetting the IP address to th...

Page 41: ...n access 13 restoring the default 6 13 25 V verifying loudspeaker amplifier operations 17 network link and activity 10 power on to loudspeaker amplifer 10 W warranty 32 web access password 6 13 25 web access username 6 13 25 web configuration log in address 13 web based loudspeaker amplifier configuration 13 weight 3 Windows setting up a TFTP server on 29 ...

Page 42: ...CyberData Corporation 930106A VoIP Loudspeaker Amplifier Operations Guide 36 ...

Reviews: