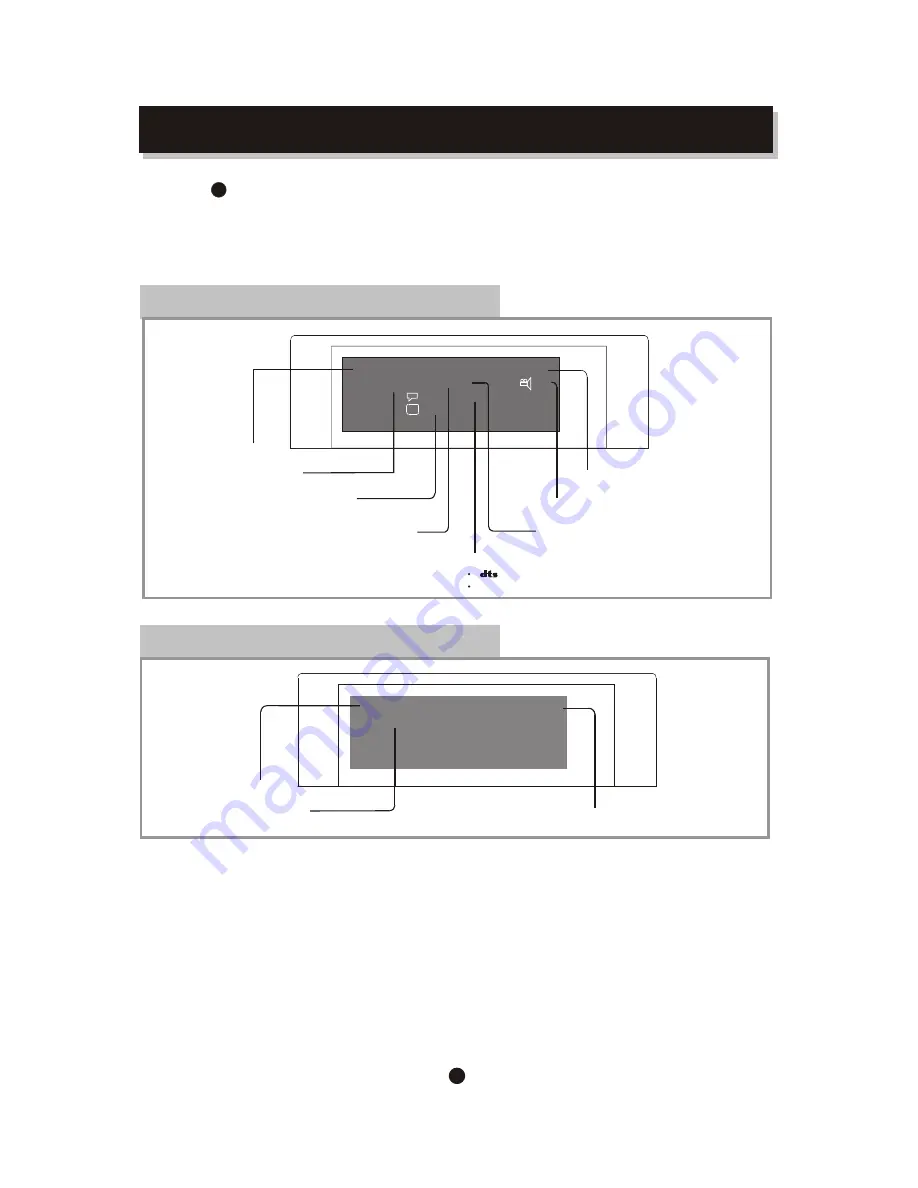
Curtis dvd5041 Instruction Manual Download Page 28

OSD - DVD mode


The OSD indicator  is a user  friendly interface 
designed for displaying

 the status of  the playback. 

When a dif ferent disc is  loaded (DVD, CD Or MP3), 
the OSD indicator  bar will be  different.

24

Press OSD


button 

an On Screen Display (OSD) indicator will be displayed
at the upper part of the TV screen in displaying the disc
information and operation status. 

The OSD indicator will remain on screen until pressing


the OSD button to turn it off. 


... ... ...
... ... ...
... ... ...
... ... ...
... ... ...
... ... ...
... ... ...

... ... ...
... ... ...
... ... ...
... ... ...
... ... ...
... ... ...

... ... ...
... ... ...
... ... ...
... ... ...
... ... ...
... ... ...
... ... ...

... ... ...
... ... ...
... ... ...
... ... ...
... ... ...
... ... ...

Disc type

Disc Title

current title / total disc titles


Chapter

current chapter / total chapters 

Playback time /
Chapter remain Time


Disc Subtitle

current subtitle / total disc subtitles


Audio Sound  Track

current audio / total tracks 

Multi-angle

Current angle / Total angles

Audio format

LPCM

DTS
LPCM

DVD  

   0012::33  01:36:25 

Title  1

/

6   Chapter 3

/

21     Angle

1

/

1  

Audio   


  1

/


AC-3 6 Ch 

Subtitle   


   1

/

Bitrate  


  6.910 

....

ON SCREEN DISPLA Y

OSD

OSD - CD mode


... ... ...
... ... ...
... ... ...
... ... ...
... ... ...
... ... ...
... ... ...

... ... ...
... ... ...
... ... ...
... ... ...
... ... ...
... ... ...

... ... ...
... ... ...
... ... ...
... ... ...
... ... ...
... ... ...
... ... ...

... ... ...
... ... ...
... ... ...
... ... ...
... ... ...
... ... ...

Disc type

Playback time /
Disc remain  time

CD

   00:12:33  01:36:25 

Track2

/

3  

Disc

Track

current track / total tracks 

Mbpss

Summary of Contents for dvd5041

Page 1: ...mp3 5 1 ch output INSTRUCTION MANUAL...

Page 2: ...the cord away from traffic areas where it will not become a trip hazard 13 To disconnect the appliance turn the appliance off switch off the power outlet and remove the plug from the power outlet 14 D...

Page 3: ...r circuits as contact with them might be fatal Installing an outdoor antenna can be hazardous and should be left to a professional antenna installer Lightning for added protection for this product dur...

Page 4: ...AGE MENU OSD Menu Subtitle Audio DVD Menu Logo VIDEO MENU TV Shape Video out AUDIO MENU Digital output LPCM 48k DS Page 2 3 3 5 6 7 8 9 10 11 12 13 14 15 22 22 23 24 26 27 WARNING IMPORTANT NOTICE FEA...

Page 5: ...beam Be sure to aim the remote control directly at the infrared sensor of the unit during operation If the sensor has been covered or there is a large object between the remote control and the sensor...

Page 6: ...nted on the disc s packing or follow the instructions of the Disc s on screen menu Care of disc Hold the disc with fingers Hold the disc s outer edge and or the center spindle hole Do not touch the di...

Page 7: ...gital signal OPTICAL output jack 1 5 1CH OUT 12 4 Y Pb Pr 5 11 Digital signal COAXIAL output jack 13 2CH L input jack 14 2CH R input jack 5 1CH CEN output jack 7 9 8 15 5 1CH SL output jack 5 1CH FL o...

Page 8: ...sc does not support the feature or requires special settings Check the features printed on the disc s packing or follow the instructions of the Disc s on screen menu REMARK Some features of the player...

Page 9: ...een this unit and other components be sure all connection with power off 2 Audio Video cables are connected according to the different colour identification and they should be fitted firmly Yellow to...

Page 10: ...110V 60Hz 7 6 CONNECTIONS...

Page 11: ...Y Pb Pr JACKS Use the COMPONENTCable not supplied to connect DVD player to your TV To use it you must press P SCAN button to switch the video mode to progressive scan or YUV Audio IN Video IN Y Pr Pb...

Page 12: ...ble supplied to connect your unit and your TV CONNECT DVD PLAYER TO TV SET BYS VIDEO SOCKET Connect the S VIDEO cable not supplied to connect DVD player and your TV Audio IN Video IN Audio IN Video IN...

Page 13: ...omatic Play The unit will take a few seconds to download the disc initial data display the disc type logo in the left upper corner of the TV screen and then start playing automatically If a DVD Disc M...

Page 14: ...Always active S Video Default option The DVD player has been pre set at the factory to Composite Video V and S Video outputs as default settings 7 10 The player is equipped with the following video o...

Page 15: ...e of protecting the TV screen The TV screen will be black and a screen Saver will appear on screen if No disc is loaded for 180 seconds In STOP mode and no button has been Pressed for 180 seconds exce...

Page 16: ...3 STOP memorizes the interrupt position May resume with Play button To stop completely Will NOT resume with Play button Open Close disctray To open and close The disc tray Press EJECT button on the re...

Page 17: ...will not advance or reverse during WARNING section of any Disc 1 2 2 Press to play slow forward Repeat pressing the Button to change slow forward speed Press PLA Y button to resume normal playback 1...

Page 18: ...urn to the DVD disc Menu Press TITLE Button return to the DVD disc Title 1 2 Disc TITLE Disc TItle Menu 2 3 Press the numeric Key pad to input data for disc or setup menu Program functionality depends...

Page 19: ...gle feature viewing angles may be selected 1 During in playback repeat pressing ANGLE button to select the desired viewing angle Status will be displayed on screen A DVD disc may contain up to 9 selec...

Page 20: ...ck feature Audio Language can be selected During in playback repeat pressing AUDIO button to select the desired audio language Playback status will be displayed on screen A DVD disc may contain up to...

Page 21: ...step too can select normal mode out PSCAN 1 2 1 2 1 1 2 PROLOGIC PROLOGIC ACTIVATION 1 Full surround is capable in PROLOGIC mode when playing CD s VCD s and WMA files Note MP3 files will not play back...

Page 22: ...Input chapter number Input time hh mm ss Press ENTER button TITLE CHAPTER TIME 18 CD disc Input time hh mm ss Hour Minute Second Press ENTER button Press the button to T rack Search mode This function...

Page 23: ...y to MP3 disc 19 The period between A and B should be at least 3 seconds Rep A B FUNCTION BUTTONS 1 A B A B A B Repeat functionality depends on different disc s production format some DVD discs do not...

Page 24: ...iewable picture Press the button repeatedly to change the zoom scale Press the CURSOR buttons to adjust the zooming position 1 Q Q 1 3 Q Q 2 4 Off Enlarged scale 2 In DVD mode Q2 ZOOM Mute 1 Press MUT...

Page 25: ...condition of PBC OFF press relevant number Key to get favorite song during playing 1 1 Press 3D button in turn it delivers on on the screen then the second press 3D button it Delivers off 2 1 3D 3D L...

Page 26: ...mming is completed Press PROG button to exit the program menu Highlight Play Program to start the program Highlight Clear All to clear all input Press ENTER button to confirm 5 Press PROG button to ca...

Page 27: ...rwards A maximum of two marks can be stored 3 Press CLEAR button to clear a particular mark Press MARK button to clear the display PLAYBACK FROMA MARKED POSITION 1 Press the MARK button on the remotec...

Page 28: ...n screen until pressing the OSD button to turn it off Disc type Disc Title current title total disc titles Chapter current chapter total chapters Playback time Chapter remain Time Disc Subtitle curren...

Page 29: ...he root directory Select a track Press ARROW button to highlight the desired track and switch between folder and pages Press ENTER button to play the selected track Playing track file information You...

Page 30: ...n Highlight Video Press ENTER Video sub menu appears ENTER TV shape 4 3LB 4 3PS 4 3LB 16 9 Video output S video Highlight the desired itemand press ENTER button Highlight the desired item Press ENTER...

Page 31: ...Password selection Press ENTER button to lock Press SETUP butto n to save the setting and quit Enter this menu to setup the rating level of the player The player will require a password to play any d...

Page 32: ...power on use TV remote to select A V signal for DVD rather than broadcast Check if the system connection is proper and secure Check if the connection cables are damaged Clean the disc Picture noise di...

Page 33: ...button Highlight AUDIO Highlight Digital Out Select RAW or PCM Press SETUP button Power on the amplifier or active type loudspeakers MP3 disc no sound or noisy Remote control does not function When PC...

Page 34: ...R 2 LAYER 3 Audio System Video Output Audio Output 2 Vpp CD DVD 92 dB 0 04 DTS digital output Audio DAC 16bit 48KHz 1 Vpp at 75 ohm 4Hz 20KHz EIAT 4Hz 22KHz 48K 4Hz 44KHz 96K Output Terminals Power in...

Reviews: