background image


Rev. K,  p. 8 of 11 

9       GAS SHOCKS AND WIRING 
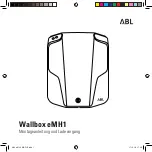
 
9.1     

Open the windshield and attach the two gas shocks 

as shown in fig. 9.1 with the rod end of the gas shock 
pointing down. Snap the gas shock onto the ball studs. 
Leave the windshield in the open position.
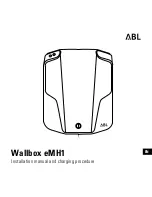
 

9.2     

Run the loomed battery wires over the front tubu-

lar frame, down along the side tubular frame and into the 
gap behind the hood as shown in fig. 9.2. Secure the 
loomed wire to the tubular frame using three of the sup-
plied cable ties. Snip off excess length of cable tie if de-
sired. Lift the hood of the vehicle. Using a 10mm socket 
or Philips screwdriver, connect the long, red, positive 
wire and the long, black, negative wire to the battery. 
Wires are labeled. Connect the key-controlled wire as 
follows: using a 3/8” deep socket, temporarily remove 
the nut on the top threaded stud as shown in fig. 9.2.1. 
Place the supplied ring terminal onto the stud and re-
install the original nut and tighten. Ref.: the top stud 
should already have an orange wire with a white stripe. 
This is the vehicle’s key-controlled wire.  

9.3     

Note: there are two (2) extra wires with female 

bullet connectors that are only used if a heater is being 
installed. The blue wire is for the low speed and the gray 
wire is for the high speed. When finished with the wire 
connections, coil up the extra length of loomed wire and 
use a cable tie to secure the wires in place as desired. 
 

10.     FINISHING TOUCHES 
 
10.1    

Make sure the rubber flaps are appropriately seal-

ing against the sides of the plastic hood of the vehicle. 
See figure 10.1. 

10.2   

Using a 5/32” Allen wrench, set the antenna at a 

desired angle and re-tighten the set screw. 

10.3   

Install wiper per instructions included in the wiper 

kit. One wiper is included with the cab. A second wiper 
is available as an additional option.  

Caution:  

If install-

ing a second wiper, double check that both wipers have a 
maximum 85 degree sweep to avoid interference. The 
motor should have a sticker on it indicating the degree of 
sweep. 

10.4   

Note: extra hardware has been provided in case 

they get lost. Discard extras such as washers, locknuts, 
“P” clamps, cable ties, etc. 


It is recommended that 
with a cab installed, the 
vehicle should be trail-
ered facing backwards. 

Fig. 10.1 View from driver’s side 

rubber flap 

Fig. 9.1 Gas shock for windshield 

this end towards the ground 

Fig. 9.2 View from driver’s side 

run loomed wire 
into this gap 

Fig. 9.2.1 View from driver’s side 

attach to the top threaded stud that 
has the orange wire with white stripe 

Summary of Contents for 2876196-067

Page 1: ...EDOM CAB INSTALLATION INSTRUCTIONS FOR THE POLARIS RANGER p n 2876196 067 Multiple U S and Foreign Patents Pending Standard item with purchase of cab one driver s side wiper Optional accessories available passenger s side wiper work lights and strobe light Rev K p 1 of 11 IMPORTANT THIS ACCESSORY WEIGHS 340 POUNDS PLEASE ADJUST THE VEHICLE PAYLOAD ACCORDINGLY ...

Page 2: ...d in product add additional weight to the base vehicle All Curtis Cabs blades and general accessories ADDED WEIGHT brochures Deduct the accessory s total weight from the vehicle s rated capacity and never exceed the vehicle s rated capacity including Exposure to Carbon Monoxide can Cause illness serious injury or death Never operate vehicle if suspicious of Carbon Monoxide Inspect exhaust system f...

Page 3: ...the procedures exactly as stated in these instructions and heed all DANGER WARN ING and CAUTION statements both in this instruction manual as well as those posted on the vehicle Prior to servicing the vehicle turn the key switch to OFF and set the parking brake Always wear safety glasses or approved eye protection when servicing the vehicle Moving parts Do not attempt to service the vehicle while ...

Page 4: ...nt most clamp can be close to the front welded joint and the rear most clamp can be 13 behind the front one Hardware will be installed in step 6 2 3 SIDE FRAME DOOR ASS Y 3 1 With assistance place the side frame assembly in place on top of the vehicle floorboard per fig 3 1 Attach the middle front using the bracket shown two 5 16 18 x 1 long hex head bolts two internal tooth locking wash ers and t...

Page 5: ...ng hex head bolts four in ternal tooth locking washers and four flat steel washers Factory installed weld nuts are provided on the tabs of the side frame See right side of figure 4 1 Leave bolts loose 5 WINDSHIELD 5 1 Have the following items ready four 5 16 18 x 1 3 4 long flat head bolts four steel washers four 5 16 18 locknuts and two plastic spacer blocks With assis tance place the windshield ...

Page 6: ... 1 4 long Truss head Phillips head bolts and four fender washers into factory installed weld nuts on the rear tabs on the side frames Snug up the bolts Do not over compress the rubber bushings 7 2 Secure the vinyl filler by applying self adhesive backed velcro to the vehicle where needed Note self adhesive backed velcro should be applied to a clean dry surface at room temperature See fig 7 2 for g...

Page 7: ...llips head bolts into fac tory installed threaded inserts in the front of the overhead console Leave bolts loose 8 6 Install three 1 4 20 x 3 4 long Truss head Phillips head bolts through the three rear P clamps and into the threaded inserts in the rear of the overhead console See fig 8 6 Tighten the previously installed four bolts 2 per side holding the front of the overhead console to the windsh...

Page 8: ...d if a heater is being installed The blue wire is for the low speed and the gray wire is for the high speed When finished with the wire connections coil up the extra length of loomed wire and use a cable tie to secure the wires in place as desired 10 FINISHING TOUCHES 10 1 Make sure the rubber flaps are appropriately seal ing against the sides of the plastic hood of the vehicle See figure 10 1 10 ...

Page 9: ...hamois should be kept free of grit by frequent rinsing in clean water 5 Grease and oil may be removed with kerosene 6 Novus I and Novus II are recommended plastic cleaners for acrylic units and can be used to remove light scratches GLASS WINDOWS 1 Windex and other glass cleaners can be used on glass windows DOORS AND BODY PANELS 1 NEVER USE AN ABRASIVE DETERGENT VEHICLE CLEANER OR A WIRE BRISTLED ...

Page 10: ......

Page 11: ......

Reviews: