background image


4


วิธีการใช้งาน

1.


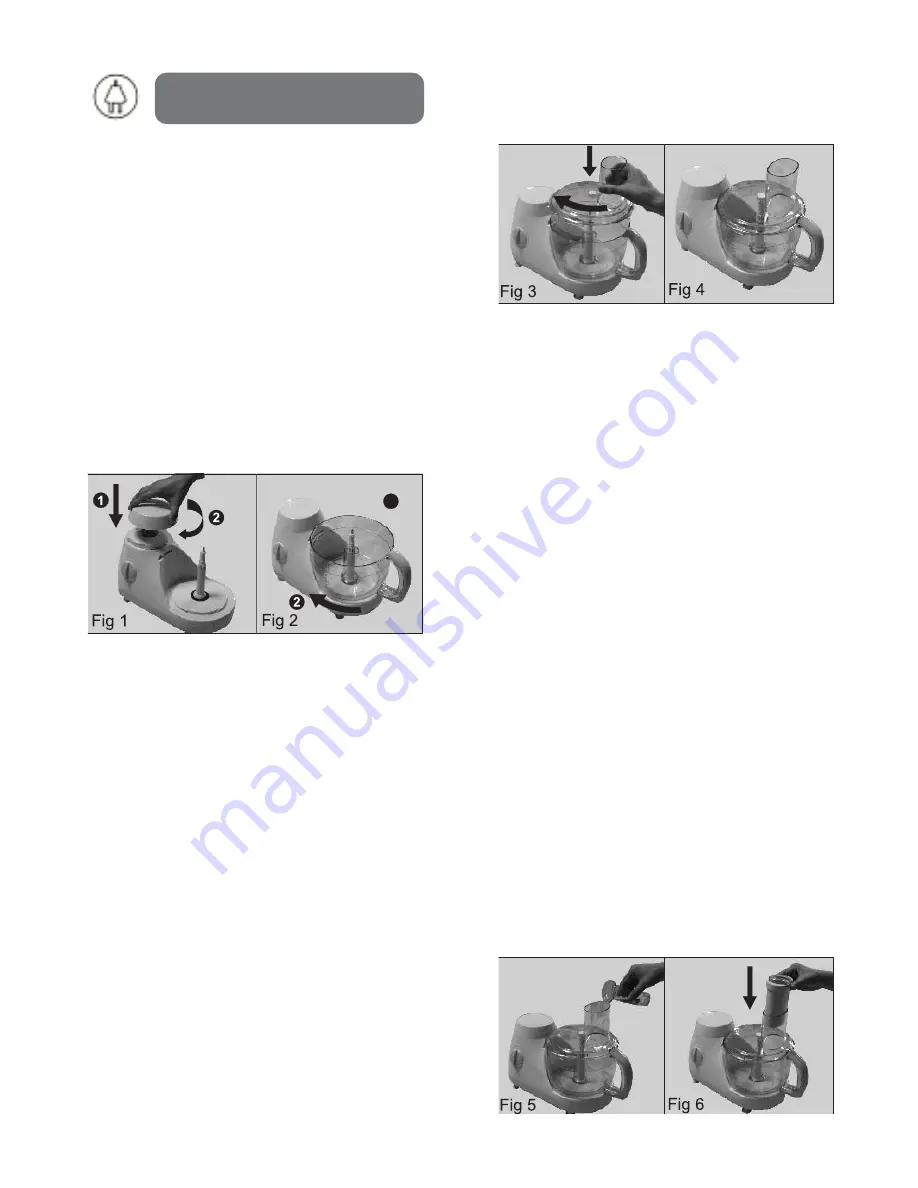
การประกอบชามผสมอาหาร

วางปิดฝาครอบตัวเครื่อง


(D) 

ลงบนตัว

เครื่อง

 (fig.1) 

จนกระทั่งลูกศรบนฝาตรงกับ

ลูกศรบนตัวเครื่อง

วางชามผสมอาหาร


(H) 

ลงไปที่ตัวเครื่อง

ตามภาพ

 (fig.2)

จับที่หูจับของชามผสมอาหาร


แล้วหมุน

ตามเข็มนาฬิกาจนหมุนต่อไปไม่ได้และจะ
มีเสียง


คลิก

2. 

การประกอบฝาชามผสมอาหาร

วางฝาชามผสมอาหาร

 (I) 

บนชามผสม

อาหาร

(H) 

ตามภาพ


(fig.3)

หมุนฝาชามโดยออกแรงเล็กน้อยไปทิศ

ทางตามเข็มนาฬิกา


จนกระทั่งหมุนต่อไป

ไม่ได้


และจะมีเสียง


คลิก

” 

ดูภาพ

ประกอบ

 (fig.4)

ตรวจสอบให้แน่ใจว่า


สัญลักษณ์ลูกศร

บนฝากับสัญลักษณ์ลูกศรบนชามผสมอาหาร
อยู่ในตำแหน่งตรงกันและขณะนี้ฝาของชาม
ผสมอาหารจะลงล็อกกับหูจับของชามผสม

บนฝาอยู่ตรงกับตำแหน่งมือจับของชาม
ผสมอาหาร

3. 

ช่องลำเลียงอาหารและก้านส่งอาหาร

1) 

ช่องลำเลียงอาหาร


สามารถใช้สำหรับ

เป็นช่องเติมน้ำหรือส่วนแข็งลงในโถผสม
ตามภาพ


(fig.5)

2)

ใช้ก้านส่งอาหารช่วยดันส่วนผสมผ่าน

ทางช่องลำเลียงอาหาร


ตามภาพ

 (fig.6)

3) 

คุณสามารถใช้ก้านส่งอาหารปิดช่อง

ลำเลียงอาหารไว้ในขณะเครื่องทำงานเพื่อ
ป้องกันฝุ่นหรือการกระเด็นของของเหลวหรือ
ส่วนผสมภายในชามผสมอาหาร

4) 

ก้านส่งอาหารสามารถใช้งานร่วมกับ

ถ้วยตวงก้านส่งอาหาร

 (fig.7)

ถ้วยตวงในก้านส่งอาหารสามารถถอด

แยกออกมาจากก้านส่งอาหารเพื่อทำให้
เป็นช่องลำเลียงอาหารที่แคบลง

ช่องลำเลียงอาหารที่แคบลง


จะช่วยในการ

เติมส่วนผสมที่มีขนาดเล็กหรือจำนวนน้อย

Summary of Contents for rbsfooprep

Page 1: ......

Page 2: ...1...

Page 3: ...2 RBSFOODPREP 700 220 240 50 60 A B C D E F G H I J K L M N O P Q R S T U V W 1 5 S S 1 5 Cuizimate...

Page 4: ...3...

Page 5: ...4 1 D fig 1 H fig 2 2 I H fig 3 fig 4 3 1 fig 5 2 fig 6 3 4 fig 7...

Page 6: ...4 1 2 fig 10 F 9 Max 9 10 60 A S N S S Pastry S S fig8 S fig 9 1 3x3x3 2 3 4 S 5...

Page 7: ...F Off V B P Q R S T U U P Q R S T fig 11 Push up fig 12 fig 13 fig 14 fig 15 F Max F Med Low Push up fig 16 6...

Page 8: ...1 2 3 4 R French fry Fig 20 F Max 1 3 C M Fig 17 Fig 18 19 D C 1 2 3 4 80 7...

Page 9: ...5 1 5 6 7 8 3 Fig 21 Fig 22 Fig 23 Fig 24 25 Fig 26 F 1 2 8...

Page 10: ...9 Fig 27 Fig 28 1 2 3 4 5...

Page 11: ...2 10 Off 15...

Page 12: ...id is securely locked in place before operating appliance If you use the appliance without the blender the appliance will not function if the housing cap has not been screwed onto the attaching hole f...

Page 13: ...nual A B C D E F G H Blender stopper Blender Lid Blender jar Housing cap Housing Knob Driving Bowl Tip safety precautions I J K L M N O P Q R S T U V W Bowl lid Throat Pusher Pusher cup Kneading Acces...

Page 14: ...severe injury to persons or damage to the food processor A scraper may be used but must be used only when the food processor is not running Blades are sharp Handle carefully Instruction for use 13 To...

Page 15: ...Turn the lid with some force clockwise until the lid will not move any further and you hear a click fig 4 Make sure that the mark on the lid and the arrow on the bowl are directly opposite each other...

Page 16: ...control to the position indicated in the table and switch the application on If you have doubts about the correct speed always select the highest speed position3 Applications recipes mentioned in the...

Page 17: ...you want to cut soft vegetable or fruits you can also select a lower speed setting Press the ingredients slowly and steadily down with the pusher Press the side of the cutter that draw the word push...

Page 18: ...lug the appliance before you remove the blender jar from the housing 4 Do not fill the blender jar with ingredients that are hotter than 80 C 5 To prevent spilling do not put more than 1 5 liters of l...

Page 19: ...nd the bowl lid by twisting the lid until to its fixture in clockwise direction Switch on the appliance by setting the speed control to the recommended speed Tips 1 The opening in the lid can be used...

Page 20: ...ter each use Never immerse any part of the housing in water or other liquid 3 The bowl and lid may be washed by hand in hot soapy water Do not place in the dishwasher Do not use abrasives 4 Clean the...

Page 21: ...lly Damage or defect from misunderstand how to use or service from non authorized people Damage or defect from not follow this instruction manual Electrical shock or any electrical problem Warranty is...

Page 22: ......

Reviews: