9- 2
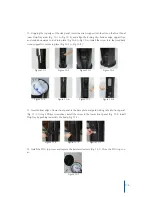
4. Remove Drip Tray by pulling outwards from the body (Fig. 4-1). Using a Philips screwdriver, re-
move the screw from the lower front panel (located behind Drip tray assembly location)(Fig. 4-2)
Pull outwards on the lower front panel to disengage locking tabs from the front of the cooler (Fig.
4-3)
5. Remove the 2 side panel installation screws from the right hand side of the cooler (located mid-
way up the front panel on the front and back) (Fig. 5-1 to Fig. 5-3)
POU Installation
6. Remove the cardboard spacer located between the 2 float arms (Fig. 6-1) Install the primary float
(Fig. 6-2)
Figure 4-1 Figure 4-2 Figure 4-3
Figure 6-1 Figure 6-2
Figure 5-1 Figure 5-2 Figure 5-3


