6 - 4
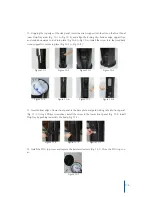
10. Remove the two silicon faucet seals from the inlet end (fig. 10-1) and unscrew the faucet cap by rotat-
ing it counterclockwise to separate the top and bottom halves of the faucet assembly (fig. 10-2 and 10-3).
11. Using only FDA approved sanitizing products, thoroughly clean all water contact parts and drip tray.
The use of these products must be in accordance with the manufacturer’s safety instructions and recom-
mendations and performed by properly trained personnel.
12. Remove front bottom panel by removing screw and set aside (fig.12-1 and 12-2). Remove both side
panels by removing the 4 screws (fig.12-3 and 12-4) and open top cover to lift panels off of locator pins
(fig.12-5 to 12-7). Clean all 3 panels using only a mild non-abrasive cleaning agent. The use of bleach or
abrasive cleaners is not recommended.
Figure 10-1 Figure 10-2 Figure 10-3
Figure 12-1 Figure 12-2 Figure 12-3 Figure 12-4
Figure 12-5 Figure 12-6 Figure 12-7


