PMS 711
2 cyan
85 magenta
76 yellow
10.25.12
CRU Mark
Page 4
4.1.2 Mounting and Unmounting Volumes
If the hard drive installed in the RAX unit is already
formatted, an icon representing the drive’s volume will
appear (mount) on the desktop. You can begin using
the volume right away. If the drive is unformatted, a
message will appear on the desktop saying that the disk
is unreadable. Use OS X’s Disk Utility to easily format the
drive (see section above).
Unmount the volume before
powering down the unit by
dragging the volume’s icon to the
Trash
, or by selecting the volume
then pressing
Command-E
.
Disconnecting the unit without
first unmounting the volume can
result in data loss.
4.1.3 Creating a Boot Drive
To activate this feature, you must first install OS X on the
hard drive in your carrier. The easiest way to do this is
to clone an existing system drive using a utility such as
Carbon Copy Cloner or Super Duper. Next, go to
System
Preferences
→
Startup Disk
. A window will list the
available bootable volumes. Select the volume from
which you wish to boot. Another method is to hold down
the
Option key
during boot up. A screen should appear
that allows you to select the volume you wish to use. This
is useful if you are only sporadically booting from the RAX
unit hard drive.
4.2 Usage with Windows Operating Systems
4.2.1 Formatting a Drive
When you first mount a drive to a Windows operating
system, a pop-up window will ask you if you would like
to format it. Click
Format Disk
and skip to Step E. If the
prompt does not pop up, use the Disk Management utility
by following these steps:
a. Right-click on the
My Computer icon
on the
desktop (Windows XP) or the
Computer button
in
the Start Menu (Windows Vista, 7, Server 2008 and
2012 product families), then select
Manage
. In the
left pane of the Computer Management window that
opens, left-click on
Disk Management
(labeled
‘A’ in the picture below). For Windows 8.1, press
X
, then select
Disk Management
from
the menu that pops up.
b. The drive should appear in the list of Disks in the
lower pane. You may need to scroll down to see it.
If the drive is already formatted, you can identify it
easily by its volume name. If the Device Properties
Box (labeled ‘B’ in the picture below) says “Not
Initialized”, you’ll need to initialize the disk before
formatting it.
Right-click on the
Device Properties Box
and
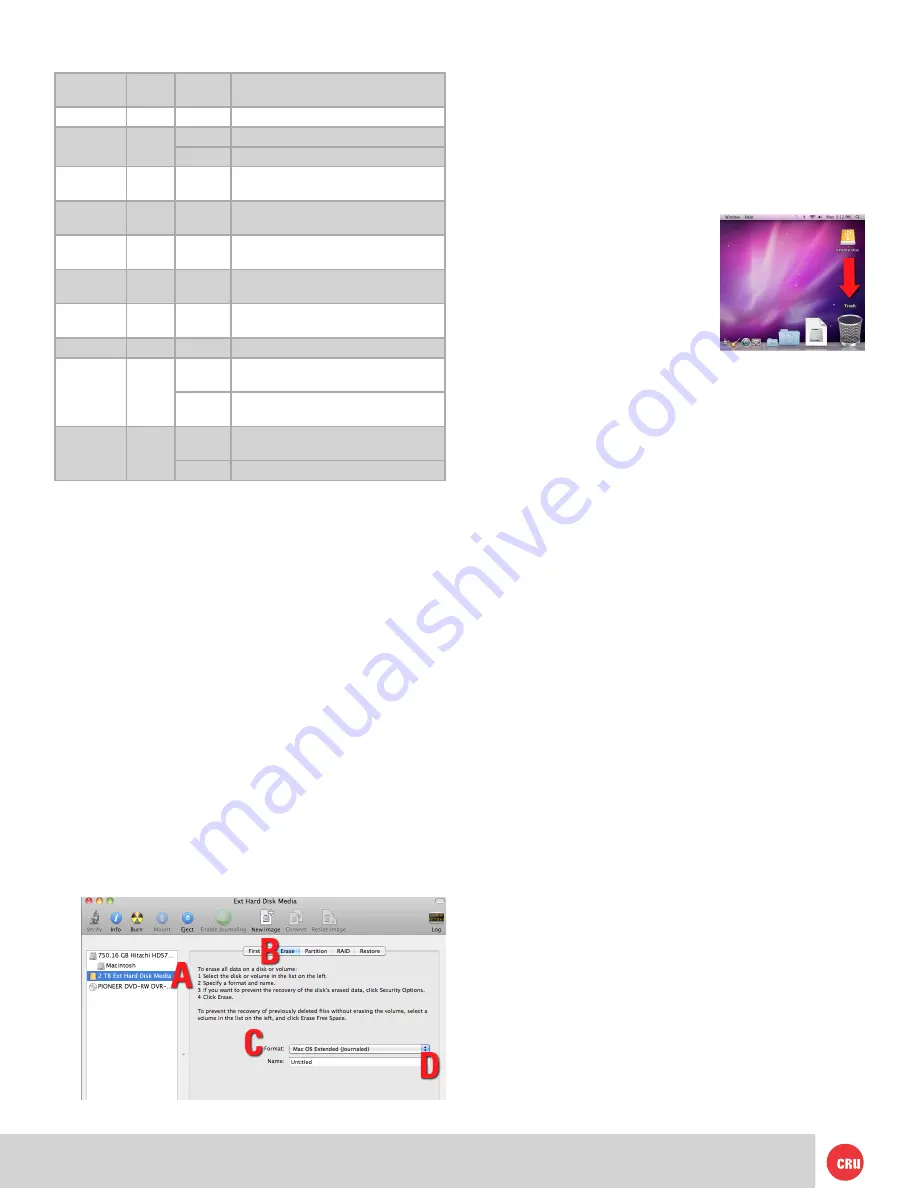
3 LED Behavior
LED
Name
Color
State
Description
Power
Green
Solid
Enclosure is powered on
Drive
Power
Green
Solid
Bay is powered on
Flashing Indicates a bay fan failure
Drive
Activity
Amber
Inter-
mittent
Flashes when the drive is being
accessed
R/W Mode
Activation*
Green
Solid
Read/Write (R/W) Mode is activated
WP Mode
Activation*
Amber
Solid
Write Protect (WP) Mode is activated
Drive Temp
Red
Solid
Indicates when a drive has exceeded
the preset alarm temperature of 155° C
Drive
Health
Red
Solid
Indicates a drive failure
Fan
Red
Solid
Indicates a unit fan failure
Key Error
Red
Solid
Encryption engine error. Contact Tech
-
nical Support.
Flashing
The Security Key is not present or is
not functioning.
Encryption
Green
Solid
The Security Key is present and
encryption is enabled
Off
Encryption is disabled
*Feature only available on 3QJp products
4 Usage with Mac and Windows Operating
Systems
4.1 Usage with Mac OS X
4.1.1 Formatting a Drive
To format, use Disk Utility (pictured below), which can be
found in the Applications folder.
a. Click on the drive in the window to the left.
b. Click the
Erase tab
in the window to the right.
c. Select the format type. Most users prefer
Mac OS
Extended with Journaling (HFS+)
, which is
required for compatibility with Time Machine (OS
10.5 or newer). If you need to use your RAX unit with
both Mac and Windows computers, select
MS-DOS
File System
instead.
d.
Enter a name for the new volume and then click
Erase
to start the process.


