2.4
Installation / Operation
2.4.1
Installing and Operating the 3116-192
1. Connect a -55 dBm to -35 dBm signal to RF IN, J101 (Figure 2.1).
2. Connect the RF OUT, J1, to the external equipment.
3. Connect 100-240 ±10% VAC, 47 - 63 Hz to AC connector on the back panel.
4. Set the gain +35 dB maximum, adjustable in 0.5 ±0.5 dB steps
5. Make sure the output stays within -20 to 0 dBm with the gain.
selected and the input level provided. (See Section 2.5 Menu Settings).
6. Be sure DS2 (green, DC Power) is on and DS6 (red, Alarm) is off (Figure 2.2).
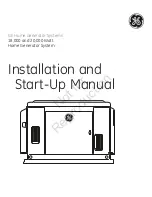
7. AC Fuse
-
The fuse is a 5 mm X 20 mm, 2 amp slow blow (Type T) and is inserted in the far slot
in the drawer below the AC input as shown in Figure 2.3. There is a spare fuse in the near slot.
If a fuse continues to open, the power supply is most likely defective.
AC Fuse - 2 amp slow blow (Type T),
5 mm X 20 mm
FUSE DRAWER
SPARE FUSE
~
INPUT
100-240± 10%VAC
47-63 Hz
2A MAX
FUSE
TYPE T 2A GDC
250 VOLT
FOR 100 - 240 V~
~
FIGURE 2.3 Fuse Location and Spare Fuse
3116-192 Manual
Page 11
12/02/21