background image


Supplemental Guide – DOC. 7961A 

CCS-UC-300: Crestron SR Room System for Skype for Business  

  39 

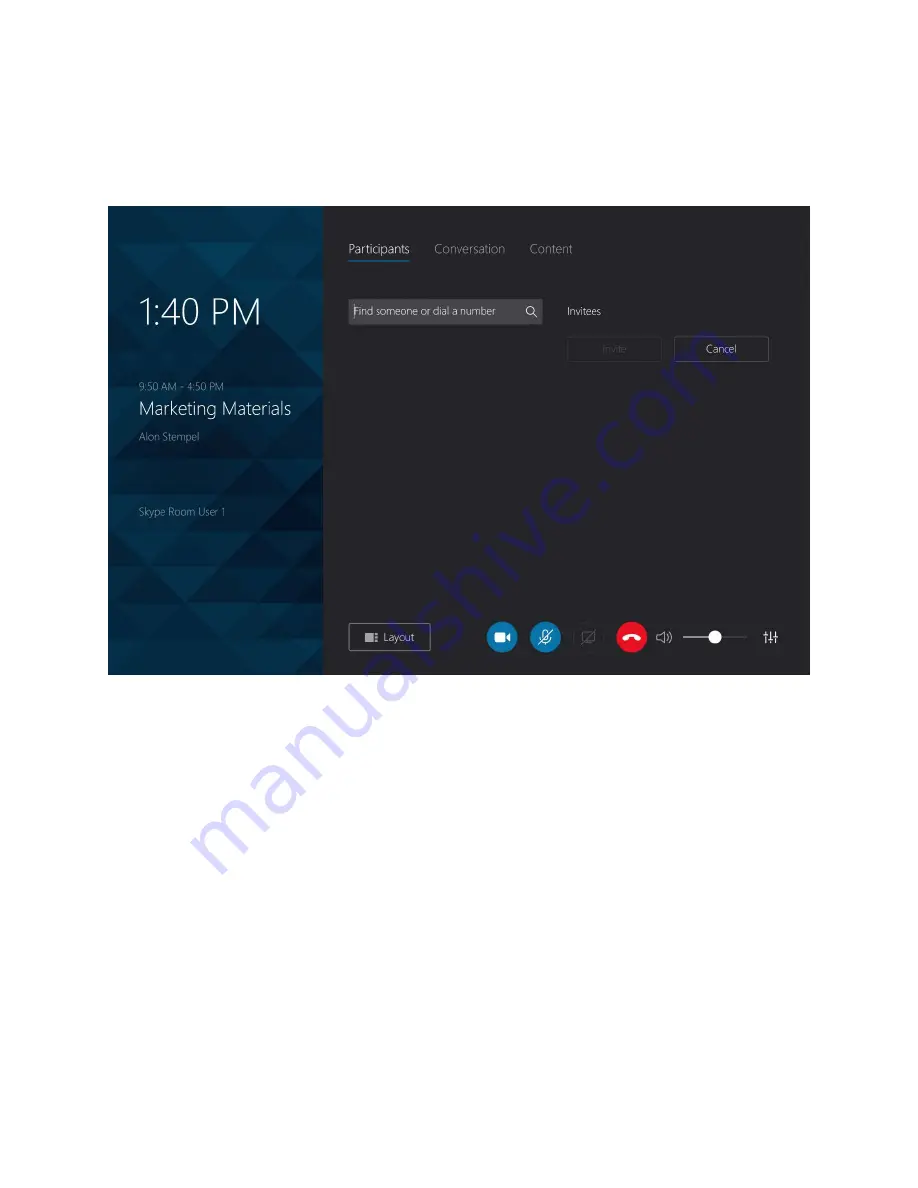
Participants can be added to the meeting from the Participants section. To add participants, 

perform the following procedure. 

1.


Tap Add Participants.  

Meeting Screen - Participants - Find a Participant 


2.


Enter the name, email address, or Skype for Business phone number of the 
participant to be invited. Upon completion, the entry is displayed under the entry 
field. 

Summary of Contents for CCS-UC-300

Page 1: ...CCS UC 300 Crestron SR Next Generation Room System for Skype for Business Supplemental Guide Crestron Electronics Inc ...

Page 2: ...udio Crestron Toolbox DM Smart Graphics and VT Pro e are either trademarks or registered trademarks of Crestron Electronics Inc in the United States and or other countries HDMI is either a trademark or registered trademark of HDMI Licensing LLC in the United States and or other countries Logitech is either a trademark or registered trademark of Logitech in the United States and or other countries ...

Page 3: ...e Settings 23 Additional Setup 23 System 25 Hardware Status 26 USB Camera 27 Smart Graphics 28 IP Table 29 Diagnostics 31 Advanced 32 Return to Skype for Business 32 Operation 33 Common Controls 33 Join a Meeting 35 Participants 38 Conversation 42 Content 43 Start a New Meeting 44 Participants 47 Conversation 51 Content 52 Dial Pad 53 Make a Phone Call or Conference Call 54 Make a Phone Call 55 Cr...

Page 4: ...edule the Room 58 Reserve from Skype for Business Program 58 Reserve from Microsoft Outlook 58 Additional Resources 60 Planning for Skype Room Systems 60 Configuration and Deployment Guide 60 Training for Skype Room System 60 Additional Help 60 Sample Crestron Fusion Room Utilization Report 61 ...

Page 5: ...able and an engine CCS UC CODEC ENGINE that mounts under the mounting surface This supplemental guide discusses the requirements setup instructions and operating instructions for the CCS UC 300 in a variety of environments and applications For more information on installing the engine refer to CCS UC 300 DO Guide Doc 7960 at www crestron com manuals Requirements This document is written for instal...

Page 6: ... Guide DOC 7961A System Administrator The system administrator should have the following knowledge and skills Skype for Business Endpoint Skype for Business Server Microsoft Exchange on premises Office 365 software cloud services Windows 10 operating system troubleshooting ...

Page 7: ...T license and the Microsoft Skype Room System software This is not provided by Crestron but it is provided by the supplier of the Surface Pro4 device What Is Included in the Box Crestron SR dock enclosure Package of screws Plastic cable exit cover Two rubber feet Tie wraps Magnetic screwdriver Additional Required Equipment An antistatic mat should be used for proper grounding and to protect the en...

Page 8: ...les which are located outside the plastic when removing the enclosure from the box Remove the Enclosure from the Box 3 Place the enclosure right side up on antistatic mat and remove the packing materials surrounding the enclosure NOTE Leave the protective plastic strips on the enclosure s front bezel to prevent scratches during assembly Remove Packing Materials L Leave Protective Strips R ...

Page 9: ...oom System for Skype for Business 5 4 Place the front of the enclosure face down on the antistatic mat and remove the two screws on the base of the enclosure Remove Screws from the Enclosure s Base 5 Remove the enclosure s rear cover Remove the Rear Cover ...

Page 10: ... the cables one at a time through the hole in the base allowing them to be moved to the rear of the housing assembly Remove the Cables 7 Slide the base of the unit away from the exposed boards to expose the heat spreader and the PCB boards Slide the Base of the Unit Away to Expose the Heat Spreader ...

Page 11: ... components Front bezel Rear cover Base Enclosure Components 8 On the front bezel remove the four screws that secure the heat spreader Remove the Screws Securing the Heat Spreader CAUTION Cables might cover the screw head in the upper left corner Gently move the cables aside to expose the screw head Rear cover Front bezel Base ...

Page 12: ...n SR Room System for Skype for Business Supplemental Guide DOC 7961A Move the Cable Aside to Expose Screw Head 9 Remove the heat spreader to expose the rear of the front bezel Rear of the Front Bezel Heat Spreader Removed ...

Page 13: ...stic Remove Surface Pro 4 from Packaging NOTE This Surface Pro 4 is provided by a distributor Before installing the Surface Pro 4 in the enclosure make sure it is imaged with the Windows 10 IOT license and has the Skype Room software installed per Microsoft s direction NOTE The Surface Pro 4 s power supply and pen are not required for installation or operation ...

Page 14: ...e Pro 4 face down into the rear of the front bezel The Microsoft logo should be at the top of the bezel as shown below The Surface Pro 4 fits easily and should not be forced Place Surface Pro 4 in Front Bezel 12 Connect the three cables at the top of the bezel as shown below Connect Cables to the Surface Pro 4 ...

Page 15: ...for Skype for Business 11 13 Reinstall the heat spreader that was removed in step 9 Ensure that the cables in the upper left corner are not caught beneath the heat spreader Reinstall the Heat Spreader 14 Slide the base on to the bezel Slide the Base On to the Bezel ...

Page 16: ...proper assembly the cable retention metal plate must go under the plastic piece Place Metal Plate Under Plastic Piece 15 Open the included bag of screws and lay them out on the antistatic mat There are 10 large silver screws 4 small silver screws and 4 medium black screws Open the Bag of Screws ...

Page 17: ...ver screws at the base of the enclosure NOTE Use the proper head screwdriver to prevent stripping Install Screws at the Base of the Enclosure 17 Install two large silver screws at the bottom of the enclosure s base NOTE Use the proper head screwdriver to prevent stripping Install Screws at the Base of the Enclosure ...

Page 18: ...siness Supplemental Guide DOC 7961A 18 Install two small screws in the base NOTE Use the proper head screwdriver to prevent stripping Install Small Screws in the Base 19 Insert the cables into the grommet one cable at a time Insert Cables into the Grommet ...

Page 19: ...ie wrap should go through the metal guide and once the tie wrap is closed all the cables should rest against the metal bar Wrap the Cables 21 Attach and secure the rear cover to the enclosure The rear cover goes into the enclosure with the cutout at the top If the enclosure is to be used with the TS SMK leave the cables where they are Attach and Secure the Rear Cover ...

Page 20: ...e for Business Supplemental Guide DOC 7961A 22 Press the rear cover flush with the enclosure and reinstall the two screws removed in step 4 Reinstall the Two Screws 23 Install the rubber feet over the screws installed in step 17 Install Rubber Feet ...

Page 21: ... Install and secure the plastic piece included to keep wires inside the grommet hole and to close the grommet hole Use two black screws to secure the piece Install Plastic Piece 25 Connect the enclosure to the engine as described in the CCS UC 300 DO Guide Doc 7960 at www crestron com manuals ...

Page 22: ...for Skype for Business To configure the system for use with Skype for Business perform the following procedure 1 Make all the hardware connections described in the CCS UC 300 DO Guide Doc 7960 at www crestron com manuals and turn on the power by pressing the power button on the bottom right of the enclosure The system boots up and the Microsoft Software License Terms screen is displayed Microsoft ...

Page 23: ...Room System for Skype for Business 19 2 Select the check box to agree to the software license terms and acknowledge reading the privacy statement Microsoft Software License Terms Screen 3 Tap Next The User Account screen is displayed User Account Screen ...

Page 24: ...ns Microphone for Conferencing selects the microphone to use in a conference Select a microphone from the drop down list Speaker for Conferencing selects the speaker to use in a Skype for Business conference Select a speaker from the drop down list These speaker functions are controlled by the Skye for Business interface NOTE Crestron recommends using the same speaker for conferencing and default ...

Page 25: ...ns the touch buttons on the right side of the enclosure volume and mute have the same function as the Skype for Business audio controls Send Logs with Feedback activates system event logging and specifies an email address where the logs are to be sent Set an email address to receive logs and select On or Off When set to On logs are sent to the email address specified 6 Tap Next The Theming screen ...

Page 26: ...tal Guide DOC 7961A 7 Select the screen theme from the drop down list and tap Next The Finish screen is displayed Finish Screen 8 Tap Finish to finish setup The Skype for Business screen is displayed Otherwise tap Back to go back and make changes Skype for Business Screen ...

Page 27: ...o configure the system for use with a USB camera a Smart Graphics software project and Crestron Fusion software Use the Settings screen to further configure the system To open the Settings screen perform the following procedure 1 Tap 2 Tap Settings The User Account Control screen is displayed 3 Enter the Administrator password sfb and tap Yes The Setup screen displayed Setup Screen 4 Tap Windows S...

Page 28: ... about firmware versions and the hardware status can be viewed Additionally a connected USB camera can be configured a Smart Graphics project can be loaded the IP table can be set event logs can be viewed and managed and the system can be connected to Crestron Fusion software To exit the Setting screen tap Done The Windows desktop is displayed ...

Page 29: ...rade the engine s firmware Tap System to display the System section The System section of the Settings screen is displayed Settings Screen System Section To view firmware information tap Query Device Versions To upgrade the engine s firmware tap Upgrade Engine Firmware The system automatically downloads the latest firmware from a remote file server and installs the firmware ...

Page 30: ...ions to the system and test the buttons on the right side of the enclosure Tap Hardware Status to display the Hardware Status section Settings Screen Hardware Status Section View the status of the engine and enclosure as well as motion sensors built in and externally connected and information on the HDMI and DM connections Tap the buttons alongside the enclosure s display to verify their operation...

Page 31: ...remotely adjusted from the USB Camera screen NOTE Tilt pan and zoom settings are not guaranteed to work without an approved camera To adjust the amount of zoom tap I or H To adjust the pan tap I or H To adjust the camera tilt tap K or J To return the camera to its default settings tap Defaults Save a Preset Tilt pan and zoom settings can be saved for recall at a later time To save a preset setting...

Page 32: ...ics to display the Smart Graphics section NOTE A Smart Graphics project can be remotely uploaded to the system by development tools such as VT Pro e Crestron Toolbox or Crestron Studio software For details refer to the respective help files Settings Screen USB Camera Section To upload a Smart Graphics project follow this procedure 1 Connect a USB drive containing the Smart Graphics project to the ...

Page 33: ...ble and configure the system for communication within a network Tap IP Table to display the IP Table section NOTE A system s IP table can be configured by development tools such as VT Pro e Crestron Toolbox or Crestron Studio software For details refer to the respective help files Settings Screen IP Table Section IP Table Entries Entries on an IP table identify the Control system s that can contro...

Page 34: ...2 Select the new IP ID address or hostname and port 3 Tap Update Selected Remove an Entry To remove an entry from the IP table perform the following procedure 1 Tap an entry on the IP table 2 Tap Remove Other IP Table Functions To hide the system from being discovered by other devices during Autodiscovery set the Automatically discover and respond to other Crestron devices setting to Off Multiple ...

Page 35: ...log select the desired log file from the drop down list Tap Refresh to view the latest log data Windows Event Viewer Tap Launch Event Viewer to open the Windows event viewer that shows system and application logs Export Log Files Tap Export Log Files to package and export all of the log files including all Crestron logs and system event logs onto external storage Upload Log Files Tap Upload Log Fi...

Page 36: ... section Settings Screen Advanced Section Enter the URL of the Crestron Fusion server Upon completion the system should be brought into Crestron Fusion software as a processor For details refer to the Crestron Fusion help file Return to Skype for Business After all changes have been made the system should be returned to regular operations To return to regular operations perform the following proce...

Page 37: ...scheduled meeting Start a new meeting Make a phone call Present content from a connected input device to the Skype for Business room s display View instructions for adding the Skype for Business room to a meeting Control other room functions if equipped Common Controls During a meeting the Skype for Business room operator can change the layout of what is shown on the room display disable and enabl...

Page 38: ...n the layout screen gallery of contacts content of connected device and or shared content from a meeting member or only the content of the connected device and or shared content from a meeting member Layout Controls To disable the Skype for Business room s camera tap Tap to enable the room camera To mute the microphone tap To unmute the microphone tap To present content from a device connected to ...

Page 39: ...61A CCS UC 300 Crestron SR Room System for Skype for Business 35 Join a Meeting When meetings are scheduled for the Skype for Business room they are listed on the left side of the screen as shown below Skype for Business Screen ...

Page 40: ...to a virtual lobby and the virtual lobby screen is displayed Virtual Lobby Screen NOTE The Skype for Business room can only join meetings that are indicated with the Skype icon If a meeting does not have a Skype icon the Skype for Business room cannot join the meeting If the room is to be included in the meeting contact the meeting organizer to have the meeting converted to a Skype for Business me...

Page 41: ...ng screen with a list of participants is displayed once the room is admitted to the meeting Meeting Screen The meeting screen displays a list of meeting participants audio and video controls and access to room controls There are sections for managing participants Participants having text conversations with other meeting participants Conversation and viewing content from connected devices and other...

Page 42: ...n SR Room System for Skype for Business Supplemental Guide DOC 7961A Participants The Participants section shows the participants in the meeting Tap Participants to view the Participants section Meeting Screen Participants ...

Page 43: ...he meeting from the Participants section To add participants perform the following procedure 1 Tap Add Participants Meeting Screen Participants Find a Participant 2 Enter the name email address or Skype for Business phone number of the participant to be invited Upon completion the entry is displayed under the entry field ...

Page 44: ...R Room System for Skype for Business Supplemental Guide DOC 7961A 3 Tap the name to add it to the list of invitees as shown below Meeting Screen Participants Invitee Added 4 Repeat steps 2 and 3 for each additional participant ...

Page 45: ... SR Room System for Skype for Business 41 5 Tap Invite to invite the list of invitees to the meeting When an invitee accepts and joins the meeting they are added to the list of participants as shown below Meeting Screen Participants Participant Added ...

Page 46: ...nt messages sent during the meeting The Skype for Business system can also send instant messages to the meeting participants Tap Conversation to view the Conversation section Meeting Screen Conversation Drag up and down to view the conversation thread To send an instant message type the message in the Type a message here field and then tap ...

Page 47: ...ng and allows the Skype for Business system operator to select what is shown on the Skype for Business room s connected display Meeting Screen Content To select what is shown on the Skype for Business room s display choose one of the following options Tap Screen to select the presenter s content for display Tap HDMI to select the Skype for Business system s HDMI input for display ...

Page 48: ...on SR Room System for Skype for Business Supplemental Guide DOC 7961A Start a New Meeting From the Skype for Business screen tap New Meeting to create a new meeting The Invite screen is displayed New Meeting Invite Screen ...

Page 49: ...e participant to be invited When the email address name or telephone number is recognized as a valid entry it is displayed below the entry field Recognized Phone Number Entered 2 Tap the icon next to the recognized entry The recognized entry is added to the list of Invitees as shown below Invitee List 3 Repeat steps 1 and 2 for each participant to be invited Tap X next to an invitee to remove them...

Page 50: ... meeting screen is displayed Meeting Screen The meeting screen displays a list of meeting participants audio and video controls and access to room controls Sections for managing participants Participants having text conversations with other meeting participants Conversation and viewing content from connected devices and other meeting participants Content ...

Page 51: ...C 7961A CCS UC 300 Crestron SR Room System for Skype for Business 47 Participants The Participants section shows the participants in the meeting Tap Participants to view the Participants section Meeting Screen Participants ...

Page 52: ...r Skype for Business Supplemental Guide DOC 7961A Participants can be added to the meeting from the Participants section To add participants perform the following procedure 1 Tap Add Participants Meeting Screen Participants Find a Participant ...

Page 53: ... the name email address or telephone number of the participant to be invited Upon completion the entry is displayed under the entry field 3 Tap the name to add it to the list of invitees as shown below Meeting Screen Participants Invitee Added 4 Repeat steps 2 and 3 for each additional participant ...

Page 54: ...for Business Supplemental Guide DOC 7961A 5 Tap Invite to invite the list of invitees to the meeting When an invitee accepts and joins the meeting they are added to the list of participants as shown below Meeting Screen Participants Participant Added ...

Page 55: ...nt messages sent during the meeting The Skype for Business system can also send instant messages to the meeting participants Tap Conversation to view the Conversation section Meeting Screen Conversation Drag up and down to view the conversation thread To send an instant message type the message in the Type a message here field and then tap ...

Page 56: ...r Business room to present content from the device connected to the HDMI port Meeting Screen Content To start or stop sharing with the meeting follow this procedure 1 Tap Content 2 Tap HDMI to present content from the device connected to the HDMI port During presenting a yellow frame surrounds the screen Tap HDMI again to stop presenting ...

Page 57: ...he Dial Pad section displays a telephone keypad to send dual tone multi frequency DTMF tones to enter extensions check voicemail etc To use the dial pad follow this procedure 1 Tap Dial Pad The Dial Pad screen is displayed Meeting Screen Dial Pad 2 Enter the desired numbers using the telephone keypad ...

Page 58: ...7961A Make a Phone Call or Conference Call The Skype for Business system can make a phone call with the option of adding additional callers to create a conference call To make a phone call tap Dial Pad from the Skype for Business screen The Dial Pad screen is displayed Dial Pad Screen ...

Page 59: ...tal Guide DOC 7961A CCS UC 300 Crestron SR Room System for Skype for Business 55 Make a Phone Call To make a phone call tap the phone number to be dialed as shown below and tap Call Dial Pad Screen Dialed Number ...

Page 60: ...s the in call screen is displayed as shown below Dial Pad Screen In Call Create a Conference Call To add a participant and create a conference call follow this procedure 1 Place a call as described in Make a Phone Call on page 55 2 During the call tap The add caller screen is displayed Dial Pad Screen Add Caller ...

Page 61: ...ded to the conference call Upon completion the entry is displayed under the entry field 4 Tap the number to add it to the list of invitees as shown below Dial Pad Screen Caller Added to Invitee List 5 Repeat steps 3 and 4 for each caller to be added 6 Tap Invite to invite the invitees to the call All participants in the conference call are displayed as shown below ...

Page 62: ...nt is displayed on the room s display device The Skype for Business system can support the following resolutions 1920 x 1080p 59 94 60Hz 16 9 1280 x 720p 59 94 60Hz 16 9 720 x 480p 59 94 60Hz 4 3 1920 x 1080p 50Hz 16 9 1280 x 720p 50Hz 16 9 720 x 576p 50Hz 4 3 Tap Stop Presenting to stop presenting content Invite the Skype for Business Room to a Meeting Schedule the Room The Skype for Business roo...

Page 63: ...restron SR Room System for Skype for Business 59 2 Add the Skype for Business room in the To field and send the update If the meeting is accepted it will appear on the room calendar shortly 3 Join the meeting from the Skype for Business system ...

Page 64: ...guration and Deployment Guide For instructions on how to download the software and deploy the DIY version of RL3 for IT professionals visit https technet microsoft com en us library mt790551 aspx Training for Skype Room System For training resources visit https techcommunity microsoft com t5 Skype Operations Framework Skype Skype Room Systems v2 readiness training now available ba p 33378 Addition...

Page 65: ...ron Fusion Room Utilization Report Below is a sample Crestron Fusion Room Utilization report For additional information refer to the Crestron Fusion help file Tiger Shark Room 65 Sealion Room 57 Orca Room 72 Hammerhead Room 21 Date Range 8 1 2017 to 8 7 2017 Room Utilization All Meetings Crestron Fusion ...

Page 66: ...Crestron Electronics Inc Supplemental Guide DOC 7961A 15 Volvo Drive Rockleigh NJ 07647 2048539 Tel 888 CRESTRON 08 17 Fax 201 767 7576 Specifications subject to www crestron com change without notice ...

Reviews: