Single Button Press and Hold (Hold for more than 1/2 second)
8
CLW-DIMUEX-P
Quick Start
Cameo® In-Wall Universal Phase Dimmer, 120 VAC
Page 1: ...load CAUTION TO REDUCE THE RISK OF OVERHEATING AND POSSIBLE DAMAGE TO OTHER EQUIPMENT DO NOT INSTALL TO CONTROL A RECEPTACLE A MOTOR OPERATED APPLIANCE A FLUORESCENT LIGHTING FIXTURE OR A TRANSFORMER...
Page 2: ...ary windings to prevent transformer failure due to overcurrent Installation Install the CLW DIMUEX P 1 Turn power off at the circuit breaker 2 Wire the device as shown in the following diagrams NOTES...
Page 3: ...ower to the transformer If you do not know the input power requirement of the transformer use the bulb s wattage rating to determine proper rating Derating Information for CLW DIMUEX P Dimmers Changin...
Page 4: ...n the left side 4 Attach the button assembly to the device Ensure that the LED strip is on the left side Power to the load the buttons and the LEDs is restored when the button assembly is attached NOT...
Page 5: ...unctions for details Operation NOTES l Before using the CLW DIMUEX P ensure the device is using the latest firmware Check for the latest firmware for the CLW DIMUEX P at www crestron com firmware l Th...
Page 6: ...talled button configuration The device has default preset levels To set new preset levels 1 Adjust the light level to the desired level 2 Tap the program button to enter Programming mode as shown belo...
Page 7: ...te the default functions available for each physical button configuration and tap or hold actuation sequence Single Button Press Double Button Press Press twice within 1 2 second 7 CLW DIMUEX P Quick...
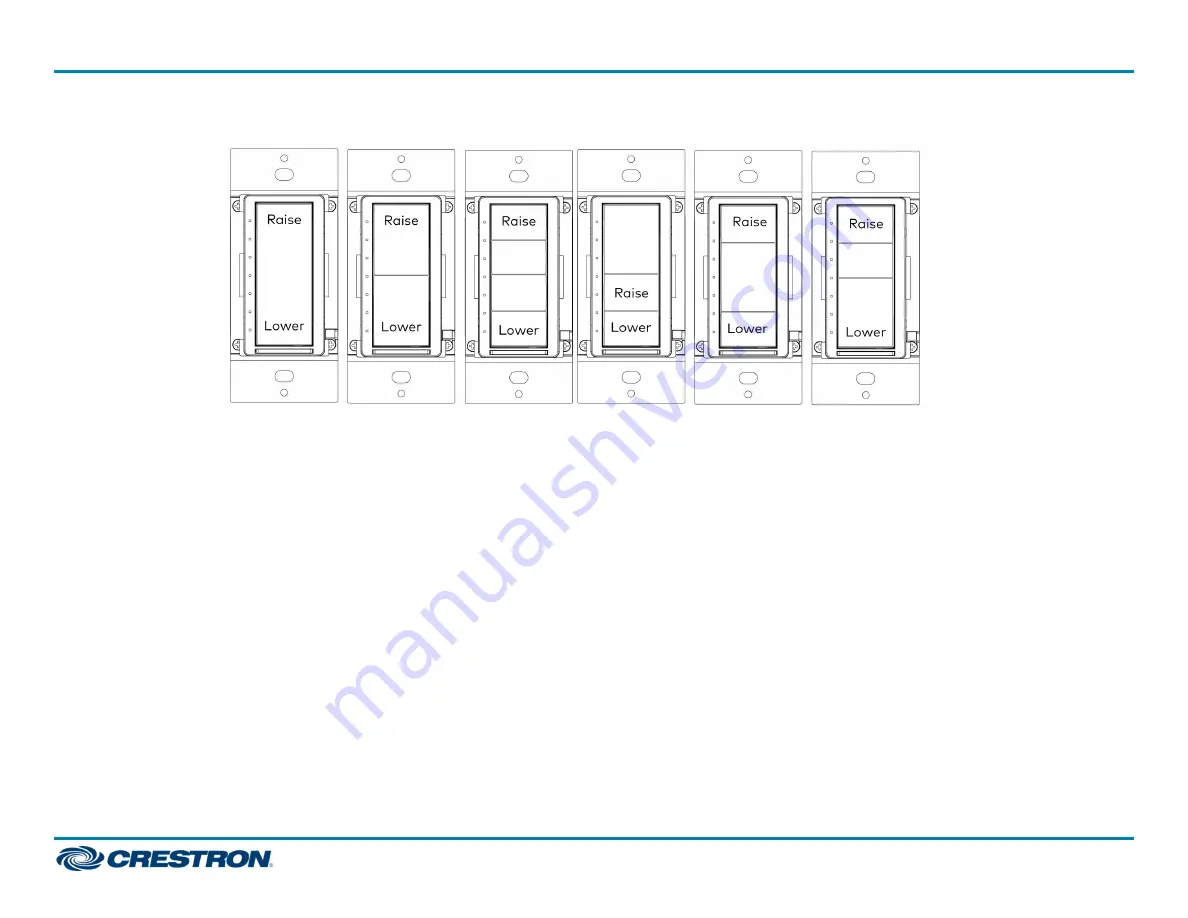
Page 8: ...Single Button Press and Hold Hold for more than 1 2 second 8 CLW DIMUEX P Quick Start Cameo In Wall Universal Phase Dimmer 120 VAC...
Page 9: ...e dimming mode is set in the control system program the LEDs will flash five times and the new mode will not be set To modify the parameter change the setting in the control system program to Local Se...
Page 10: ...tap tap press hold for up to 2 seconds The top button s LED flashes to indicate the communications status Refer to the following table for details LED Communications Status Turns on for 5 seconds The...
Page 11: ...circuit breaker is closed The load is not operational e g lamps are burned out Verify that the load is operational and that the air gap switch is closed The dimmer is in Remote mode Check the SIMPL pr...
Page 12: ...e_license_agreement The product warranty can be found at www crestron com warranty The specific patents that cover Crestron products are listed at www crestron com legal patents Certain Crestron produ...