background image

cressi.com

UNDERWATER COMPUTER FUNCTION

As we said to access the underwater computer when Drake is in the watch function, press and hold the 
MODE button or scroll until the DIVE menu with UP or DOWN buttons, then press the MODE button. The 
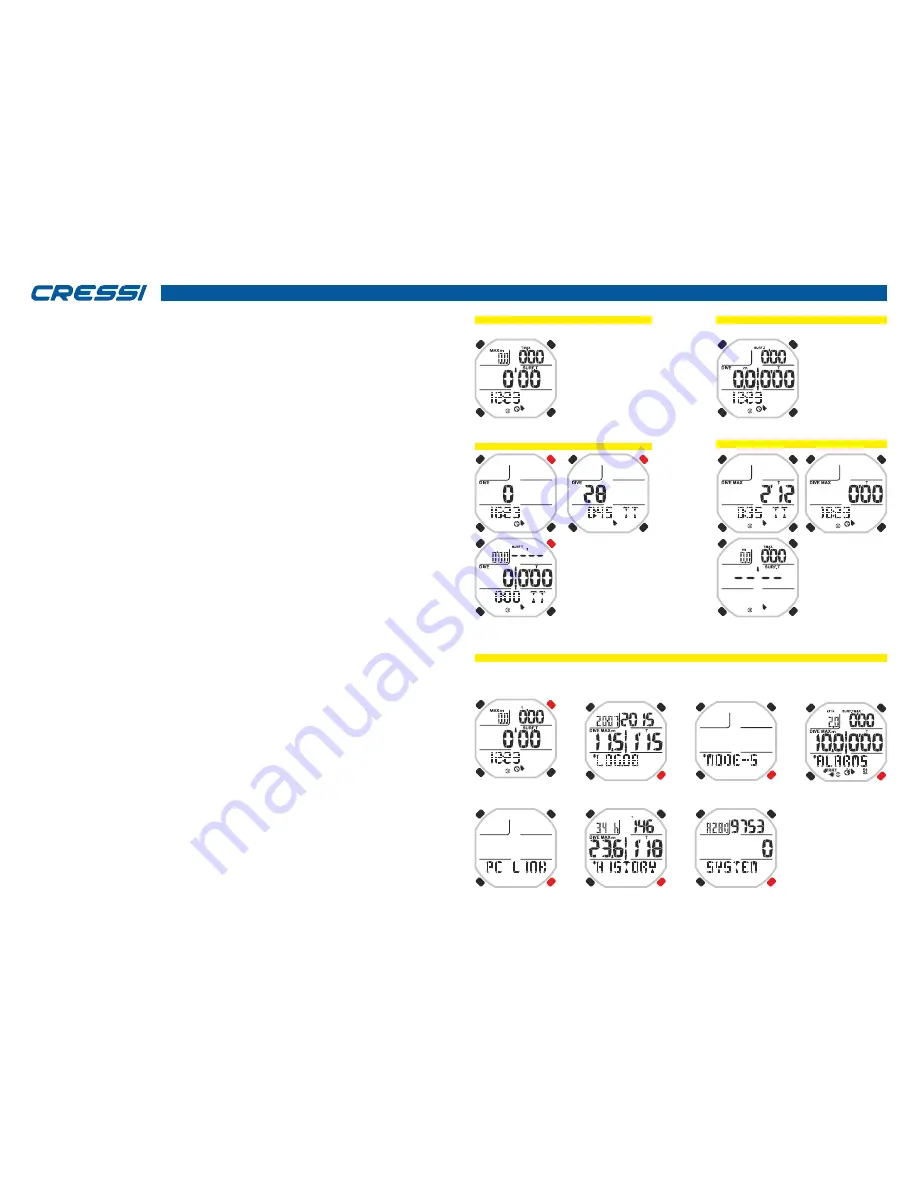
screen of the PRE DIVE function appears. This screen will show time and depth counters, the current time 
and the following icons may appear:
- Watch icon indicating that the neighbouring numbers refer to the time.
- Bell icon indicating that the audible alarms are activated.
- Sea water or fresh water icon.
- Icon of alarm indication with STEP if the function is active.
- Lamp icon to indicate the automatic lighting of the display in depth if the function is active.

WARNING: The underwater computer is not activated automatically and it is necessary to activate it 
manually before diving. The manual activation is always possible even after a few dives, but must 
also be performed out of the water. Otherwise there will be a systematic error on the depth 
measurement.

During the PRE DIVE function, the screen is lighted by pressing the LIGHT button.
Then press the UP button to scroll and advance the main menu, which shows, in succession, 7 sub menus 
of the screen:
1) LOG-00: It is the record of the dives (Logbook) of the device and the number following the "LOG" 
message indicates the number of the last session.
2) MODE-S: It allows choosing the free diving mode that you want. The computer has four modes: FREE, 
PRO, DYNAMIC and STATIC.
3) ALARMS: The ALARMS menu allows setting different alarms and functions.
4) PCLINK: It allows the connection and interfacing of Drake to a personal computer.
5) HISTORY: In this menu, the historical memory of dives performed is highlighted.
6) SYSTEM: In the System menu, it is possible to set the unit of measurement of the computer and the 
sampling frequency.
7) PRE DIVE: It is the screen that anticipates our dives and appears after entering the underwater 
computer function or after setting the alarms and adjustments.

To access the sub menus (excluding history and pclink), press the Mode button. Then, press the 
UP button to move forward and press the DOWN button to move backward in the menu by scrolling 
through the data contained in it. To exit, just press and hold the Mode button or wait until Drake 
computer returns to the previous menu screen automatically. Return to the watch function is 
performed automatically or by pressing during some seconds the Mode button until you hear the 
confirmation acoustic signal.

Find below the explanation of all the operations available for each menu of the display.

 FREE  PRE DIVE DISPLAY

DYNAMIC  PRE DIVE DISPLAY 

DIVE COMPUTER MENU

8

LONG

UP

DOWN

MODE

LIGHT

PRO PRE DIVE DISPLAY 

STATIC PRE DIVE DISPLAY 

Last session

data (dive-run counter

+ total time) 

From different

computer mode

(pro, free, dinamic) 

READY TO DIVE

READY TO DIVE

PRE-DIVE

Summary of Contents for DRAKE

Page 1: ...cressi com DRAKE INSTRUCTION MANUAL cressi com...

Page 2: ...REE and PRO programs setting of acoustic alarms and sea and fresh water page 15 Automatic lighting and Depth to Step alarm for PRO program page 16 Diving time and Surface time sum alarm for DYNAMIC pr...

Page 3: ...n aid to free diving for people carefully prepared to the risks this activity entails It must be used then only and exclusively when you have a complete theoretical and practical training on the techn...

Page 4: ...ing has the STATIC program and the dynamic diving has the DYNAMIC program Additionally the device may be set by the user for either metric m C or feet system ft F The Drake underwater watch computer c...

Page 5: ...use the loss of TIME and DATE CHRONOGRAPH To access the chronograph press the UP or DOWN push button up to the CHRONO menu down in the display then press MODE CHRONO disappear to give way to the count...

Page 6: ...velling it is necessary to store data of the computer using the time zone of the place but at the same time it is possible to also see the time at the place of origin This need is strongly felt especi...

Page 7: ...DE button and then the message DIVE appears on the display and then after releasing it the PRE DIVE screen of the set program Free Pro Dynamic and Static In the second mode it is necessary to scroll t...

Page 8: ...ber of the last session 2 MODE S It allows choosing the free diving mode that you want The computer has four modes FREE PRO DYNAMIC and STATIC 3 ALARMS The ALARMS menu allows setting different alarms...

Page 9: ...ted to free diving without the need to conduct a comprehensive analysis of its performance Very suitable for underwater fishermen Perfect for snorkelling and for those who practice intensively the dis...

Page 10: ...age speed Scrolling with UP or DOWN buttons at the centre total diving time and total surface time Scrolling with UP or DOWN buttons in the complete display average data from top left average time rat...

Page 11: ...diaphragmatic contractions Always visible Acoustic alarms icon activated REPS icon activated How to use the STATIC program Once in the program it must be operated manually by pressing the Mode button...

Page 12: ...buttons downward total training and session time time and reset function Always visible Sea water or fresh water setting icon Acoustic alarms icon activated How to use the DYNAMIC program Once in the...

Page 13: ...ine It is a disease that is known since the 40s and that affected the Polynesian pearl divers the term TARAVANA means madness The cause can be summed up in an intense and excessive activity of diving...

Page 14: ...the message DEPTH1 will appear Confirm by pressing the MODE button The message DEPTH2 will appear Set the desired value by pressing the UP or DOWN buttons And so on up to the third alarm Confirm the...

Page 15: ...utton again The flashing words ON or OFF will appear on the display Change the words using the UP or DOWN button but remember that in case of ON the alarms will be activated while in case of OFF the a...

Page 16: ...ery time a predetermined value in metres is passed For example By setting the STEP alarm to 5 we will be notified whenever the depth reaches a multiple of 5 That is 5 10 15 20 etc To set the STEP alar...

Page 17: ...flash Press the UP button once The numbers in the top right below the word SURF T MAX will flash Press the MODE button again The display will show only the highlighted information and the minutes indi...

Page 18: ...ain The display will show only the highlighted information and the minutes indicator will flash Set the desired value by pressing the UP or DOWN buttons Confirm the set value by pressing the Mode butt...

Page 19: ...arked with the words DIVE MAX this value must flash Enter with the MODE button and change the value with the UP or DOWN buttons Confirm the set value by holding down the Mode button for a few seconds...

Page 20: ...ing an acoustic signal to confirm the exit from the menu Alternatively after the last time the buttons are pressed the computer will automatically register the changes by issuing an acoustic signal to...

Page 21: ...ings stored they must be imported with the load function IMPORT OF ALARMS SETTINGS To import a previously saved alarm setting it is necessary to scroll with the UP and DOWN buttons up to the ALARMS me...

Page 22: ...press the UP or DOWN button to move forwards or backwards to the desired one The LOG BOOK has four screens per session To display the second screen of the session once desired session number has been...

Page 23: ...s necessary to have the appropriate hardware adapter sold separately The Personal Computer must be equipped with Windows Mac operating system and video resolution 800x600 or higher recommended To conn...

Page 24: ...se and we will have the ability to store multiple sessions and individual dives In contrast with short times we will have a greater accuracy of the diving profiles and a greater accuracy of the data p...

Page 25: ...or water filtration due to incorrect battery replacement will void the warranty 25 TECHNICAL SPECIFICATIONS Sizes and Weight Diameter 48 mm Height 15 mm Weight 135 g Depth sensor Sea or fresh water se...

Page 26: ...or replacement of the Product Cressi or a Cressi authorised service centre can use new as new or repaired products or parts Exceptions and limitations This limited warranty does not cover 1 a product...

Reviews: