background image

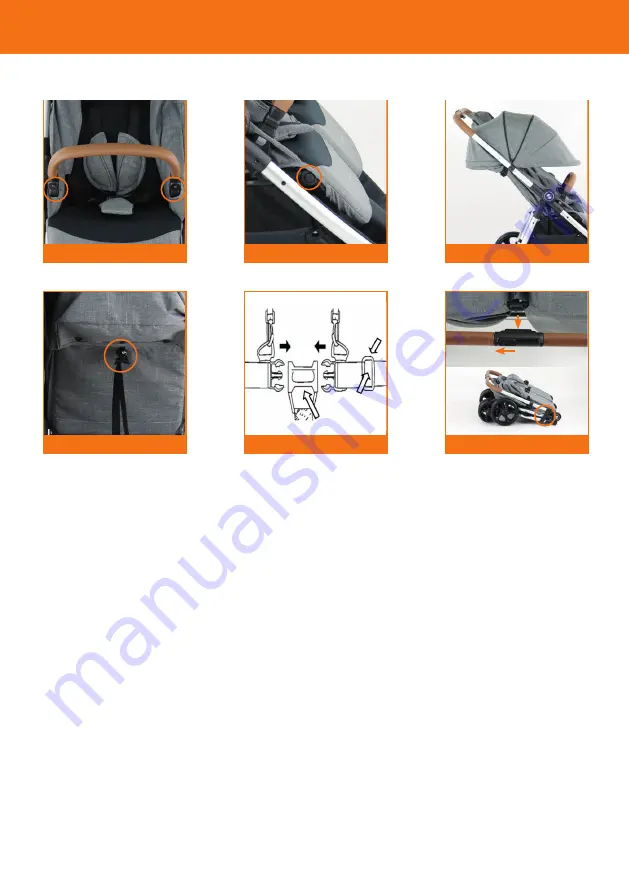
7. Attach the bumper bars

Push the ends of the bumper bars in to the 

slots on the chassis until they ’click’ in to pla-

ce. To remove the bars, push the buttons on 

both sides and pull the bars off.

8. Foot rest adjustment

Push the buttons on both sides of the leg rest 

and select desired position.

9. To operate the canopy

Pull the canopy forward by the front rim. For 

added shade/weatherprotection,the canopy 

can be unzipped further.


10. To operate the seat recline function

Squeeze the clasp on the back of the seat unit 

and pull downwards. When the backrest has 

reached the desired position, release. To raise 

the backrest, hold both straps with one hand 

and push the backrest up with your other.

11. To adjust and secure the harness

Push the buckle prongs in to the buckle 

housing until they click. Adjust sliders to fit for 

your child. After making adjustments to the 

seat always re adjust the harness. Release 

the harness by pressing the button on the 

buckle housing unit.

WARNING! Always use the crotch strap in 

combination with the waist belt.

WARNING! For children aged 0 - 6 months 

the harness must be fed through the retaining 

loops to prevent risk of strangulation. 

12. To fold the stroller

Make sure the seats are in the upright posi-

tion, the canopy is retracted and the brake 

are engaged. Slide the primary lock button 

(A) to the side and then squeeze the secon-

dary lock button(B). Keep the secondary lock 

button held in and push up  and forward on 

the handle. Fold until folding catch locks.

7. Adjusting the footrest

In order to adjust the footrest a push/pull 

technique must be applied. Push the footrest 

inwards to make it adjustable. When the de-

sired position is reached pull outwards until 

it locks into position.

8. Canopy locking

To lock the canopy in fully unfolded position, 

use your hand to drag it out to position. A 

click should be felt when the canopy is fully 

unfolded and locked in position. Someti-

mes a small force/handpress from above is 

needed to reach the locking position.

9. Swivel lock/release

To change the front wheels from fixated or 

swiveled function adjust the button left or 

right.

10. Handle height adjustment

There are multiple handle height positions. 

To  adjust,  press  the  centre  button  on  both 

sides and simultaneously and adjust to desi-

red level. Release button and engage at the 

desired height.

11. Using the brakes

To  apply  brake,  press  down  gently  on  the 

middle  of  the  brake  bar. To  release  brake, 

place foot under brake bar and pull upwards.

Warning always apply the brakes when the 

pushchair is stationary and placing or remo-

ving the child.

7

A

B

8

9

10

11

A

B

12

A

B

C

1

2

Summary of Contents for duo lightway

Page 1: ...nual Read these instructions carefully before use Important Keep these instructions for future use duo lightway instruction manual Read these instructions carefully before use Important Keep these instructions for future use ...

Page 2: ...t C Seat release button D Folding handle E Wheel lock F Restraining system G Safety lock H Adjustable footrest A F G H B C D E comfort instructions duo lightway instructions A Chassis B Rear Axle C Front Wheels D Bumper Bars E Rear wheels A B C D E ...

Page 3: ... unit and stem off or you can just remove the wheel unit by pushing the button located on the bottom of the leg and pull the wheel unit off 1 Chassis Out of the box the Comfort is fully assemb led and ready for use except wheels seatu nit and canopy 2 To unfold To open the Comfort chassis stand behind the pushchair and with both hands on the pushbar pull up until the chassis clicks into place 3 At...

Page 4: ...e seats are in the upright posi tion the canopy is retracted and the brake are engaged Slide the primary lock button A to the side and then squeeze the secon dary lock button B Keep the secondary lock button held in and push up and forward on the handle Fold until folding catch locks 7 Adjusting the footrest In order to adjust the footrest a push pull technique must be applied Push the footrest in...

Page 5: ... securely locked in its positions 16 Your Comfort should now be fully assem bled and ready for use Hardlift Carrycot WARNING This product is only suitable for a child who cannot sit up unaided use only on a firm horizontal level and dry surface WARNING Do not let other children play unattended near the carry cot WARNING Do not use if any part is broken torn or missing 12 Folding the chassis Pull t...

Page 6: ...age the accumulation of dirt Regular light lubrication of moving parts will extend the life of your pushchair and make opening and folding easier Do not leave the Comfort pushchair in sunlight for prolonged periods as the colour of some fabrics may fade Store the pushchair in a dry well ventilated and safe place Your pushchair should be serviced and reconditioned before using it for a second baby ...

Page 7: ... should only be used under adult supervision WARNING Do not use the pushchair in a manner for which it is not designed WARNING if the pushchair is to be used by someone unfamiliar with it e g by grandparents always show them how it works WARNING always use the crotch strap in combination with the waist belt WARNING never use the carrycot on a stand WARNING This product is not suitable for running ...

Page 8: ...ackrest C Seat release button D Folding handle E Wheel lock F Restraining system G Safety lock H Adjustable footrest A F G H B C D E comfort instructions duo lightway instruktioner A Chassi B Bakaxel C Framhjul D Frontbågar E Bakhjul A B C D E ...

Page 9: ...m att trycka på knappen på botten av benet och dra av hjulet 1 Chassis Out of the box the Comfort is fully assemb led and ready for use except wheels seatu nit and canopy 2 To unfold To open the Comfort chassis stand behind the pushchair and with both hands on the pushbar pull up until the chassis clicks into place 3 Attach the wheels Open the wheel lock by pressing Place the wheel into the axle R...

Page 10: ...en Skjut den primära låsknappen 1 åt sidan och tryck sedan på den sekundära låsningsknap pen 2 Håll den sekundära låsningsknappen intryckt och tryck uppåt och framåt på hand taget fäll tills chassilåset håller fast 7 Adjusting the footrest In order to adjust the footrest a push pull technique must be applied Push the footrest inwards to make it adjustable When the de sired position is reached pull...

Page 11: ...ly locked in its positions 16 Your Comfort should now be fully assem bled and ready for use Hardlift Carrycot WARNING This product is only suitable for a child who cannot sit up unaided use only on a firm horizontal level and dry surface WARNING Do not let other children play unattended near the carry cot WARNING Do not use if any part is broken torn or missing 12 Folding the chassis Pull the fold...

Page 12: ...vslängden för din Comfort och göra ihopfällning lättare Lämna inte din Comfort i direkt solljus un der längre perioder eftersom färgen på vissa tyger kan blekna Förvara vagnen på en torr och väl ventile rad och säker plats Din sittvagn skall servas och gås igenomin nan du använder det för ett andra barn eller inom 18 månader beroende på vilket som inträffar först Detta kan arrangeras genom att kon...

Page 13: ...nvänd inte vagnen på annat sätt än den är utformad för VARNING Om vagnen skall brukas av någon som ej är van vid den exempelvis mor eller farföräldrar visa dem alltid hur vagnens alla delar fungerar VARNING Använd alltid selens grenband i samband med användning av selen VARNING Placera aldrig liggdelen på ett bord eller liknande yta VARNING Denna produkt är inte avsedd för användning i samband med...

Page 14: ...fore use and keep this manual for future reference Your child s safety may be affected if you do not follow these instructions WARNING It may be dangerous to leave your child unattended contact info elitegroup se Crescent Comfort Elite Group Sweden ...

Page 15: ...fore use and keep this manual for future reference Your child s safety may be affected if you do not follow these instructions WARNING It may be dangerous to leave your child unattended contact info elitegroup se Crescent Comfort Elite Group Sweden ...

Page 16: ...crescentbarnvagnar se ...

Reviews: