background image

22

Chapter 2  Preparation

For reflective:

Tape the reflectives to the 

reflective

 side of the mask, according to 

the format you want to define. Make sure the image side is up and 
in the correct orientation.

The first original should be near the 0,0 point at the lower 

left


corner of the mask. Taping the originals is similar to direct 
mounting in multi preview (see 

Direct Mount on page 24

), but here 

you proceed from 

left to right

. Make sure not to cover the barcode 

windows.

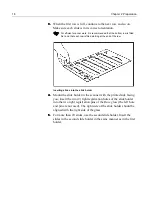
To mount in the scanner, turn the mask over so that the 

transparency

 label of the mask faces up; insert the mask 

registration holes into the registration pins of the glass.

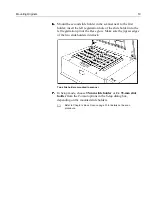
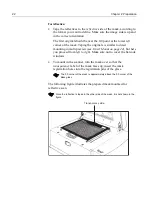
The following figure illustrates the prepared mask mounted for 
reflective scan.

The 0,0 corner of the mask is approximately above the 0,0 corner of the 

Base glass

.

Since the reflective is taped to the other side of the mask, it is not shown in the 
figure.

Transparency side

Summary of Contents for iQsmart 2

Page 1: ...ower up shutdown Startup sequence Operating panel Light Table Base glass Masks Mounting originals in the scanner Power Up Shutdown 1 Turn on your Macintosh computer 2 Turn on the scanner by switching...

Page 2: ...llowing Turn the scanner off and then on again If the LED is still red call your Service Engineer NOTE Shut down by quitting the application then switching off the Main Power switch located on the bac...

Page 3: ...ers can refer to the user guide oXYgen Scanning Application 399Z1P555C pg 16 Chapter 2 for information about the Base glass The iQsmart2 is supplied with a 12 wide Base glass which has an etched finis...

Page 4: ...refer to the oXYgen Dot for iQsmart Scanners User Guide 399Z151895D The Operating Panel The operating panel is located at the lower right corner of the top of the scanner and is mainly used during po...

Page 5: ...on and off The following are the meanings of the LED of the Power button Off Power is OFF Green Power is ON Red Power is OUTSIDE THE TOLERANCE RANGE The following are the meanings of the LED of the St...

Page 6: ...t Table turns on To turn off the Light Table do the following Close the Top cover The Light Table turns off automatically Mounting Originals This section describes the various methods for mounting ori...

Page 7: ...ended The advantages of using masks include Preparing the originals in advance on a different worktable while the scanner is busy with other scans Positioning the originals is easier using the mask gr...

Page 8: ...ed for scanning up to twenty 35 mm slides framed 35 mm transparencies The holder has five 5 rows each can hold four 4 slides If necessary a second holder can be used for scanning up to 40 slides To us...

Page 9: ...ation holes of the slide holder into the two right registration pins of the Base glass the left hole and pin are not used The right side of the slide holder should be aligned with the right side of th...

Page 10: ...egistration pin of the Base glass Make sure the jigsaw edges of the two slide holders interlock Two slide holders mounted in scanner 7 7 7 7 In Setup mode choose 35 mm slide holder or 2 x 35 mm slide...

Page 11: ...labeled on the mask A set of barcode windows appears at one edge the first and last barcode windows are always open The other barcodes are not implemented in this version For transparency Mark outline...

Page 12: ...r b a r c o d e 37 2 1 0 3 6 7 5 4 8 9 10 11 12 13 14 16 17 15 18 19 20 21 22 23 24 25 26 27 28 29 30 31 32 33 34 35 36 38 39 40 41 42 43 2 1 0 3 6 7 5 4 8 9 10 11 12 13 14 16 17 15 18 20 21 22 24 25...

Page 13: ...w see Direct Mount on page 24 but here you proceed from left to right Make sure not to cover the barcode windows To mount in the scanner turn the mask over so that the transparency label of the mask f...

Page 14: ...r Defined menu appears 5 5 5 5 From the Save User Defined menu choose an option depending on the format you want to define 6 6 6 6 In the window that appears enter the name of the new user defined for...

Page 15: ...eview In multi preview all originals are taped to the Base glass and scanned in a single run The originals must be of the same type transparency or reflective but may be of different sizes and media p...

Page 16: ...window you should note the total size of the area occupied by the originals by checking the vertical and horizontal scales of the glass The following figure illustrates direct mount of multi previews...

Reviews: