E NGLISH
12
• Raise the rosette up to the mounting bracket and align the loosened screws in the mount-
ing bracket with the holes in the rosette.
•
Rotate the fin to adjust. Reinsert the screws and secure with a screwdriver.
• Once you have the mounting bracket secured to the junction box you can proceed to hang
the fan.
•
Hold the fan firmly with both hands. Pass the rod through the mounting bracket opening
and let the ball rest on the mounting bracket.
• Rotate the ball coupling until it lines up with the tab on the mounting bracket.
• Tip
: Someone else should help you hold the ladder and hand you the fan after you get on it.
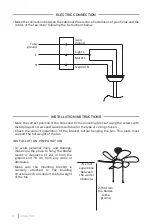
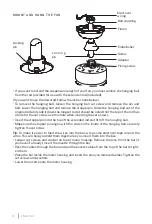
MOUNTING THE ROSE T TE
1
2
3
Chain mounting
Hook the pin at the end of the chain into the slot and pull to tighten. After that, you can turn
it on to electricity and enjoy your new fan.
In compliance with Directives: 2012/19/EU and 2015/863/EU on the restriction of the use of dangerous substances in elec-
tric and electronic equipment as well as their waste disposal. The symbol with the crossed dustbin shown on the package
indicates that the product at the end of its service life shall be collected as separate waste. Therefore, any products that
have reached the end of their useful life must be given to waste disposal centres specialising in separate collection of
waste electrical and electronic equipment, or given back to the retailer at the time of purchasing new similar equipment,
on a one for one basis. The adequate separate collection for the subsequent start-up of the equipment sent to be recycled,
treated and disposed of in an environmentally compatible way contributes to preventing possible negative effects on the
environment and health and optimises the recycling and reuse of components making up the apparatus. Abusive disposal
of the product by the user involves application of the administrative sanctions according to the laws.
Summary of Contents for WINDLIGHT EASY
Page 1: ...USER MANUAL CEILING FAN WINDLIGHT EASY ...
Page 2: ......
Page 3: ......
Page 62: ......
Page 63: ......
Page 64: ... Made in P R C ...

