


11
E NGLISH
• Check the correct operation of the ceiling fan, checking that there are no strange move-
ments or misalignments in any part of the fan.
• In the event that any type of hum / vibration can be seen, you can proceed to adjust the
blades with the anti-roll kit.
• The anti-roll kit has self-adhesive weights and u-shaped clips.
• Turn off the ceiling fan.
• You can put the clip in the center of any blade and check if the vibration decreases.
• Turn on the fan and check. If there are no changes, turn off the fan and add another.
• Install the bulb (not included).
•
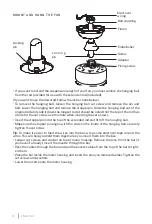
Attach the lampshade to the motor by inserting the glass neck into the light fixture, keeping
two spring clips inside the glass neck. Pull the glass shade towards the third spring clip.
Push the third clip to fit inside the glass and push the glass towards the mounter.
• Assemble the decorative keychain and extension chains from the hardware bag to the fan
pull chains by inserting the end of the chain into the chain link. Confirm that the chains are
secure by pulling lightly on both chains on the coupling.
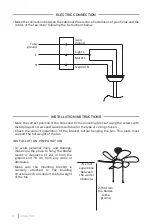
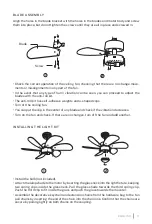
Align the holes in the blade bracket with the holes in the blades and motor body and screw
them into place, but do not tighten the screws until they are all in place and screwed in.
B L ADE AS SE MB LY
INSTALLING THE LIGHT KIT
1
2
1
2
Screw
Blade
Summary of Contents for WINDLIGHT EASY
Page 1: ...USER MANUAL CEILING FAN WINDLIGHT EASY ...
Page 2: ......
Page 3: ......
Page 62: ......
Page 63: ......
Page 64: ... Made in P R C ...