background image

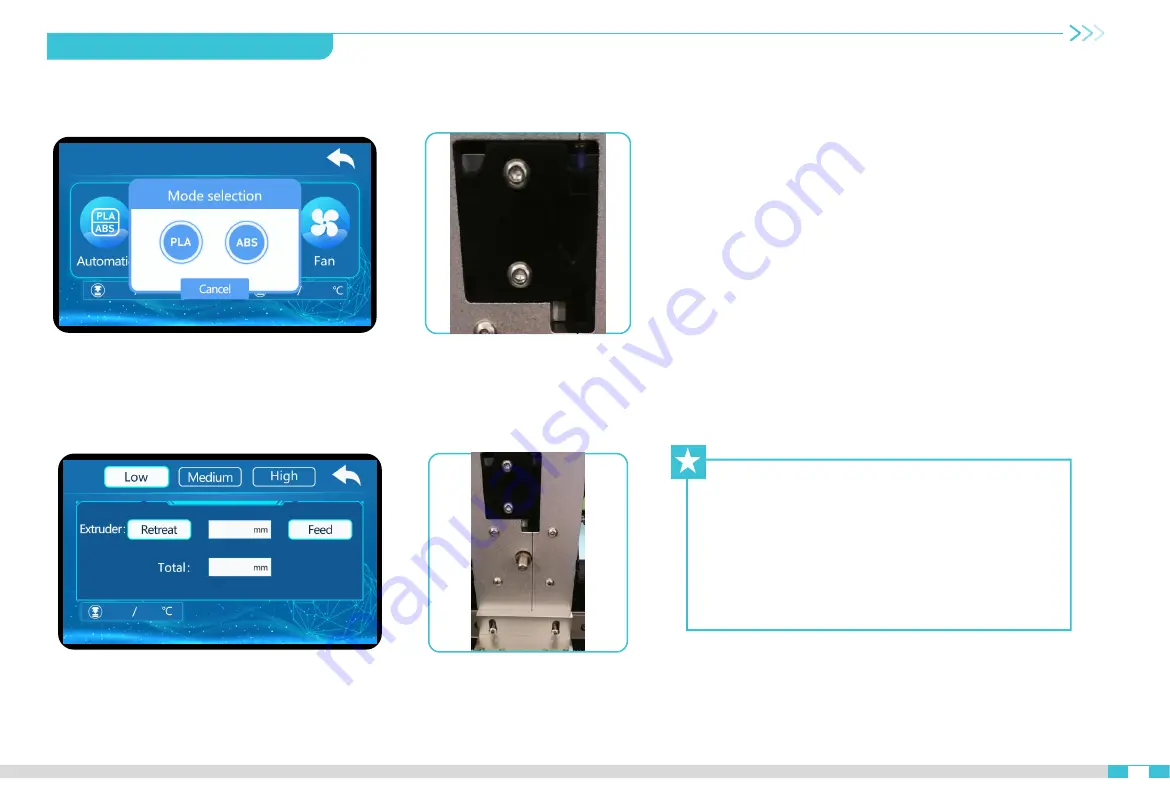
Preheat Nozzle

First touch Automatic, heating nozzle.

PLA about 200

ABS about 240

.

Feeding

Click to change the material, and manually 

pass the material breaking test. After that, 

feed the extrusion gear and click feed.

Cut the consumable port into an oblique angle with diagonal 

pliers, and manually send the consumable through the small 

pneumatic joint to the broken material detection switch. When 

the consumable passes through the extrusion gear, you can 

click feeding. When the consumables overflow from the 

nozzle, it means that the consumables loading is completed. It 

should be noted that because the machine has been tested 

before leaving the factory, there will be residual consumables 

in the nozzle, which may be inconsistent with the color of the 

consumables you want to use. At this time, you only need to 

extrude a small section of consumables to completely extrude 

the residual consumables in the nozzle, and then you can 

print the color you want.

Tips

How to change filament?

When change the filament you need to heating 

up the nozzle temperature to 200

 first. In 

Refuel

 option, touch 

Retreat

then the 

filament will exit automatically, next you touch 

Feed

 to change a new filament.

10.0

10.0

Material Cut-off

Detector Switch

Extrusion

9.Filling the Filament 

填充耗材

09

Summary of Contents for CR-1000 Pro

Page 1: ...3D Printer User Manual 3D V1 0 Create reality achieve dreams CR 1000 Pro CR 1000 Pro...

Page 2: ...can also learn how to use the printer in the following ways View the accompanied instructions and videos in the SD card Visit our official website www creality com to find relevant software hardware...

Page 3: ...he printer without supervision This machine is equipped with a security protection mechanism Do not manually move the nozzle and printing platform mechanism manually while booting up otherwise the dev...

Page 4: ...ction 01 01 Equipment Parameters 02 02 Parts List 03 03 Device Installation 04 04 Boot Information 05 08 Filling the Filament 09 10 Leveling 11 12 Start Printing 13 14 After Sales Service Card 15 18 C...

Page 5: ...Control panel 4 SD slot SD 7 Reset Switch 10 2 3 01 1 Introduction Nozzle assembly 2 Front door 5 USB Slot USB 8 Servo switch 11 XY frame XY 3 Screen 6 Power switch 9 LED light LED 12 1 5 4 8 6 7 9 1...

Page 6: ...035 1394 2050mm 648KG Input AC100 120V AC200 240V Output 24v AC100 120V AC200 240V 24v WIN MAC Linux 2500W 7inch 7 Model Software language Print method Molding Number of nozzles Print size Layer thick...

Page 7: ...Warranty card certificate Power cable 4 5 Shovel 6 Teflon tube 7 Spare parts SD card card reader SD Black tie Glue stick Lubricating oil USB data cable USB 8 9 10 11 12 13 14 3 Package Content 03 Util...

Page 8: ...4 Device Installation 04 The equipment is delivered in a complete machine After receiving the goods professional and technical personnel will help you install and debug the equipment...

Page 9: ...arget temperature manually Cooling Cooling down Fan Manual control machine can control the operation of the fan Leveling Auxiliary leveling mode Refuel Feed filament manually Move Homing and move XYZ...

Page 10: ...6 Boot Information 06...

Page 11: ...7 Energy saving mode 8 Time 9 Adjust 10 Z aixs compensation Z calibrate manually professional Energy saving Automatically shut down hot bed after certain time printing Fan ON OFF fan Turn off the fan...

Page 12: ...1 2 3 4 5 6 7 8 9 10 Z Z ABS 100 11 12 8 Boot Information 08 1 2 3 4 5 6 11 10 9 8 7 12...

Page 13: ...consumables loading is completed It should be noted that because the machine has been tested before leaving the factory there will be residual consumables in the nozzle which may be inconsistent with...

Page 14: ...PLA 200 ABS 240 10 Filling the Filament 200 C 10 10 0 10 0...

Page 15: ...n the axes return to zero click the leveling mode When the axes stop moving turn on the leveling switch and then click automatic leveling until the measurement is completed You can find the more detai...

Page 16: ...12 Leveling 12 0 0 0 0 0 0...

Page 17: ...installation directory Open slicer Load Open file Select the file Save to file Save to the memory card Slicing For details on the software instructions please refer to the slicing software manual in...

Page 18: ...umbers Warning Do not save more than 20 files in the memory card Do not put any other files except Gcode Otherwise it may cause unstable operation of the machine or printing failure Please don t inser...

Page 19: ...uired to be complete and intact According to our after sales inspection if the appearance of the product received by return exchange is damaged the parts are incomplete or the problem is caused by not...

Page 20: ...anual If there is a shortage or quality problem in the gift you can contact the after sales department to apply for replacement or replacement within 7 days l Warranty within warranty period After the...

Page 21: ...7 168 7 15 UV 2K U 7 17 After Sales Service Card 17...

Page 22: ...3D SD 8 30 20 45 400 6133 882 cs creality com 18 After Sales Service Card 18...

Page 23: ...ty card along with the returned machine Repair Change Return Name Telephone Address Serial Number Order Number Malfuction And Damage Depiction Or Return And Change Reasons Suggestions Repair Records C...

Page 24: ......

Page 25: ......

Page 26: ...hall be reserved by Shenzhen Creality 3D Technology Co Ltd Scan To Learn More SHENZHEN CREALITY 3D TECHNOLOGY CO LTD Add 1 8F JinXiuHongDu Building Meilong BIvd Longhua Dist Shenzhen China 518131 Offi...

Reviews: