CRASHTESTHOBBY.COM ALBATROSS Manual Download Page 3

6.  Install a carbon spar in the horizontal elevator to add strength and improve the function of the elevator. 
7.  Cut a slit with a razor blade 2.5" back from the front of the horizontal tail that is 12" wide leaving 3" on each end uncut. 
8.  Sand the flat carbon spar lightly so the CA glue will have a better grip. 
9.  Press the 12 " spar into the slot making sure that it does not poke out the top or the bottom along its length. 
10.  It helps to put a little baking soda along the spar to help the CA glue set.  Baking soda is a catalyst for CA glue. 
11.  Use thin CA glue along the length of the spar.  Make sure it is well secured. 
12.  If you are adding the spar to a plane that is already built, cut the slit as described and insert the spar.  It may help to make a small 

slit up into the vertical stab to be able to insert the spar.  


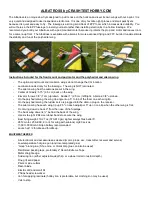
POLYHEDRAL WING CONSTRUCTION 

13.  Lay the wing core on a flat surface, and determine which tip goes on which end. The tips should fit so that they angle upwards. 

(The pre-cut slits in the tips go towards the center.) 

14.  Have a ruler to measure the height of the wing tips as you glue them.  
15.  Use your low-temp hot glue gun to glue the tips onto the wing core 

with the tips up 5” from the TOP of the wing cores. 

16.  Lay a bead of hot glue along the seam between the wing portions, to fill in any gaps, and smooth with a flat tool as the glue dries.  
17.  There are 2 fiberglass spars included in the kit

—1 for the bottom center of the wing, and 1 for the top center of the wing. 

18.  Lightly sand the fiberglass spars so the glue will stick to them. 
19.  Some kits have the spar slots precut, if yours does not you will need to cut the spar slots. 


20.  Lay the spar on top of the wing, and slide the ends of the spar through the pre-cut slits 

that are 4” back in the wing tips. 

21.  Place hot glue into the slot, and replace the spar, with the ends through the slits in the wing tips. Make sure both ends of the spar 

are seated completely down through the pre-cut slits in the wing tip, so that the spar lays flat.  

22.  Fill in the pre-cut slits in the wing tips with hot glue, especially around the spar that goes through it.  
23.  Turn the wing over, and use snips to cut off any excess spar sticking out of the slits. 
24.  Install the spar on the bottom of the center wing section.  


Summary of Contents for ALBATROSS

Page 1: ...Elevator throws 3 8 1 cm up down Rudder 1 2 5 cm left right Ailerons 3 8 up down On the polyhedral wing the wing tip angle is up 5 to top of the foam on each wingtip On the polyhedral wing the rudder...

Page 2: ...ip glue Laminating the tail adds a lot of weight behind the CG We recommend you don t laminate the tail surfaces so you can keep your Albatross light Pin the tail pieces rudder elevator on a piece of...

Page 3: ...Have a ruler to measure the height of the wing tips as you glue them 15 Use your low temp hot glue gun to glue the tips onto the wing core with the tips up 5 from the TOP of the wing cores 16 Lay a be...

Page 4: ...ove I used black spars for the pictures but you will get white spars in the kit 34 There are top and bottom spars back 4 from the front of the wing joined in the middle with a wood dihedral brace 35 T...

Page 5: ...ting into the foam and to reinforce the joint in the wing 48 Lay out your aileron servos so the servo wires overlap 2 in the center of the wing and the servos are as far apart from each other as the s...

Page 6: ...The nose of the fuselage is cut at an odd angle for nose mounted motors This is done on purpose to compensate for the torque and the lift created upon acceleration DO NOT correct this angle if you ar...

Page 7: ...the fuselage back past the back wing dowel This stiffens the fuselage against the forces of the rubber bands on the top of the fuselage 75 Wrap a piece of E tape around the fuselage where the rear do...

Page 8: ...fuselage that goes back 20 from the nose This helps to keep the fuselage from flexing and breaking with the pressure of the rubber bands 88 Turn the fuselage upside down and center a length of laminat...

Page 9: ...n Dowels that hold the wing 97 Cut the front slit with a razor blade using a straight edge 9 back from the nose of the plane that is 3 4 deep into the foam 98 Cut the rear slit behind the back edge of...

Page 10: ...ut hitting the bottom of the rudder 108 Place the rudder on top of the fuselage and horizontal tail piece so that the back of the rudder lines up with the back of the elevator Make sure the rudder is...

Page 11: ...ge 116 Cut a slot for the servo and other radio wiring The receiver and ESC will also be on this line 117 Use hot glue to set the servos in place 118 EZ connectors can be on the servo arm or on the ho...

Page 12: ...e front edge of the rudder where the push rod will go 131 Use your razor blade to cut a slot completely through the rudder about 1 8 25 cm back from the hinge Remember to note the angled side of the h...

Page 13: ...one end of a Velcro strap through the slit and wrap the other end up and over the fuselage so that they meet on the battery s side of the fuselage and will wrap completely around the battery 144 Make...

Page 14: ...trailing edge of the elevator Use your transmitter to set the throw range of movement on the elevator to 3 8 1cm up and 3 8 down Make sure your stick movement translates to the proper up down on your...

Reviews: