background image


USER MANUAL 

NAVCAM-818SHD 

11 


PLAYBACK ON TV (WITH HDMI)


Connect the NAVCAM-818SHD to a HDMI equipped TV or AV monitor with a mini-HMDI to HDMI 
cable. Turn on the NAVCAM-818SHD and select  PLAY. 

USB CONNECTION


Connect the NAVCAM-818SHD to a Windows PC with a Micro USB to USB cable. The screen will 
then display “USB Connecting…” The unit is now  connected. 


Find the device Under “ My computer” or “Windows Explorer” find the newly connected drive. 
Recorded files and images are recorded in the NORMAL folder, while preserved files are recorded 
in the EVENT folder. Files can be played back using Windows Media player, VLC or a  compatible 
.MOV media player or an image viewer (for  images). 


USER SETTINGS


From the main screen, press the 

MENU 

button, then using a combination of the arrow keys and 

the 

OK 

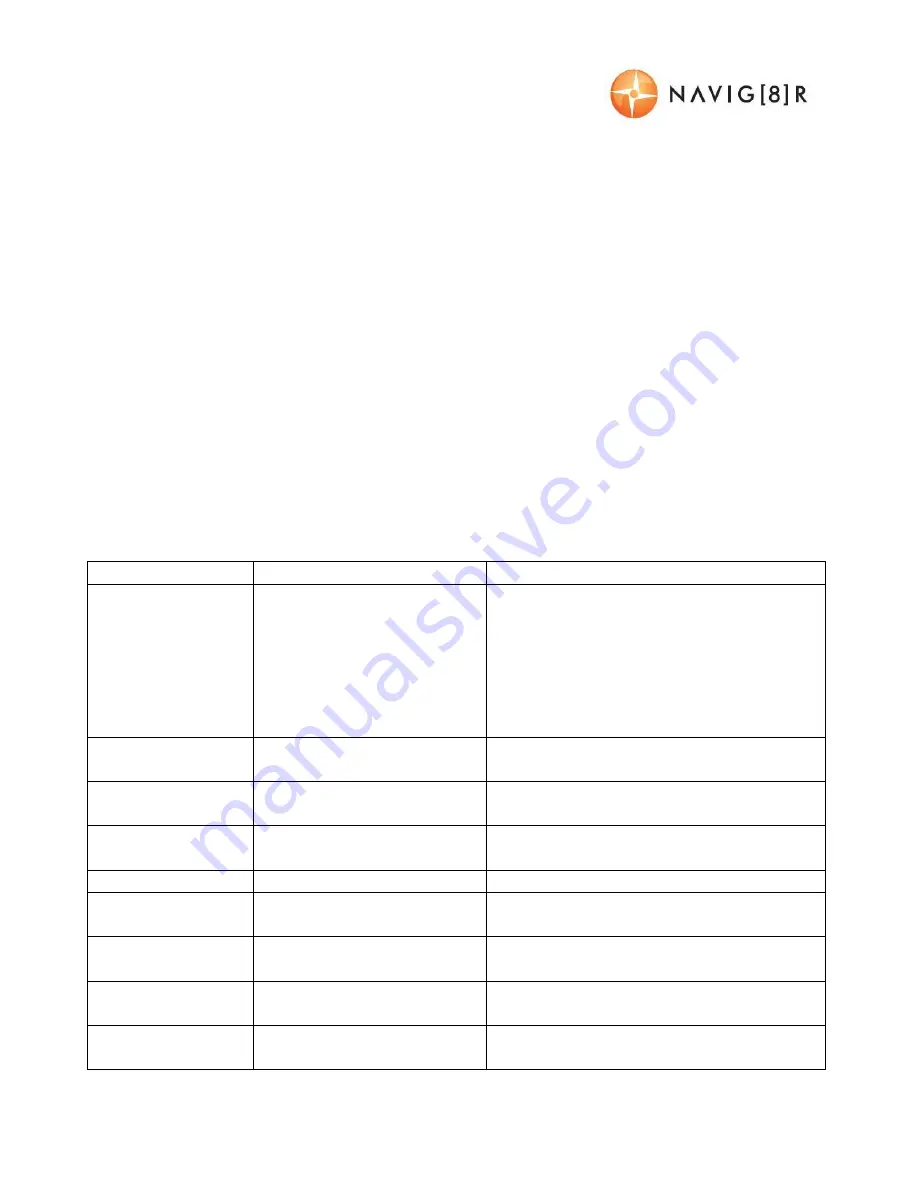
button to confirm your choice, select settings from the following options  list: 


Feature


Options


Description


Video Resolution


2560x1080 30fps 21:9, 
2304x1296 30fps 16:9, 
1920x1080 45fps 16:9, 
1920x1080 30fps 16:9, 
1280x720 60fps 16:9, 
1280x720 30fps 16:9


Change the resolution of recorded files 
(Note: Higher Resolution files take up more 
storage space)


Recycle record


Off / 1 Minute / 3 Minutes / 5 
Minutes


Select the length of each recorded file


Motion Detection


On / Off


When power is connected, begin recording 
when motion is detected.


Park Mode


On / Off


When the car is turned off, begin recording 
if an impact is detected.


Image Quality


S.Fine, Fine, Normal


Increase or decrease the image  quality.


Microphone Setup


On / Off


Record the sounds/ voices from inside your 
car whilst recording


Stamp Setting


Date / Time / Driver ID


Select on/ off to add a time-stamp to the 
recorded video


Driver ID Setting


[Enter your own number 
plate details]


Stamp your own number plate details onto 
video recordings


G Sensor Setting


Off / High / Medium / Low


Adjust the level of impact required to 
preserve recorded incident files.


Summary of Contents for NAVCAM-818SHD

Page 1: ...US ERMANUAL NAVCAM 818S HD 1...

Page 2: ...e NAVCAM 818SHDfor the first time 9 Power ON OFF Auto ON OFF 9 About GPSsignal reception 9 Auto record when turned on 9 Recording files 9 Playingback a recorded file 10 Deletinga file 10 Auto bump fil...

Page 3: ...red and will not cause the device to fall There are no user serviceable partsin this product Un authorized attemptsto dismantle or repair thisproduct will void product warranty WHAT SINTHEBOX 1 NAVCAM...

Page 4: ...TTON ANDHARDWAREOVERVIEW 1 Menu Return 7 Mini HDMI Out 2 Playback UP Map shortcut button 8 Reset button 3 S nap Down Preserve fil button 9 Power ON OFF button 4 Record OK 10 Micro SD slot 5 Mount S oc...

Page 5: ...GPSconnection pressto show the map Pressto select next menu video image S OS DOWN When recording pressto preserve the video recording file Pressto select next menu video image In video preview pressto...

Page 6: ...p through options 5 S croll down through options 6 Confirm selection 3 4 5 6 PLAYBACKS CREEN RECORDING S TOPPED 1 Menu S ettings Pressto Toggle thru 2 Playback recorded files 3 Take Photo DS C 4 Take...

Page 7: ...Through GPSlocation not found eg If indoors Red LED Light Device is charging Blue LED Light Device is ON PLAYBACKS CREEN PRES SPLAYFROM THEMENU S CREEN 1 Return to main screen 2 S croll up through op...

Page 8: ...nings GPSDisplay for Navigation Watch your progressusingthe onscreen real time usingthe onscreen GPSguided map Pressthe UPARROW button to view maps once you are connected to GPSS atellites GPSTracking...

Page 9: ...convenience your NAVCAM 818S HDwill automatically connect to GPSsatelliteswhen in range Just like all PND Portable Navigation Devices thismay take a few minutes especially the first time The signal ca...

Page 10: ...een and while not recording pressMenu button two timesto enter the file deletingmenu S elect whether you would like to delete from your delete protected files Event Video or from your normal files Nor...

Page 11: ...ist Feature Options Description Video Resolution 2560x1080 30fps 21 9 2304x1296 30fps 16 9 1920x1080 45fps 16 9 1920x1080 30fps 16 9 1920x1080 30fps 16 9 1280x720 60fps 16 9 1280x720 30fps 16 9 Change...

Page 12: ...light on or off accordingto your driving situation Card Volume Display storage space details S how thememory card remaining capacity Format Yes No Format S Dcard Note Permanently erases all data on c...

Page 13: ...UIC KGUIDE INSTALLINGTHESOFTWARE Install the software disc and select an installation or view the user manual Install GPSPlayer S oftware For 32 or 64bit Windows O S Install Video Player S oftware Vie...

Page 14: ...US ERMANUAL NAVCAM 818S HD 14 THEGPSSOFTWARE OVERVIEW...

Page 15: ...closure Disconnect power lead to device Cant playback the MOVvideo les Upgrade your windowsmedia player version or use an alternate media player such asVLCmedia player My video picturesof an incident...

Page 16: ...GPS GPSlocation and Speed stamp S upported on video Power off auto save Yes Current file will auto save when power isturned off Auto power on off Yes when ignition turned on off 1 3 5 Minutes Lens Hi...

Page 17: ...the driver to have a break after a user set period of continuous driving Ideal for long journeys Time S tamp The time and date isstamped on the video On Video playback with or without software you can...

Page 18: ...ature of the fault and refund or replace the product asper their store refund or warranty policy S tep 2b If your place of purchase cannot be contacted then you can contact Laser Customer S ervice wit...

Reviews: