3
GENERAL INFORMATION
To The Purchaser:
Congratulations! You are the owner of one of the fi nest
pumps on the market today. These pumps are products
engineered and manufactured of high quality components.
With years of pump building experience along with a con-
tinuing quality assurance program combine to produce a
pump which will stand up to the toughest applications.
Check local codes and requirements before installation.
Servicing should be performed by knowledgeable pump
service contractors or authorized service stations.
Receiving:
Upon receiving the pump, it should be inspected for dam-
age or shortages. If damage has occurred, fi le a claim
immediately with the company that delivered the pump.
If the manual is removed from the crating, do not lose or
misplace.
Storage:
Short Term -
Pumps are manufactured for effi cient
performance following long inoperative periods in storage.
For best results, pumps can be retained in storage, as
factory assembled, in a dry atmosphere with constant
temperatures for up to six (6) months.
Long Term -
Any length of time exceeding six (6) months,
but not more than twenty four (24) months. The units
should be stored in a temperature controlled area, a roofed
over walled enclosure that provides protection from the
elements (rain, snow, wind blown dust, etc..), and whose
temperature can be maintained b40 deg. F and
+120 deg. F. Pump should be stored in its original shipping
container and before initial start up, rotate impeller by hand
to assure seal and impeller rotate freely.
Service Centers
:
For the location of the nearest Weinman Service Center,
check your Weinman representative or Crane Pumps &
Systems, Inc., Service Department in Piqua, Ohio, telephone
(937) 778-8947 or Crane Pumps & Systems Canada, Inc.,
Bramton, Ontario, (905) 457-6223.
SERVICE
Your Weinman In-Line Unipump requires no maintenance
other than periodic inspection and occasional cleaning.
The inspection is to prevent breakdown, thus obtaining
optimum service life. The pump is lubricated by the liquid
being pumped and therefore does not require additional
lubrication. The motor, however, may require lubrication,
in which case the motor manufacture’s recommendation
should be followed.
REPAIRS
The pump may be disassembled using the illustrations and
text provided. Although complete disassembly is covered,
it will seldom be necessary to completely disassemble your
Weinman In-Line Unipump.
Inspect removed parts at disassembly to determine their
reusability. Cracked casing should never be reused.
Gaskets should be replaced at reassembly as a matter of
economy; they are much less expensive to replace rou-
tinely than to replace as the need occurs. In general, it is
economical to return only the motor and motor controller to
the manufacturer for repair.
DISASSEMBLY
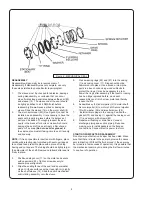
Disassemble only what is needed to make repairs or to ac-
complish inspection. Proceed to disassemble the pump as
follows: (See Figure 1)
1.
Break all electrical connections to prevent any
Possibility of pump starting during disassembly.
2.
Remove plugs (81) from casing (1) to drain pump.
3.
Remove all relief, cooling, fl ushing or drain lines from
the pump. Break suction and discharge connections
only if it is desired to remove casing (1).
4.
Remove capscrews (82) and lift pump assembly
from casing (1). Remove gasket (73).
5.
Unscrew impeller screw (26) and remove washer (28),
O-ring and gasket (not shown).
6.
Slide impeller (2) and impeller key (32) from shaft.
7.
Wearing rings (25) and (27) are pressed into their
housings and must be removed with a puller. New
ring(s) should be used for reassembly, since it is
likely that during removal this will be lost.
8.
Slide seal (80) rotating assembly off shaft sleeve
(14). The rubber in the seal may partially adhere to
the
sleeve.
CAUTION! - The mechanical seal (80) (Figure 2)
is a precision product and must be treated as
such. During removal, great care must be taken
to avoid dropping any part of the seal. Take
particular care not to scratch the lapped faces
on the washer or the sealing seat. Do not put
a seal back into service until the sealing faces
of the washer and seat have been lapped or
replaced.
9.
Unscrew capscrew (83) and remove casing cover
(11).
10.
Remove seal (80) stationary element from casing
cover
(11).
11.
Remove the shaft sleeve (14).
Summary of Contents for WEINMAN 6012CV
Page 8: ...Notes ...


