background image

Page 

53

 of 

101


REFRIGERATION SETTINGS 

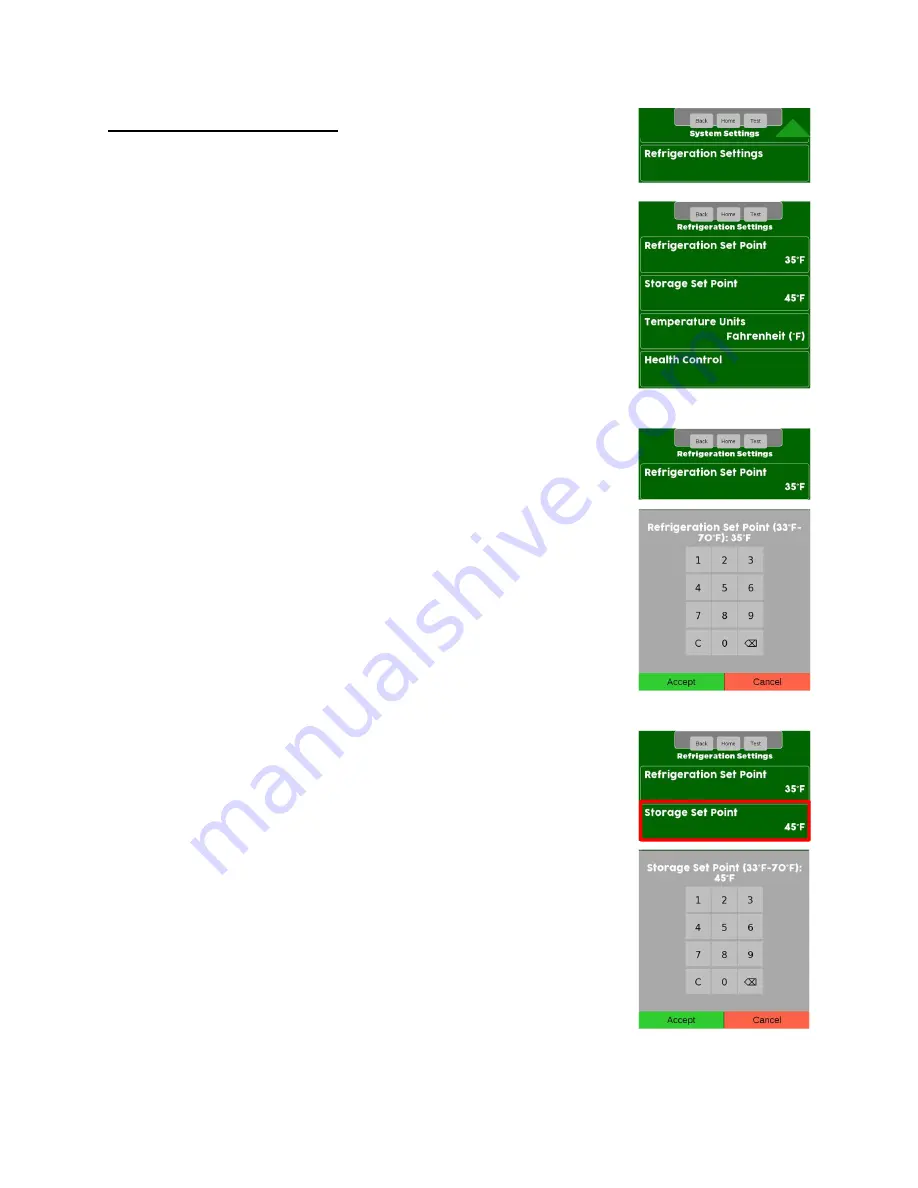
Touch Refrigeration Settings Menu Bar to enter the Menu.


Setting the Temperature Range 

Refrigerated Temperature is settable from 33°F - 70°F (1°C - 21°C) and the 

Health Control Menu will be available for Temperatures below 41°F, and is 

settable to be assigned to individual or grouped Selections.


Any perishable product like milk, should be stored and transported in 
refrigerated conditions, and loaded to the Machine at the end of the overall 
reloading cycle.


Refrigeration Set Point 

Touch Refrigeration Set Point Menu Bar to adjust the Temperature.


On the keypad enter the desired Temperature.  
Touch Accept to Save!


Storage Set Point 

Touch Storage Set Point Menu Bar to enter the Menu.


Set the desired Storage Set Point target Temperature for when Refrigeration 

Storage Mode has been enabled.  

Touch Accept to Save! 


Summary of Contents for 3800-6

Page 1: ...Page 1 of 101 ...

Page 2: ...Page 2 of 101 ...

Page 3: ...d be Setup Before Operating the Machine 8 9 Adding Initial Change Load 9 Set Inhibit Times 9 Test Vend 9 Refrigeration Set Point 10 The Driver Menu Access 10 Planogram Management 11 14 OPERATOR TECHNICIAN MAIN MENU 15 BevMAX Refresh 6 Media Programming Map 16 Monetary 18 27 Price Menu Icon 27 28 Data Recall 29 34 System Settings 35 57 Test 57 63 Product Configuration 64 70 Special Vend Modes 70 82...

Page 4: ...nt hazard Keep hands loose clothing and long hair away from moving parts CAUTION The Machine is a heavy item Ensure that sufficient personnel are available for moving and transporting the Machine Use proper lifting procedures and equipment to prevent injury or damage CAUTION This Machine is designed to dispense cold drink beverage products CAUTION If this Machine is used to dispense perishable col...

Page 5: ...enable or disable specific Idle Screens and Credit Card logos see System Settings Advertisements Touching any of these Screens will take you to the Main Menu Main Menu Screen Features The Main Menu allows your customer to view Promotions when enabled and view Nutritional Facts when a Product Library or Planogram is present by pressing If multiple Languages are enabled a Change Language icon will b...

Page 6: ...can be disabled by enabling Rapid Vend under the Special Vend Modes Menu and the Machine will immediately go to Checkout after making a Selection If you have a UPC Code associated with that Selection an Image of the Product will appear on the Screen Pressing the information Icon next to the Product Image will show a popup with Nutritional Facts for that Product If you do not have a Planogram insta...

Page 7: ...nderstand the options available and procedures for programming the Media Atlas H Board All programming testing and service functions are accomplished by using the Touch Screen in an easy to follow Display prompted format Closing the Service Door or activating the Service Door Switch on the right side of Door Switch Bracket Assembly will exit the function you are currently in and place the Vender b...

Page 8: ...l and troubleshooting purposes MENUS THAT SHOULD BE SET UP BEFORE OPERATING THE MACHINE 1 When opening the Service Door on the Machine you will be prompted for a PIN entering 3333 on the Touch Screen keypad will place you in the Operator Technician Main Menu 2 To Set the Prices touch the Price Menu Bar in the Operator Technician Main Menu 3 Make sure the Shopping Cart Size max 3 and Shopping Cart ...

Page 9: ...he Operator Technician Main Menu touch Timed Events Time of Day Events Inhibit Touch Create Event then Enable State Start Time Stop Time Days of Week Selections to be inhibited and then touch Save this Event TEST VEND Allows the service technician to perform a complete test on a Single Product or All Products when a product is present in all selections of the vender The Service Door must be opened...

Page 10: ...ges or Cancel to exit without making changes THE DRIVER MENU ACCESS If PIN 1111 was entered and No Errors Exist the Driver Main Menu will appear This Menu allows limited access to the Service Modes Touching an Icon or Menu Bar on the Screen will provide access to that Menu Driver access allows you to 1 Data Recall View Sales Data 2 View the Firmware Information 3 Telemetry Send a wireless DEX read...

Page 11: ...o a Selection 2 Once a UPC Code is assigned to a Selection the consumer will see an Image of that Product when that Selection is made 3 Pressing the Information Icon next to the Product Image will show the Nutritional Facts for that Product 4 For a UPC Code to be valid the UPC Code must be in the Library or Planogram loaded in the Machine 5 Deleting a UPC Code will cause that Selection to show a g...

Page 12: ...Touch a Menu Bar to View Audit or Edit the Planogram Touch View Planogram Menu Bar to View the current Planogram information If a Planogram has been loaded into the Machine an Image Price and Selection Number for each Selection will be shown If not a generic picture will be shown ...

Page 13: ...lanogram Menu Choose a Tray you wish to Audit The Screen will show the current Product and UPC assigned to the Selections on that Tray Touch Edit Planogram to make changes to the Planogram Menu Choose a Tray you wish to Edit Choose the Selection you wish to Edit ...

Page 14: ...rough to choose a Product If you choose Edit Current Code a numeric box will appear allowing you to enter a new UPC Code This Code must be in the current Planogram or Library You must choose Save to lock in the changes Touch Price Menu Bar to enter a new Price for the Selection A numeric keypad will appear enter a new Price and choose Accept The Screen will revert back to the previous Menu you mus...

Page 15: ...The lighter green arrow at the top or bottom of the Screen indicates that additional Menus are available to be seen or reviewed 9 Across the top of the Main Menu is a series of three Icons that will always be present when in the Service Menu a The Back Icon returns you to the prior Menu Screen b The Home Icon returns you to the Main Service Menu c The Test Icon is not currently used 10 The content...

Page 16: ...nce Last Reboot MDB Cashless Postpay Only Clone Board Port And Cup Sensors Last Reboot Reason Show Currency Symbol Cab Lights When OOS Security Codes Telemetry when Assigned Decimal Separator Advertisements Product Configuration Enter PIN Get Network Status Correct Change Parms High Contrast Service Mode Selection Configuration Change Driver PIN Ping Server Force Vend Automatic Reboot Settings Rem...

Page 17: ...Page 17 of 101 This page left blank intentionally ...

Page 18: ... B 9 Onboard Cashless 10 MDB Cashless Cart 11 MDB Cashless Postpay Only 12 Show Currency Symbol 13 Decimal Separator 14 Correct Change Parms a Force Vend b Declining Balance c Accept on Low Change d Low Change Message e Credit For Failed Vend f Allow Consumer Overpay 15 Cash Discount MDB LEVEL Touch MDB Level Menu Bar The Display will show the MDB Devices currently communicating and the MDB Level ...

Page 19: ...ly If the Coin Return is depressed change coins will be paid back If OFF Not Stacked The Machine will accepts bills that meets or exceeds the highest vend price If the Coin Return is depressed the last bill inserted will be returned and all previous bills inserted will be returned in change coins Touch Bill Acceptance Menu Bar to enter the Menu All denominations the Validator is capable of accepti...

Page 20: ...et the Coin Mechanism type The current setting is shown without entering the Menu Touch the desired Coin Mechanism option Menu Bar and Accept to save Note Executive Coin Mechanism is not used in the US When enabled all Bill Related Menus are removed Touch Coins In Out Menu Bar ...

Page 21: ...Onboard Reader MDB is an add on Card Reader that plugs into the MDB harness in the Machine Your options in this Menu are MDB Card Reader or no MDB Card Reader Onboard is a swipe built into the front of the Machine When using Onboard Cashless an NFC Near Field Communication or Tap and Go option is available Crane Onboard Cashless interfaces with other online systems so in many cases we can accept C...

Page 22: ...work and not used with Credit Cards Touch the Onboard Cashless Menu Bar Enable to toggle between Off and On An Onboard Card Reader is a built in Card Swipe on the front of the Machine that plugs directly into the Atlas Controller at J42 Crane Onboard Cashless accepts NFC Tap and Go transactions If you have a separate NFC Reader installed as long as the Onboard Card Reader is assigned and enabled a...

Page 23: ...o be enabled CURRENCY SYMBOL OPTIONS Touch the Menu Bar to toggle the Show Currency Symbol between On and Off If Turned On the Currency Symbol will be shown when applicable If turned Off the Currency Symbol will not be shown in the Main Menu with service door closed DECIMAL SEPARATOR OPTION Touch the Menu Bar to change the Decimal Separator Touch your Decimal Separator option and touch Accept to c...

Page 24: ...e to receive their credit back when any of the following conditions are met The established credit meets or exceeds the minimum price of the Selections in the Machine Any bills are stacked in establishing credit Any non tube coins are inserted in establishing credit A No Change Without Purchase message will be displayed when a consumer attempts to return credit Declining Balance Touch Declining Ba...

Page 25: ...ue Enter the value of money you wish to accept when no change is available Setting this to anything other than 0 00 may cause the customer to get short changed Touch Accept to Save Low Change Message Used to set the lowest amount registered in the Coin Mechanism before the Display shows USE EXACT CHANGE Touch Low Change Message to enter lowest value on corresponding line default setting of 1 00 re...

Page 26: ...eturn Change or Hold Credit Menu Bar to select the option for handling the remaining credit after a failed vend Touch Accept to Save Allow Consumer Overpay Touch the Allow Customer Overpay Menu Bar to toggle between Off and On When Consumer Overpay set to Off the Machine will not accept any currency for which it cannot make change regardless of Low Change Message Setting or Accept on Low Change Se...

Page 27: ...redit prices are shown at bottom of the Shopping Cart Screen The Prices set in the Machine and shown in the Consumer and Service Mode Screens are the cash sales Prices In other words the Cash Discount has already been applied Price Icon From the Main Menu Touch the Price Menu Bar to access the Price Setting Menus There are three options for setting prices Entire Machine By Tray Individual Prices S...

Page 28: ...ave or Cancel to exit without changing the Price SETTING INDIVIDUAL PRICES Step 1 Touch the down arrow and touch Individual Prices Menu Bar Step 2 Touch a Tray Menu Bar For this example Tray 1 Step 3 Touch a Selection Menu Bar For this example Selection 107 A numeric keypad will appear on the Screen along with a window displaying the Selection number and the current Price Use the numeric keypad to...

Page 29: ...re exactly the same and therefore not duplicated in this Programming Guide There is one additional Menu in the Resettable Menu Clear Data This Menu allows you to reset to zero the Resettable Data As a default the Resettable Data is also reset each time the Machine successfully transmits a DEX file The Non Resettable Data cannot be reset Cash Totals Touch Cash Menu Bar The cumulative value and cumu...

Page 30: ...y vend type including Revalue if applicable Bills Sales Data Touch Bill Data Menu Bar This Screen allows you to view information about bills by denomination both accepted and paid out when using a Validator or Recycler Also included is the current value of bills stored in a Recycler Cassette if applicable Overall Totals Touch Overall Totals Menu Bar ...

Page 31: ...th cumulative cash and cumulative number of transactions Data by Tray Touch By Tray Menu Bar Touch a Tray Number Menu Bar to see the Sales Data for that Tray For this example Tray 1 Totals for the Tray selected will be shown on the Display Touch the Back or Home Icon to exit ...

Page 32: ...e Selection 101 Clear Resettable Data Option Totals for the Selection chosen are shown on the Display Touch Back or Home Icon to exit There is one additional Menu in the Resettable Menu that is not in the Non Resettable Menu it is Clear Data This Menu allows you to clear the Resettable Data The Non Resettable Data can not be cleared The Resettable Data is also cleared each time the Machine success...

Page 33: ... Touch Reboot History Menu Bar A list of Times beginning with the last time the Atlas Control Board was rebooted are shown on the Display including Reboot Reason Time and Date Events Power Losses A list of times beginning with the last time the Atlas Control Board had Power Losses are shown on the Display including Duration Time and Date This includes turning the Machine Off then On Events Door Ev...

Page 34: ...ithout entering a Menu Last Data Clear Last Vend Last Price Change Last Clock Set Last Health Control Event if applicable IDENTIFICATION NUMBERS Touch Identification Numbers Menu Bar All Items attached to the Atlas Controller using MDB communications will be shown Touch Back or Home Icon to exit ...

Page 35: ...STEM SETTINGS Touching the System Settings Menu Bar from the Home Screen allows access to the System Settings Menus shown on the four Screens below Touch the down arrow to scroll to the next Menu Screen Touch the up arrow to return to the previous Menu Screen Details for each of these Menu Items is detailed in subsequent pages in this Guide ...

Page 36: ...INE INFORMATION OPTIONS Touch Machine Information Menu Bar to access and create Identification numbers used for DEX Touch Machine ID or Machine Location Menu Bar to assign or change the number This ID can be text numeric or a combination both A keypad will appear on the Screen along with a window to enter the ID or Location information Use the keypad to enter the information Touch Accept when fini...

Page 37: ...nd Date Menus Touch Time Zones Menu Bar to change Note Warning about reboot Touch your Time Zone Menu Bar followed by Accept to Save Touch Time Format Menu Bar to change the Format between 24 hours and AM PM Touch your desired format use AM PM or use 24hr clock Menu Bar Touch Accept to Save ...

Page 38: ... desired format Menu Bar Touch Accept to Save Touch the time Menu Bar to change the current Time Use the keypad to enter in the hours and minutes to change the Time Touch Accept when finished Press the Door Switch after setting the Time and or Date this will cause a reboot and ensure the Time Date are Saved ...

Page 39: ...me Date are saved LANGUAGE OPTIONS The Language Menu allows you to Customize the Languages available to your customer User Interface As shown in the picture to the left you can enable multiple Languages at one time The Language used in the Service Application Menus can also be changed and is independent of the Customer User Interface Languages set Additional Languages can now be uploaded without c...

Page 40: ...urrent Language options To change the Language used in the Service Application Menus Touch the Service Application Menu Bar Touch a Language Menu Bar and Touch Accept to apply that Language as a default for the Service Application Menus To change the Language options used to communicate with the Customer touch the User Interface Menu Bar ...

Page 41: ... used on the Screen to communicate with your Customers Choosing Default Language will bring up a list of Languages available to be used as a Default Language Choose a Default Language for your Screen Touch Accept to change the current Default Language to the new Language selected Once the Idle Screen Message is touched during vending you will have an option to change to one of the Enabled language...

Page 42: ...reate and enable messages for both the Idle Screen and the Vending Screen independently These Messages can be mixed Text and or Numeric characters Touch a Menu Bar to add a checkmark to enable a Custom Message Adding a checkmark will automatically bring up the next Screen Touch the Vending Screen Message or Idle Screen Message Menu Bar to create your Custom Message ...

Page 43: ...dits inserted in the Machine The Idle Timeout is settable from 2 to 180 seconds 3 minutes The factory default for the Idle Timeout is 30 seconds Touch Idle Timeout and a Screen will pop up allowing you to change the Timeout period Touch Accept to save the new time entered START SCREEN RENEWAL 2hrs The Start screen renewal Menu Item allows you to refresh the Screen if it is blurry or has become bur...

Page 44: ...e the Machine to a previously saved configuration Backups are saved with date time created Backups are stored on the Atlas Controller not removable Media If you choose Restore Factory Defaults a conformation Screen will appear Choose Yes to continue or No to cancel Touch Make configuration backup Menu Bar to backup your current configuration for recovery later All previous backups will be listed Y...

Page 45: ...las folder Preparing the Flash USB Drive Before attempting to Clone an existing Machine configuration you must create a folder on your USB Flash Drive named atlas lower case text only 1 Insert the Flash Drive into an available USB port on the Atlas Control Board typically USB 3 2 Enter PIN 3333 3 Touch System Settings Menu Bar then Clone Configurations or Clone Board Menu Bar 4 When choosing to Cl...

Page 46: ...confirmation box will appear verifying you want to install or remove the file Touch Yes to continue or No cancel CABINET LIGHTS WHEN OUT OF SERVICE OOS This Menu allows you to choose if you want the cabinets vertical lights to stay on or turn off when the Machine is Out of Service Touch CAB Lights When OOS to toggle between Off and On Choosing Off will cause the cabinet vertical lights to turn off...

Page 47: ...ith Crane you may Update Ads from Server OTA Over the Air Default Advertisements The Default Advertisements Menu contains all the Default and pre loaded Advertisements On power up the Machine will find the Coin Mechanism and Bill Acceptor enable them and turn on the Default Advertisements The Advertisements will show the values of bills being accepted including 1 coins Attaching an MDB Card Reader...

Page 48: ...d all service modes are in Black White Yellow as pictured Touch the High Contrast Menu Bar to toggle between Off and On AUTOMATIC REBOOT SETTINGS As a default the Machine is set to Reboot itself every evening at 2 00 am local time This Menu allows you to turn Off or change the parameter of the Nightly Reboot If your Machine is equipped with Cashless this setting must be left On On is the default s...

Page 49: ...nds Touch Accept when finished to Save SCREEN BRIGHTNESS Touch Screen Brightness Menu Bar Use the numeric keypad to change the Brightness 1 100 the higher the number the brighter the Screen 100 is the default Touch Accept to Save LED COLOR OPTIONS Touch LED Color Menu Bar to change the color of the Pill Surround and Onboard Payment Devices Lighting Use the arrow keys to scroll through the color op...

Page 50: ...ufacturer Representative DTS Standby Mode Touch DTS Standby Mode Menu Bar to change the transfer type Touch DDCMP or DEX Menu Bar to change the transfer type Touch Accept to Save Note In the US you will always choose DEX DTS Audit List To Modify the Audit List Touch DTS Audit List Menu Bar Touch a Menu Bar to add or remove items from the audit list This Menu gives you the ability to shorten the DE...

Page 51: ...second Cashless Module in the Machine if installed Data Reset on Transfer Touch the Data Reset on Transfer Menu Bar to change preference Touch Reset or No Reset Menu Bar Touch Accept to Save Recommended Setting Data Reset on Transfer should be set to Reset Setting this option to No Reset will result in the size of the DEX file increasing over time to unmanageable levels Cache Settings Touch the DT...

Page 52: ...he Easitrax operating system from CPI Enabling this Menu Item will send the DEX information as required for Easitrax Touch the Easitrax Menu bar to toggle between Off On VIX Handheld This switch was added to disable VIX Handheld capability to resolve a situation with some DEX downloader devices could not work properly due to ViX handheld wrongly activating If customer has problems with DEXing they...

Page 53: ...lections Any perishable product like milk should be stored and transported in refrigerated conditions and loaded to the Machine at the end of the overall reloading cycle Refrigeration Set Point Touch Refrigeration Set Point Menu Bar to adjust the Temperature On the keypad enter the desired Temperature Touch Accept to Save Storage Set Point Touch Storage Set Point Menu Bar to enter the Menu Set the...

Page 54: ... to Save Health Control Touch Health Control Menu Bar to enter the Menu Touch Select All Clear All or choose a Tray to check and or change the current Health Control Status For this example Tray 1 All available Selections are shown Touch Select All Clear All a Selection or the down arrow to add a checkmark and enable Selections for Health Control For this example Selections 101 and 102 ...

Page 55: ... Motor Power Interrupt Switch left switch in bracket must be engaged and the Switch Lock slid forwards for power to be applied This will allow the Delivery Cup Assembly to move to the swipe location as if it were making a delivery Hook Offset This Menu allows you to manually set the hook offset distance from the wall The target swipe distance is about the thickness of two quarters from the wall Si...

Page 56: ... so when making changes to the X or Y motor this is a reference Since 3310 1 then 331 a tenth of an inch ENABLE AUTOCAL HOOK OFFSET This feature is optional and may be turned off note the default is on Note if set to Off you can manually set the hook offset in the System Settings Cabinet Offsets On the first vend after each door closure and on the first vend after a power cycle the Media Atlas H B...

Page 57: ...st Screen to access the Test Menu for that Item Touch the down arrow to the bottom right side of the Screen to scroll down to the additional Test Menu Items SCREEN TEST Touch the Screen Test Menu Bar The Display will illuminate sequentially starting with White then Yellow then Light Blue then Green then Purple then Red then Dark Blue Touch the Screen to Exit TOUCHSCREEN TEST Touch the Touchscreen ...

Page 58: ...Off will cause the fan to turn off or choose On will cause the fan to turn on and run Touch Toggle Compressor to toggle Current Status between Off and On Choosing Off will cause the Compressor to turn off or choose On will cause the Compressor to turn on NFC MAGTEK HEAD TEST Touch NFC MagTek Head Test Menu Bar NFC Near Field Communication Swipe or Tap a Card Device to test The Display will keep tr...

Page 59: ...ts by pressing a Menu Bar Test Single Product Touch Test Single Product Menu Bar will bring up the Test Vend options Menu Touching single Product will bring up Tray Selection Menu Touch Selection Menu Bar Note the left Motor Power Door Switch must be engaged for movement to occur during test Note when testing with the service door open and a product is physically dispensed from the tray you must c...

Page 60: ...Menu Bar and the test will start You can Pause Test or Stop test If you Pause a Resume Test Menu Bar will appear as shown below Note the left Motor Power Door Switch must be engaged for movement to occur during test Note when testing with the service door open and a product is physically dispensed from the tray you must catch the product when it goes through the Delivery Port Door and place it in ...

Page 61: ...ashless System Test Menu Bar and a Screen indicates to Please swipe or tap card or phone Menu Bar Screen will provide the sequential steps and the status of the test COIN RETURN MOTOR Touch Coin Return Motor Test Menu Bar Touch Perform Test Menu Bar and the Coin Return Motor will run one cycle The Display will show Test is Complete or Test Failed ...

Page 62: ...ress the Target and the Gate Assembly will deliver product in to the Delivery Cup Note the Motor Power Interrupt Switch left switch in bracket must be engaged for movement to occur during test Switch status on the Screen will change as the test progresses and Delivery Cup Assembly position changes Touch Move to Selection Menu Bar and a keypad window will open to allowing you to enter the Selection...

Page 63: ...enu Bar Note This test will only toggle the 2 Vertical side Lights Off and On The Horizontal top Light will remain on Touch Toggle Cabinet Lighting Menu Bar to toggle the Light Relay between Off and On This will operate the 2 Vertical side Lights in the Refrigerated Cabinet area Touch Back Icon to exit PORT AND CUP SENSORS Touching the Port and Cup Sensors Menu Bar will open a Screen that provides...

Page 64: ...LECTION CONFIGURATION To manually configure Selections Touch the desired Tray number Menu Bar Touch a Selection Menu Bar to add or remove a checkmark Selections with a checkmark are part of the configuration Unchecking a Selection will exclude it from operating In some cases the down arrow will be present indicating you can scroll down for additional Selections REMOVE PRODUCT LIBRARY Touch Remove ...

Page 65: ...mation will be available for that Selection You can use the same UPC Code for multiple Selections if you want two or more Selections of the same product Choose a Selection and use the Numeric Keypad to enter the UPC Code you wish to add Touch Accept to save and Cancel to exit without changes Use the Aa key to switch to Alpha for symbols SHOPPING CART SETUP This Menu provides access to set up the S...

Page 66: ...ely If Rapid Vend is turned On you must turn it Off for the Shopping Cart Menu to appear set the amount to be paid back in this Menu then turn Rapid Vend back On if desired SPACE TO SALES FIFO Space to Sales STS or First In First Out FIFO FIFO allows you to program your Machine to run multiple Selections as a Single Selection No matter which Selection ID of the Group is entered the Machine will ve...

Page 67: ...order so if you select 301 the product could be delivered from 301 303 or 305 Touch Add Group Menu Bar Touch the desired Tray to add Selections to the Group For this example Tray 1 All available Selections are shown Touch a Selection to add a checkmark to the Selections that will be part of the Group In some cases the down arrow will be lit allowing you to scroll to additional Selections Touch Bac...

Page 68: ...is example Tray 1 Touch Selections to check or uncheck them from the Group Use Select All to enable or Clear All to disable all Selections on the Tray Touch Back Icon when finished to exit Touch Delete Group Menu Bar Touch the desired Group Number Menu Bar to be Deleted For this example Group 1 A confirmation box will appear touch Yes to confirm or No to cancel ...

Page 69: ... the Machine a picture of the Product for each Selection will be shown For this example Tray 1 If not the Selection Number and Price will be shown Touch FIFO Mappings Menu Bar Touch a Tray Number Menu Bar to view the current FIFO Mappings The Display will show the current Mapping for the Selection Grouping s on the Tray selected ...

Page 70: ...nu heading PORT SENSOR PICKER SENSOR Touch Port Sensor or Picker Cup Sensor Menu Bar to toggle the selected Sensor Off On Note when both are off if a product is not dispensed the Customer losses their credit unless a vend mech error occurs The Port Sensor when On will sense product placed in the Port and or removed from the Port The Delivery Picker Cup Sensor when On will sense product placed in t...

Page 71: ...d Cart Totals you can provide a Payment Screen Message Enter the message touch accept or cancel FREE VEND Touch Free Vend Menu Bar to toggle the Free Vend setting between OFF and ON When set to On all Items will be free until turned Off TOKEN ENABLE This Menu allows you to choose the Selection s the customer is permitted to purchase with Tokens or Coupons Note Tokens must be Enabled in the Monetar...

Page 72: ...ckmark to the Selections that you want to work with Token Coupons For this example Selection 101 WINNER MODE When Winner Mode is turned on The customer will receive their Product and get their money back or an additional Item programmable at no charge The Display will prompt the customer if they are a Winner The frequency of a Winner is programmable By touching a Menu Bar on the Screen you can Add...

Page 73: ...n a window to select winner or prize Once you have selected touch Accept to save your selection If set to winner the customer will receive their money back based on the frequency set If set to prize another Menu Item will appear on the Display This is where you choose the Item the customer will win based on the Frequency set Touch Frequency Menu Bar to choose how often a customer will be a winner ...

Page 74: ...PC toggle in the Off position will cause the Menu Bar below it to say Selections and you can choose which Selection will be active for this winner event Changing the By UPC toggle to the On position will cause the Menu Bar below it to say by UPC EAN Codes and you can choose which UPC Codes will be active for this winner event If using Selection Numbers for this event touch the Selections Menu Bar ...

Page 75: ...UR WORK After entering your Parameters and selections for Winner Mode you must touch Add New Winner Group If you do not touch Add New Winner Group before exiting your settings will not be saved Touch Delete Group Menu Bar Touch Group Menu Bar to Delete Touch Yes to confirm or No to cancel Touch Edit Group Menu Bar Touch Group Menu Bar to Edit Touch the Item you wish to Edit Save the changes when y...

Page 76: ...access the Combo Vends set up Mode How Combo Vends Works 1 Select the first Item and place it in the Shopping Cart by pressing the Shopping Cart Icon 2 Select the second Item and place it in the Shopping Cart if a third Item is part of the Combo Vend it must be placed in the Cart also 3 Insert money and touch Check Out 4 All Items in the Cart will be delivered 1 at a time 5 The discount will be Di...

Page 77: ...g Save Combo Promotion See step by step instructions on the following pages Groups in Promotion You can choose to have 2 or 3 Selections as part of a Combo Vend Group Touch Menu Bar 2 or 3 to select number of Groups in Promotion If you choose 3 the customer must buy three items that are part of the Group for the discount to apply Touch Accept to Save Discount Type Use the keypad to enter the Disco...

Page 78: ...t set If you choose Off only the last Item in the Discount Group will be discounted Selections Combo Vends can be set up by Selections default or UPC Codes Choose the Selections Menu Bar to change between Selections and UPC Code The current choice is shown on the bottom right of the Menu Bar Touch the Menu Bar on the Screen to choose Selections or UPC Touch Accept to Save Edit Groups Touch the Men...

Page 79: ...ate Touch the Menu Bar to enter a Start Date and End Date for the Combo Vend A Start Date must be entered If no End Date is entered the Combo Vend Promotion will not end Enter the Start Date or End Date as selected on the Menu Bar pictured to the right The date should be entered as selected in the Time Date Menu In the US that is MM DD YYYY After entering all options times for all Groups touch the...

Page 80: ...o cancel Edit Promotion Touch Edit Promotion Menu Bar to Edit an existing Promotion Select the Promotion you want to Edit Select the Item you wish to Edit Save the changes when you are done Editing by touching Save Combo Promotion Combo Vend Selection Mapping Touch Combo Vend Selection Mapping Menu Bar to view Selections currently assigned to a Combo Vend ...

Page 81: ...ote The Shopping Cart is automatically disabled when Rapid Vend is turned On and will prevent consumers from making multiple Selections during a single transaction SKIP MAIN MENU When Skip Main Menu is set to On and the Idle Loop standby screens Screen is touched the Screen will immediately transition to the Numeric Keypad Screen bypassing the Main Menu Screen with options to Make a Selection View...

Page 82: ...be discounted or discounts by time of day see the Combo Vends or Timed Events Menu instructions Touch the MultiVend Discount Enable Menu Bar to toggle to On A Percent Discount Menu Bar will appear Touch the Menu Bar to change the Percentage of the Discount Use the keypad to enter a new Discount Percentage Touch Accept when finished PICKER CUP DANCE Touch the Picker Cup Dance Menu Bar to toggle thi...

Page 83: ...you change the PIN don t forget it you won t be able to access the Service Mode without it ENTER PIN Touch Enter PIN Menu Bar A window with keypad will appear enter your existing PIN CHANGE DRIVER OPERATOR ENGINEER OR MANUFACTURE PIN Touch a Menu Bar to change the existing Driver Operator Engineer or Manufacturer PIN number Enter your new PIN Number for the Selected Menu PIN using the keypad Touch...

Page 84: ...tion All the Monetary peripherals in the Machine including Model Number and Software Version The Software Version of the X Motor Board Y Motor Board Environment Board Cup Board and Port Board The Serial Number of the Atlas Control Board along with the Software Version and Kernel file Version If Crane Cashless is used it will also show the Processor Customer Account Number and Customer Code OTA USB...

Page 85: ...1111 has a Send DEX Icon GET NETWORK STATUS To view the current Network Status touch Get Network Status Menu Bar The Screen will open a window that shows the current Network Status PING SERVER Touch Ping Server Menu Bar to Ping the Server If the Pinging the Server is unsuccessful then perform Radio Diagnostics to determine the issue Resolve before continuing SYNC TIME WITH SERVER only present when...

Page 86: ...s Copy your VixConfigData cfg file to this folder Verify the Radio is connected to USB 1 port on the Atlas Board USB 1 is the high power USB port All Refresh 6 Media Models require a digitally signed VIX file Contact CMS Service at service cranems com and provide your current VIX file or provide your account number and SW Code A file will be prepared and then digitally signed and returned to you T...

Page 87: ...fresh 6 Media Models will require a digitally signed VIXConfigData cfg file to assign the Machine Also the Machine Atlas Board Number must be correctly associated with the assigned Customer Number to permit assignment to complete Contact support craneconnectivity com to insure your Machine is properly associated before proceeding Contact your local FSE for assistance in obtaining a digitally signe...

Page 88: ... UNASSIGN UNIT Touch Unassign Unit to unassign a unit that is currently assigned This option is only seen in Telemetry Assigned Unit Menu SEND LOGS Touch Send Logs to send log files information to Streamware Connect Server This option is only seen in Telemetry Assigned Unit Menu LOAD NETWORK CONFIG This option is seen in both Telemetry Assigned and UnAssigned Unit Menus If the Flash stick not foun...

Page 89: ... the Error Screen is full a down arrow will appear on the bottom right side of the Screen allowing the user to scroll down to a second Screen of Errors NONE No errors have occurred Selection Error Selection Sold Out VEND MECH ERROR Horiz Horizontal Drive System issue Vert Vertical Drive System issue X Motor Home X Motor Board has tried to home the mechanism but has failed Y Motor home Y Motor Boar...

Page 90: ...ceptor Jam CM Acceptor Jammed CM all tube error Coin Mech All Tubes Error CM All Tubes Error CM Tube Error Coin Mech Tube Error Coin Tube Empty Coin Tube needs coins CM Sensor Error Coin Mech Sensor Error NOTE ACCEPTOR ERROR BV no com Note Acceptor disconnected BV stacker error Stacker Full BV Bill Defective Motor Recycler Jam Validator Bill Jam BV Brch ROM Checksum error BV recycler cassette Stac...

Page 91: ...ue Cup Board No Comm Cup Board Communication issue Env Board No Comm Environmental Board Communication issue Port Board No Comm Port Board Communication issue X Board No Comm X Motor Board Communication issue Y Board No Comm Y Motor Board Communication issue C Reset Cup Board reset unexpectedly E Reset Environmental Board reset unexpectedly P Reset Port Board reset unexpectedly X Reset X Motor Boa...

Page 92: ...ot have the same Menus As an example a Price Adjust Event will have a discount feature that a Power or Backup Event would not have In some cases some Menus will not be present until another Menu is enabled Events are settable daily or weekly When daily is chosen you choose the days of the week so the Event does not cross over midnight As an example if you were to set a Power Event from 10 00 PM to...

Page 93: ...epending on your Selections You can choose the Selections for your Free Vend Event This Menu is different from Winner Mode and all Selections chosen will be Free for the times and days set Save your changes often by choosing Accept then Save This Event If you exit without choosing Save This Event your changes will be lost Inhibit The Inhibit Menu allows you to set times and or day s when specific ...

Page 94: ... Promotion has a pre programmed advertisement that advises the customer that the Promotion s are available The recommended maximum number of Promotions stored is six Available Pre Defined Promotions Backup Events The Backup Events Menu allows you to create a backup of the Events you have created This Menu also allows you to program the time and day or days you wish to Backup the Events ...

Page 95: ...ivity Inactivity Minutes before the Machine goes into Power Saving Mode Inactivity Minutes are settable from 1 to 600 Save your changes often by choosing Accept then Save This Event If you exit without choosing Save This Event your changes will be lost To Create New Event To Create Remove Event Program all options for an Event before saving Once the Event details are programmed Touch Save This Eve...

Page 96: ... an Event so be careful Enabling Frequency of the Event Touch Enable State to toggle the state of the Event between Off and On Choosing Off allows an Event to remain stored in the Machine for future use it is not necessary to remove the Event In Time of Day Events if the Event involves changing Prices touch Price Adjust Type and a Screen will pop up with the type of price adjustment options to cho...

Page 97: ...y you have a choice of a Start Day and End Day also Setting Start Stop Time Date The Start Date is the Date the Event will start The End Date is the Date the Event will stop and no longer be active If no End Date is set the Event will not end The Event will continue as long as the Enable State for the Event is On Touch Start Time on the Display to enter the time you want the Event to start As an e...

Page 98: ...ou can choose which Selection s will be active for this Timed Event Changing the By UPC toggle to the On position will cause the Menu Bar below it to say by UPC EAN Codes and you can choose which UPC Codes will be active for this Timed Event Setting up Selections for the Event If using Selection numbers for this Event touch the Selections Menu Bar Choose a Tray for Items you want to initiate the E...

Page 99: ...ion Storage Event page 1 of 2 Touch a Menu Bar to set Frequency Start Time Stop Time Days of Week or Inactivity Minutes You can set multiple Events per day if necessary The Menu Bars on the right contain all the options that need to be set up for your Refrigeration Storage Mode Event and may change depending on your Selections Save your changes often by choosing Accept then Save This Event If you ...

Page 100: ... Bar to Enable Event Set Start Time Stop Time Days of Week Suggestion Type or Products You can set multiple Events per day if necessary The Menu Bars on the right contain all the options that need to be set up for your Suggestion Engine Event and may change depending on your Selections Save your changes often by choosing Accept then Save This Event If you exit without choosing Save This Event your...

Page 101: ...___________________ ____________________________________________________ ____________________________________________________ ____________________________________________________ ____________________________________________________ ____________________________________________________ ____________________________________________________ ____________________________________________________ _________...

Reviews: