Camden EC2 - Two Channel Preamp, Mojo
Processor, and Dual Headphone Mixer
User Manual
Camden EC2 User Manual
-Page 1-
©2020 Cranborne Audio Ltd
Page 1: ...Camden EC2 Two Channel Preamp Mojo Processor and Dual Headphone Mixer User Manual Camden EC2 User Manual Page 1 2020 Cranborne Audio Ltd ...
Page 2: ... the highest quality and truly innovative new ways of working and achieving that sound that we all desire Cranborne Audio for us means so much more than metal boxes with components in them These are our labours of love that embody and demonstrate our demand for excellence By distilling what matters and putting our soul into these tools we hope to help other people make magic and express themselves...
Page 3: ...icate and natural preamps you ve ever heard but at the turn of a dial can transform into the fattest warmest and the most character of any preamp in your arsenal To partner the preamps we added two discrete line mixers with reference grade headphone amplifiers that allow you to monitor the local preamps directly during mic placement or blend live sources with pre recorded sources during tracking C...
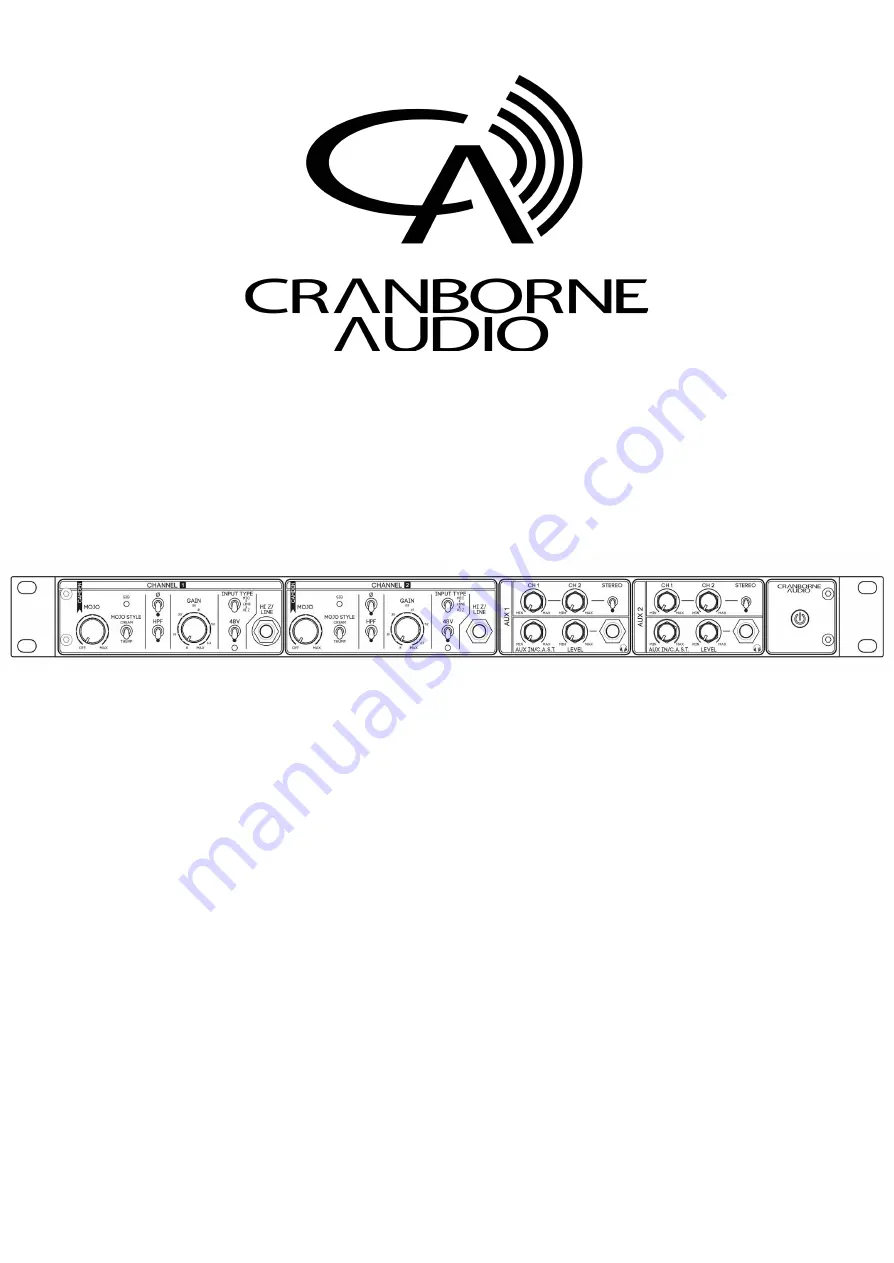
Page 4: ...eamp Outputs 16 Ground Lift R6 16 Input Type Switch F7 17 Gain Control F6 17 Signal Indicator F3 18 48v Switch F8 18 48v Status Indicator F10 19 Polarity Ø Switch F5 20 HPF Switch F4 20 Headphone Amplifiers 21 Channel Level Controls 21 Stereo Pan Switch F15 21 Aux Headphone Level Control F14 21 Aux In C A S T Level Control F12 22 Aux Headphones Output F16 22 Mojo 23 Mojo Control F1 23 Mojo Style S...
Page 5: ...Preamp Channels 34 Technical Specifications 36 Important Safety Instructions 38 General Safety 38 Installation notes 38 Power Safety 39 CE Certification 39 FCC Certification 39 RoHS Notice 40 Instructions for disposal of WEEE by end users in the European Union 40 Electromagnetic Compatibility 40 Camden EC2 User Manual Page 5 2020 Cranborne Audio Ltd ...
Page 6: ... Inverts the polarity of the input signal by 180 Switch Down ON F14 Aux Headphone Level Adjusts the main level of the Aux bus to the Aux Headphones output F6 Gain Control 12 position switched pot Adjusts the input sensitivity of the preamp from 8 to 68 5dB in 5 5dB increments F15 Stereo Pan Switch Sets the Pan position of Ch 1 and Ch 2 to the Left and Right sides of the Aux headphone output for mo...
Page 7: ... chassis ground to help eliminate ground loops in specific setups R4 Link Output Outputs an unaffected buffered output to connect downstream equipment such as guitar amplifiers in parallel to Camden EC2 s Hi Z and Line inputs R15 C A S T Output Enables Camden EC 2 Preamp signals to be sent directly to the C A S T Inputs on another Cranborne Audio device C A S T Out also receives the Aux Mix inc Ta...
Page 8: ...Camden EC2 s rack ears can be repositioned in 2 ways to suit particular applications and offer greater protection during transport Standard Default Standard rack ear configuration where the rack ears are mounted flush to the front panel of Camden EC2 Recessed Protective rack ear configuration where the rack ears are brought forward allowing Camden EC2 to sit backwards into the rack to protect fron...
Page 9: ...Damage caused using an improper PSU with incorrect polarity or voltage is not covered under warranty Connecting Power Align the metal pins and plastic locator of the plug with Camden EC2 s Power Inlet R11 Once located push the connector firmly into the socket whilst holding the plug s outer housing and not the cable itself Disconnecting Power Grip the body of the plug firmly and pull the body of t...
Page 10: ...that any connected speakers audio interfaces are switched off and any headphones have been disconnected from Camden EC2 Press and hold the Power Switch for approximately 3 seconds The power icon will deluminate and you will hear the soft clicking of the relays indicating that Camden EC2 has been safely powered off Note Please follow these safe powering sequences carefully in order to prevent any u...
Page 11: ...the power connector has been removed Wait 30 seconds before continuing 2 Place Camden EC2 on a flat surface and carefully remove the screws fixing the top panel 3 Locate the Auto Power label on the PCB 4 Carefully remove the black plastic jumper that is installed over the OFF legs and reposition it over the ON legs This jumper will then bridge the connection and enable Auto Power On Off 5 Re fix t...
Page 12: ...onnections Note Ensure that the inputs on the Audio Interface can accept balanced line level signals at 4dBu or higher reference level for best performance 3 Power On Camden EC2 using a brief tap of the Power Switch F17 Then power on your Audio Interface 4 Connect two available line outputs on the Audio Interface to the Aux Inputs R8 on the rear panel of Camden EC2 s Now your Camden EC2 is fully p...
Page 13: ... a shielded Cat 5e Cat 6 or Cat 7 cable 4 Power on Camden EC2 followed by other downstream equipment 5 On Camden EC2 set Source Switch R2 on the rear panel to C A S T Now Camden EC2 is fully integrated into a C A S T system Mic Line sources connected to N22H will arrive at Camden EC2 s preamps ready for processing before travelling through C A S T directly to N22 for further processing and recordi...
Page 14: ...esired source XLR Input R3 The rear XLR input accepts both Mic and balanced Line inputs The XLR is engaged by default however it may need to be selected by using the rear panel Source Switch R2 and switching it to its UP position Jack Input F9 The Jack input can accept balanced Line sources or unbalanced balanced Hi Z sources via jack Microphones cannot be connected directly to this jack input Not...
Page 15: ... use the Link Output for when reamping check out our Using the Link Output For Reamping application guide Tip Wait did we just say buffered Yes we did Buffers are a dirty word in guitar kingdom but there is no need to fear them The Link Output has an output impedance of 75 Ohms which is the exact same as many high quality guitar buffers and the value of some pedals when they are switched on This w...
Page 16: ...alanced output that can be connected to both balanced and unbalanced sources using a TRS or TS guitar style jack cable The output has a maximum output level of 18dBu Ground Lift R6 The Ground Lift R6 switch lifts the ground of Pin 1 on the preamp s XLR output to remove ground hum and buzz in applicable setups The Ground Lift only applies to the XLR output and is activated when the switch is Down T...
Page 17: ... has a maximum input level of 24dBu Gain Control F6 The Gain control F6 is used to adjust the input sensitivity of the preamp to boost incoming signals to optimum operating level and achieve the best signal to noise ratio The gain control is a 12 position stepped switch that adjusts the input sensitivity in steps of 5 5dB Mic Mode Gain Range Position Min 2 3 4 5 6 7 8 9 10 11 Max Gain dB 8 13 5 19...
Page 18: ...8 engages 48v phantom power and sends supply voltage down pin 1 of the chassis XLR input socket to power condenser microphones and Di boxes if required Phantom power is off when in the up position Phantom power is on and ready when in the down position and the LED is lit up red Note Do not engage 48v with vintage ribbon mics connected to Camden EC2 as sending voltages through to the ribbon can cau...
Page 19: ...charging When the 48v Status Indicator lights RED the 48v is fully charged and the preamp is ready for use Disengaging 48v When disengaged the 48v Status Indicator LED lights Amber whilst current is discharged from the XLR connector During this time do not disconnect the microphone DI Box or connect a ribbon mics to the XLR as voltage is still present Once the LED has turned off there is no longer...
Page 20: ...attenuation at 80Hz and features a 12dB per octave slope Camden EC2 s High Pass Filter has been tuned to achieve a smoother onset but more dramatic roll off than standard filters resulting in a more natural sounding low frequency attenuation Tip As the HPF is positioned after the Mojo circuit in the signal path it can also be used in conjunction with Mojo to create even more tonal shaping possibil...
Page 21: ...me of Camden EC2 s preamp channels in its Aux busses and headphone outputs The controls are fed directly from the analogue output of the preamps and so enable the headphone outputs to monitor the preamps in zero latency Ch1 Level F11 Adjusts the level of preamp channel 1 Ch2 Level F13 Adjusts the level of preamp channel 2 Stereo Pan Switch F15 The Stereo Pan Switch F15 sets the Pan position of Ch ...
Page 22: ...ides Aux Headphones Output F16 The Headphones Output F16 is used for connecting headphones to Camden EC2 s headphone amplifiers The connection is made by a TRS connector that is found on popular professional and prosumer headphones For consumer headphones or earbuds with smaller connectors you can connect a suitable adapter to convert the jack to a larger jack Splitters and headphone extenders can...
Page 23: ...uilt a brand new type of saturation circuit consisting of an array of different filters some of which are inductive and discrete second and third order harmonic generators that allow precise emulation of the saturation and low end reinforcement behaviours of vintage equipment Mojo can even be dialed in to well beyond the point that destructive clipping would usually occur with transformer based de...
Page 24: ...ing EQ moves will result in extreme wooliness as all sonic energy is boosted even unwanted audio in between the hits On sources such as Kick drum Thump will add the desired amount of low end thickness required to provide the foundation for the rest of the mix to sit on As Thump is NOT EQ based the content added is controlled by the hits unlike EQ On Snare Vocals and Guitar sources that are traditi...
Page 25: ...s a delicate amount of Cream will add high end harmonics that will bring the vocals forward whilst also taming the midrange honkiness of an unprocessed vocal track Higher Cream settings will take a clean vocal track through to a warm vintage saturation with subtle overdrive effects that have the effect of smoothing out esses and adding up front warmth On drums you will notice a fattening of transi...
Page 26: ...sure that the maximum signal integrity is transmitted over shielded Cat 5 Cat 6 and Cat 7 cables for distances of up to 100m 330ft without high end roll off and with very low crosstalk Recommendation For best possible performance over maximum distances we recommend using Cat 7 cables with robust connectors to ensure that the C A S T connection is secure and will remain impervious to RF and crossta...
Page 27: ...am you are able to create your own C A S T devices if desired TTRR RRTT Pin Signal Pin Signal 1 C A S T IN 1 1 C A S T OUT 1 2 C A S T IN 1 2 C A S T OUT 1 3 C A S T IN 2 3 C A S T OUT 2 4 C A S T OUT 1 4 C A S T IN1 5 C A S T OUT 1 5 C A S T IN 1 6 C A S T IN 2 6 C A S T OUT 2 7 C A S T OUT 2 7 C A S T IN 2 8 C A S T OUT 2 8 C A S T IN 2 Note Any equipment designed by users or 3rd parties that su...
Page 28: ...ily high enough to cause permanent damage to home routers or computers Only connect C A S T Outputs to Input and Vice Versa Connecting a C A S T Input to another C A S T Input can cause irreparable damage to microphones speakers and Cranborne Audio gear Ensure the Cat 5e Cat 6 and Cat 7 cable used is fully shielded C A S T s performance is limited when non shielded cables are used and 48v will not...
Page 29: ...o Preamp 2 Input Aux 1 Mix Output L Aux 1 Mix Output R C A S T Output 9 The C A S T Output 9 is used to connect Camden EC2 to the C A S T Input of another C A S T enabled device The single C A S T connector transports 4 channels of balanced analogue audio in both directions 2 In 2 Out and each path is labelled as either a Receive path for signals received by Camden EC2 or Transmit path for signals...
Page 30: ...rectly to Preamp One using the front panel Hi Z Jack input and the Link Output of channel one is connected directly to the input of a bass guitar amp Preamp Two on Camden EC2 is then used to mic up the Bass Guitar amp By connecting Camden EC2 to your Audio Interface in the way displayed above you will be able to record both the completely clean Camden EC2 User Manual Page 30 2020 Cranborne Audio L...
Page 31: ...ctor is required in order to pass 48v correctly 2 Connect Camden EC2 s C A S T Output to the C A S T Input on N22 using a shielded Cat 5e Cat 6 or Cat 7 cable 3 On N22H set the Source Switch 6 to C A S T and connect your headphones to the Headphone Output 2 i If using battery power the unit will power on automatically when headphones are connected ii If using mains power N22H powers on automatical...
Page 32: ...ect the outputs of N22 to the inputs of your recording device i Output 1 Camden EC2 s Channel 1 output ii Output 2 Camden EC2 s Channel 2 output 9 Connect the outputs of your recording device to N22 s inputs These connections are sent through C A S T and to Camden EC2 s Aux In C A S T level control i Input 1 Camden EC2 s Aux Input L ii Input 2 Camden EC2 s Aux Input R You can then send a click tra...
Page 33: ...for monitoring and mixing 1 Connect the stereo outputs of your desired audio interface into Camden EC2 s Aux Inputs R8 2 Connect Camden EC2 s C A S T Output R9 to N22 s C A S T Input using a shielded Cat 5e Cat 6 or Cat 7 cable 3 Connect the stereo outputs of your external source to N22 s inputs i Any balanced Line level sources can be connected to N22 via jack or XLR 4 Connect your headphones to ...
Page 34: ...to a single mono output on a true stereo output if required using a simple N22 passive breakout box This hardware setup diagram will get N22 connected to a Camden EC2 in a C A S T enabled system for advanced submixing and summing during and recording Submixing 2 to 1 1 Connect N22 s C A S T Output to the C A S T Input on Camden EC2 R1 using a shielded Cat 5e Cat 6 or Cat 7 cable i Note A fully shi...
Page 35: ... s Aux 1 Mixer for redundant recording If you engage the Stereo Pan Switch F15 Channel 1 and 2 on Camden EC2 will be sent to Outputs 1 and 2 on the connected N22 Submixing 4 to 1 After you have followed the steps above to submix 2 channels into 1 you can also add another stereo source to the system that will allow you to submix 4 channels into a single output if desired 1 Connect a stereo source t...
Page 36: ...y Response 0 7dB 1 Hz to 1000 kHz Min Gain 0 7dB 1 Hz to 1000 kHz 35dB Gain 1dB 1 5 Hz to 900 kHz 63dB Gain 1dB 5 Hz to 200 kHz Max Gain Phase Shift 2 75 20Hz to 20kHz 40dB Gain 4 20Hz to 20kHz 63dB Gain 6 20Hz to 20kHz Max Gain THD N 0 00025 1kHz 35dB Gain 24dBu out Intermodulation DIstortion 0 0006 50Hz and 7kHz 35dB gain 20dBu out 0 0005 50Hz and 7kHz 35dB gain 15dBu out Hi Pass Filter HPF 80Hz...
Page 37: ...s 1kHz Dynamic Range 114 5dB A weighted AES17 method 20Hz 20kHz 300 Ohm load Noise Floor 93 5dBu A weighted 20Hz 20kHz 300 Ohm load Power AC Requirements 100V 240V AC 50 60 Hz Total Power Consumption 24v 1 25A DC 30W Environmental Operating Temperature 1 to 35 degrees Celsius Storage Conditions 20 to 50 degrees Celsius Dims Weights Unit Width 481mm 19 Rackmount Height 44 45mm 1 75 1u Depth 240mm 9...
Page 38: ...Camden EC2 User Manual Page 38 2020 Cranborne Audio Ltd ...
Page 39: ...sed for long periods of time Refer all servicing to qualified service personnel Servicing is required when the apparatus has been damaged in any way such as power supply cord or plug is damaged liquid has been spilled or objects have fallen into the apparatus the apparatus has been exposed to rain or moisture does not operate normally or has been dropped Do NOT modify this unit altercations may af...
Page 40: ...nnel When servicing disconnect all power sources before removing any panels CE Certification This unit is CE compliant Note that any cables supplied with Cranborne Audio equipment may be fitted with ferrite rings at each end This is to comply with the current regulations and these ferrites should not be removed FCC Certification Do not modify this unit This product when installed as indicated in t...
Page 41: ...here may be some potential safety hazard if the apparatus is operated at altitude exceeding 2000m Evaluation of apparatus based on the temperate climate conditions only There may be some potential safety hazard if the apparatus is operated in tropical climate conditions Electromagnetic Compatibility EN 55032 2015 Class B EN 55016 2 1 2009 A1 2011 EN 55016 2 3 2010 A1 2010 EN 55035 2017 EN 61000 4 ...