background image

Summary of Contents for EZ3 917.271111

Page 1: ...271111 Safety Assembly Operation Maintenance Repair Parts CAUTION Read and follow all Safety Rules and Instructions before operating this equip ment For answersto yourquestions about thisproduct Call 1 800 659 5917 Sears Craftsman Help Line 5 am 5 pm Mon Sat Sears Roebuck and Co Hoffman Estates IL 60179 ...

Page 2: ...rranty service on your Craftsman riding equipment is available at no charge for 30 days from the date of purchase Please contact your nearest service center After 30 days from the date of purchase warranty service is available by taking your Craftsman dding equip ment to your nearest Sears Service Center In home warranty service will still be avail able after 30 days from the date of purchase but ...

Page 3: ... denly turn over if a wheel is over the edge of a cliff or ditch or if an edge caves in Do not mow on wet grass Reduced traction could cause sliding Do nottry to stabilize the machine by putting your foot on the ground Do not use grass catcher on steep slopes CHILDREN Tragic accidents can occur if the operator is not alert to the presence of children Children are often attracted to the machine and...

Page 4: ...ful care of another responsible adult Be alert and turn machine off if children enter the area Before and when backing look behind and down for small children Mow up and down slopes 15 Max not across Remove obstacles such as recks tree limbs etc Watch for holes ruts or bumps Uneven terrain could overturn the machine Tall grass can hide obstacles Use slow speed Choose a low gear so that you will no...

Page 5: ...ble you to assemble and maintain your tractor properly Always observe the SAFETY RULES MAINTENANCE AGREEMENT A Sears Maintenance Agreement is avail able on this product Contact your nearest Sears store for details CUSTOMER RESPONSIBILITIES Read and observe the safety rules Follow a regular schedule in maintain ing caring for and using your tractor Follow the instructions under Mainte nance and Sto...

Page 6: ...own full size 1 Hex Bolt 5 16 18 x 1 1 4 1 Hex Bolt 3 8 16 x 1 1 Lockwasher 3 8 1 Locknut 5 16 18 1 Knob 1 Washer 17 32 x 1 3 16 x 12 Gauge 1 Shoulder Bolt 5 16 18 2 Washers 3 16 x 3 4x 16 Gauge _ 10 x 5 8 2 Weld Nuts 10 _ 2 Lock Washers 10 6 ...

Page 7: ...Parts Bag Steering Wheel 2 Shoulder Bolts _ 2 Center lockNuts 2 Washers 3 8 x 7 8 x 14 Gauge Parts Bag contents not shown full size Slope Sheet _ _ Steering Wheel 2 Keys Insert ___ I I I 2 Latch Hook Steering I_ Assemblies Extension II _ Shaft iIM 2 Gauge Steering Wheel Iol Wheels Adapter I 1 7 ...

Page 8: ...HAFT AND BOOT Slide extension shaft onto lower steer ing shaft Align mounting holes in exten sion and lower shafts and install 5 16 hex bolt and Iocknut Tighten securely IMPORTANT Tighten bolt and nut secure ly to 18 22 ft Ibs torque Place tabs of steering beet over tab slots in dash and push down to secure INSTALL STEERING WHEEL Position front wheels of the tractor so they are pointing straight f...

Page 9: ...inal INSTALL SEAT Adjust seat before tightening adjustment knob Remove cardboard packing on seat pan Place seat on seat pan and assemble shoulder bolt Tighten shoulder bolt securely Assemble adjustment knob and flat washer loosely Do not tighten Lower seat into operating positionand sit on seat Slide seat untila comfortable position is reached which allowsyou to press clutch brake pedal all the wa...

Page 10: ...all two latch hooks to mulcher plate using screw washer lock washer and weld nut as shown NOTE Pre assemble weld nut to latch hook by inserting weld nut from the top with hook pointing down Tighten hardware securely Raise and hold deflector shield in up right position Place front of mulcher plate over front of mower deck opening and slide into place as shown Hook front latch into hole on front of ...

Page 11: ...TISFAC TION FROM THIS QUALITY PRODUCT Please review the following checklist All assembly instructions have been completed No remaining loose parts in carton Battery is properly prepared and charged Minimum 1 hour at 6 amps Seat is adjusted comfortably and tight ened securely All tires are properly inflated For ship ping purposes the tires were overinflat ed at the factory Be sure mower deck is pro...

Page 12: ...F REVERSE FORWARD FAST SLOW OIL PRESSURE LIGHTS ON OVER TEMP LIGHT FUEL CHOKE MOWER HEIGHT PARKING BRAKE UNLOCKED MOWER LIFT LOCKED R N H L ATTACHMENT REVERSE NEUTRAL HIGH LOW PARKING BRAKE CLUTCH ENGAGED KEEP AREA CLEAR SLOPE HAZARDS ATTACHMENT IGNITION CLUTCH DISENGAGED SEE SAFETY RULES SECTION V DANGER KEEP HANDS AND FEET AWAY FREE WHEEL Automatic Models only 12 ...

Page 13: ...Used to engage the mower blades or other attach ments mounted to your tl actor LIGHT SWITCH Turns the headlights on and off THROTTLE CHOKE CONTROL Used to control engine speed CLUTCH BRAKE PEDAL Used for declutching and braking the tractor and starting the engine HEIGHT ADJUSTMENT KNOB Used to adjust the mower cutting height GEARSHIFT LEVER Selects the speed and direction of the tractor ATTACHMENT...

Page 14: ...prevent unauthorized use Never use choke to stop engine IMPORTANT Leaving the ignition switch in any position other than OFF will cause the battery to be discharged dead NOTE Under certain conditions when tractor is standing idle with the engine run ning hot engine exhaust gases may cause browning of grass To eliminate this possibility always stop engine when stopping tractor on grass areas _ CAUT...

Page 15: ... 1st gear Be sure you have allowed room for tractor to rollslightlyas you restart movement To restart movement slowlyrelease parking brake and clutch brake pedal Make all turns slowly TO TRANSPORT Raise attachment lift to highest position with attachment lift control When pushing or towing your tractor be sure gearshift lever is in neutral N position Do not push or tow tractor at more than five 5 ...

Page 16: ...t on seat in operating position depress clutch brake pedal and set parking brake Place gear shift lever in neutral N posi tion Move attachment clutch to DISEN GAGED position Move throttle control to choke position NOTE Before starting read the warm and cold starting procedures below Insert key into ignition and tum key clockwise to START position and release key as soon as engine starts Do not run...

Page 17: ...n operating attachments select a ground speed that will suit the terrain and give best performance of the at tachment being used MULCHING MOWING TIPS IMPORTANT For best performance keep mower housing free of built up grass and trash Clean after each use The special mulching blade will recut the grass clipping_l 0any times and reduce them in si_e So that as they fall onto the lawn they will dispers...

Page 18: ...S The warranty on this tractor does not cover items that have been subjected to operator abuse or negligence To receive full value from the warranty operator must maintain tractor as instructed in this manual Some adjustments will need to be made periodi cally to properly maintain your tractor All adjustments in the Service and Adjustments section of this manual should be checked at least once eac...

Page 19: ...ve hex bolt lock washer and flat washer securing blade Install new or resharpened blade with trailing edge up towards deck as shown IMPORTANT To ensure proper assembly center hole in blade must align with star on mandrel assembly Reassemble hex bolt lock washer and flat washer in exact order as shown Tighten bolt securely 27 35 Ft Lbs torque IMPORTANT Blade bolt is grade 8 heat treated MandrelAsse...

Page 20: ...erature range expected before oil change All oil must meet API service classification SF SG or SH Be sure tracto is on level surface Oil will drain more freely when warm Catch oil in a suitable container Remove oil fill cap dipstick Be careful not to allow dirt to enter the engine when changing oil Remove drain plug After oil has drained completely replace oil drain plug and tighten securely Refil...

Page 21: ...the tractor is used more than 100 hours in one year Drain oil from engine crankcase See TO CHANGE ENGINE OIL in this sec tion of this manual through step remove drain plug Remove oil filter and wipe off filter adapter Apply a thin coating of new engine oil to the rubber gasket on replacement oil fil ter Install replacement oil filter on filter adapter Tum oil filter clockwise until rubbdr gasket c...

Page 22: ...ment other than the mower deck is to be mounted on the tractor remove the front links TO INSTALL MOWER Raise attachment lift lever to its highest position Slide mower under tractor with dis charge guard to right side of tractor Lower lift lever to its lowest position Install mower in reverse order of removal instructions Retainer Spring Engine Pulley Front Link Retainer Spdn_ Retainer Springs Both...

Page 23: ...oth front links an equal number of turns When distance D is 1 8 to 1 2 lower at front than rear tighten nut P against trunnion on beth front links Recheck side to side adjustment _ o _ ool Mandrel o o o Both Front Links Should be Equal in Length Nut E Front Links Trunnion TO REPLACE MOWER BLADE DRIVE BELT The mower blade drive bell may be replaced without tools Park the tractor on level surface En...

Page 24: ...l and reassemble per instructions in the Assembly section of this manual FRONT WHEEL TOE IN CAMBER The front wheel toe in and Camber are not adjustable on your tractor If damage has occurred to affect the front wheel toe in or camber contact your nearest authorized service center TO REMOVE WHEEL FOR REPAIRS Block up axle securely Remove axle cover retaining ring and washers to allow wheel removal ...

Page 25: ...ter Positive Negative Terminal Terminal REPLACING BATTERY _ CAUTION Do not short battery termi nals by allowing a wrench or any other object to contact both terminals at the same time Before connecting battery remove metal bracelets wristwatch bands rings etc Positive terminal must be connected first to prevent sparking from accidental grounding Lift seat pan to raised positionand open battery box...

Page 26: ...nee tie is turned in too tight NOTE The carburetor on this engine is low emission It is equipped with an idle fuel adjusting needle with a lim ter cap which allows some adjustment within the limits allowed by the cap Do not attempt to remove the limiter cap The limiter cap cannot be removed without breaking the adjusting needle Be sure you have a clean air filter and the throttle control cable is ...

Page 27: ... system parts such as carburetor fuel filter fuel hose or tank during storage Also experience indicates that alcohol blended fuels called gasohol or using ethanol or methanol can attract moisture which leads to separation and formation of acids during storage 27 Acidic gas can damage the fuel system of an engine while in storage Drain the fuel tank Start the engine and let it run until the fuel li...

Page 28: ...d battery termi nals CORRECTION Fill fuel tank See TO START ENGINE in Operation section Wait several minutes before attempting to start Replace spark plug Clean replace air filter Replace fuel filter Drain fuel tank and carbure tor refill tank with fresh gasoline and replace fuel fil ter Check all wiring See To Adjust Carburetor in Service and Adjustments section Contact an authorized ser vice cen...

Page 29: ... trash under mower Bent blade mandrel Clogged mower deck vent holes from buildup of CORRECTION Check replace solenoid or starter Set in Higher Cut posi tion reduce speed Adjust throttle control Clean underside of mower housing Clean replace air filter Check oil level change oil Clean and regap or change spark plug Replace fuel filter Drain fuel tank and refill with fresh gasoline Drain fuel tank a...

Page 30: ... or damaged wiring Blown fuse Bad battery cell s P_oorcable connections Faulty regulator if so equipped Faulty altemator Engine throttle control not set at SLOW positionfor 30 seconds before stopping engine CORRECTION Remove obstruction Replace mower drive belt Replace idler pulley Replace blade mandrel Place throttle control in FAST position Shift to slower speed Allow grass to dry before mowing ...

Page 31: ...RELAY 2 _ SPARK IGNIT_N _ PLUG UNIT GAP 2 PLUGS ON TWINCYL ENGINES OPERATOR PRESENCE RELAY 3 185 86 t HEADLIGHTS IGNmON SlW TCH I t I j WIRING INSULATED CLIPS NOTE IF WIRING INSULATED CLIPS WERE REMOVED FOR SERVICING OF UNIT THEY SHOULD BE REPLACED TO PROPERLY SECURE YOUR WIRING NON REMOVABLE CONNECTIONS O REMOVABLE CONNECTIONS RELAy 31 ...

Page 32: ...ELECTRICAL TRACTOR MODEL NUMBER 917 271111 26 I I I k I q6 32 ...

Page 33: ...ch Hinge Switch InterlockN OPNJN OPN Washer Lock 1 4 Nut Hex Jam 1 4 20 UNC Hamass LightSocket w 4152J LightBulb Cable Battery 6 Gauge Red 11 Cable Battery 6 Gauge Red W16 Wire Fuse 30 Amp Nut KepsHex 1 4 20 Uric Cable Ground 6 Gauge Black 12 Switch PlungerNormalOP Olive Switch Ignition4 Position Nut Ignition Cover IgnitionSwitch Key Molded Craftsman Harness Ignition BoltBIk FinHex 1 4 20 UNC x 1 ...

Page 34: ...TRACTOR MODEL NUMBER 917 271111 CHASSIS AND ENCLOSURES 28 58 12 53 54 40 _3 37 55 34 ...

Page 35: ...rriage 3 8 16 x 3 4 Panel Dash LH Clip RnnermanGdlleP L Panel Dash RH Screw Tnd Roll 3 6 16x 1 2 HoodAssembly Bumber Hood Washer 13 32 x 13 16 x 12 Gauge Locknut Grinew CUpsMS 558 Lens Grille Fender FootrestPntSTLT N Hold 558 Bracket Fender Support Screw Tndrol 5 16 18 x 1 2 PivotBracketAssembly LH PivotBracketAssembly RH NutLock w Insert 1 4 20 UNC Washer 9 32 x 718x 16 Gauge Bracket GrillePickof...

Page 36: ...TRACTOR MODEL NUMBER 917 271111 GROUND DRIVE IO 21 t _26 1 58 18 113 6 32 61 62 34 p_50 148 27i_ o 4 26 27 36 ...

Page 37: ...Keeper Belt Idler 113 127285X 42 19131312 Washer 13 32 x 13 16x 12 Gauge 116 72110610 47 127783 Pulley Idler V Groove Plastic 145 74490540 48 154407 BellcrankClutchGmdDntStl 148 159103 49 123205X Retainer Belt 149 122052X 50 STD523715 Bolt 150 150935 51 STD541437 Nut CrownLock 3 8 16 UNC 151 19133210 52 STD541431 Nut CrownLock 5 16 18 UNC 53 105710 Unk Clutch 55 105709X Spring Clutch Return DESCRI...

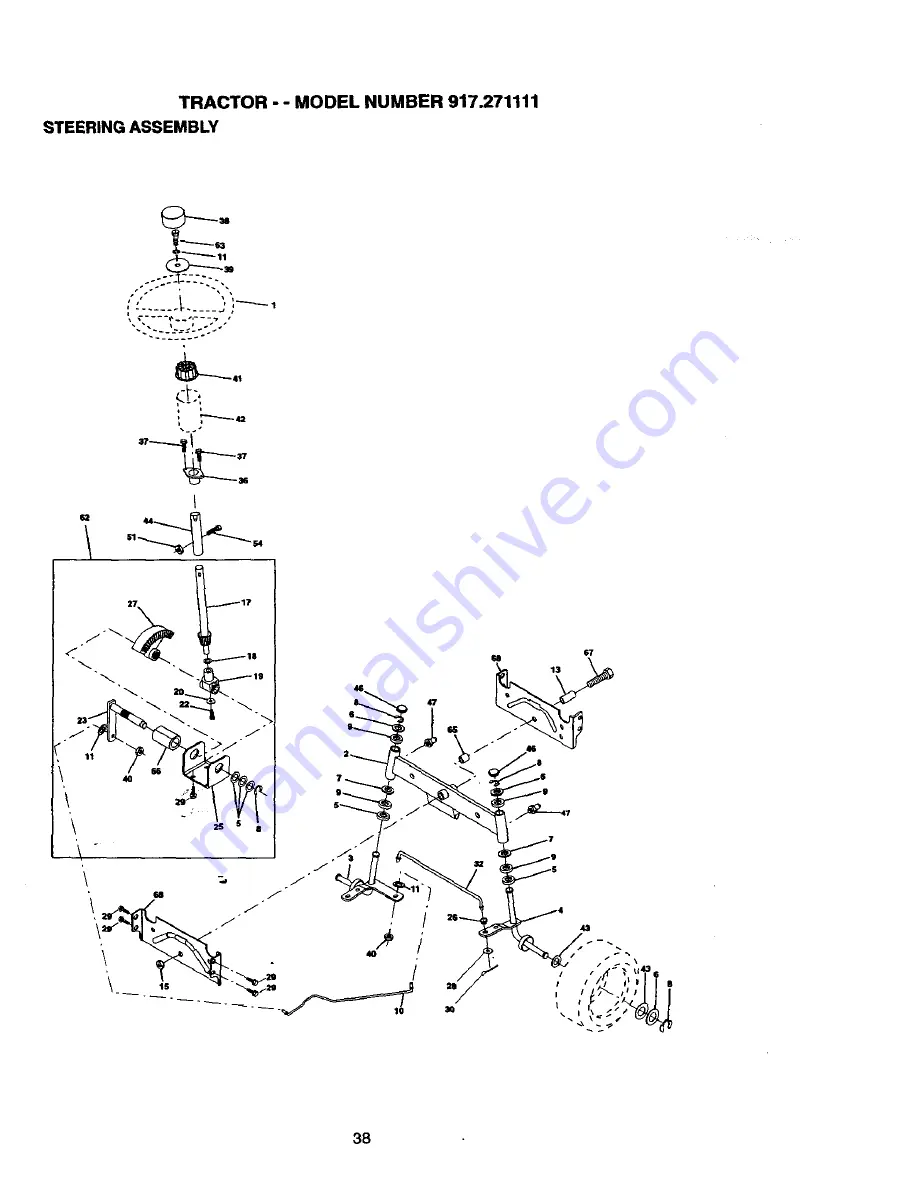
Page 38: ...TRACTOR MODEL NUMBER 917 271111 STEERING ASSEMBLY 63 s _ J _ I i_1 44 3B ...

Page 39: ... StrgBIk Dmglink ExtendedStamped Washer Lock Hvy Hlcl Spr 3 8 Basring Axle STLT GT Locknut Flange 5 8 11 UNC Shaft Asm Strg Private Label Washer Thrust 515 x 750 x 033 Support Shaft Washer Shim 1 4 x 5 8 x 062 Screw Hex Socket lid 1 4 20 x 5 8 Shaft Asm Pittman Bracket Steering Bushing Rod Re BIkLt Gear Sector Washer 13 32 x 7 8 x 16ga Screw Thdrol3 8 16x3 4 Ty tt Pin Cotter 1 8 x 3 4 Cad Rod ReWi...

Page 40: ...ENGINE TRACTOR MODEL NUMBER 917 271111 I I OPTIONAL EQUIPMENT Spark Arrester 8O 23 4O ...

Page 41: ...kdown KohlerModelNo CV16 43513 Muffler Gasket KohlerCV13 CV16 5 Nipple Pipe3 8 NPT x 3 1 2 Elbow Std 90 Degree 3 8 18 Npt Washer Shield BRNJDBRGuard Arrestor Spark Tank Fuel Cap Assembly FuelTank Vented Clamp Hose BIk Screw Thdrol5 16 18 x 3 4 TYT Line Fuel PlugOil Drain Order From EngineManufacturer Bushing Snap Fuel Line Screw Hex Washer Head Thd Roll 1 4 20 x 3 4 Washer 9 32 x 7 8 x 16 Gauge Wa...

Page 42: ...w Thdrol3 6 16 X 1 Ty tt Washer 13 32 X 1 X14Ga Pan Pnt Seat blk Knob Seat Adj Wingnut KEY PART NO NO DESCRIPTION 12 121246X 13 121248X 14 72050412 15 134300 16 121250X 17 123976X 21 153236 22 STD541431 24 19171912 25 127018X BracketPnt MountingSwitch BushingSnap BIk Ny150 Id BoltRdhd ShtNk 1 4o20X1 1 2 Spacer Split28 X 96 Zinc SpringCprsn 1 27 BIkPnt Nut Lock1 4 Lge FigGr 5 Zinc BoltShoulder5 16 ...

Page 43: ...Belt Ddve Schematic Decal V Belt Schematic Decal BetteP Dngr Psn Eng Decal Batte_ Diehard Sears Decal LiftHandle Pad FootrestLH STLT Pad FootrestRH STLT Owner sManual English Owner s Manual Spanish WHEELS TIRES 7 4 10 11 KEY PART NO NO DESCRIPTION 1 59192 Cap ValueTire 2 65139 Stem Value 3 106222X Tire Front 4 59904 Tube FrontTire NotProvided Sewiea Item Only 5 106732X427 Rim Front 6 278H FittingG...

Page 44: ...TRACTOR MODEL NUMBER 917 271111 LIFT ASSEMBLY 25 2423 7 13 5 6 49 3O 3 8 I I 6 5 19 13 i 32 13 19 20 44 ...

Page 45: ...Link Front 16 73350800 NutJam Hex 1 2 13 Unc 17 130171 TrunnionBIkZinc 18 73680800 Nut Crownlock1 2 13 UNC 19 139868 Arm SuspensionRear 20 163552 RetainerSpdng 23 110807X Nut Special 24 19131016 Washer 13 32 x 5 8 x 16 Ga 25 2876H Spring2 1 8 26 76020308 Pin Cotter3 32 x 1 2 27 126971X Rod AdjustLiftZinc 7 49 Wrk 28 73350600 Nut Hex Jam 3 8 16unc 29 138057 Knob Inf 3 8 16uncBIkW Syn 30 150233 Trun...

Page 46: ...TRACTOR MODEL NUMBER 917 271111 MOWER DECK 76 73 71 17 79 58 68 36 _33 32 21 16 21 22 24 26 27 46 ...

Page 47: ... Flat 121 143723 37 STD551037 Washer 13 32 x 13 16 x 16 Gauge 128 153390 40 STD541437 NutCrownlock3 8 16UNC 129 19131312 41 133551 Rod Pivot withNibs 130 STD523710 43 140083 Rod Clutch Secondary withNibs 131 STD533710 44 140088 Guard Mandrel LH 132 19132203 45 STD624003 Retainer 46 137729 Screw Thd Roll 1 4 20 x 5 8 141 6266H 48 133944 Washer Hardened 130794 49 155066 RollerAsserQbly Cam Follower ...

Page 48: ...TRACTOR MODEL NUMBER 917 271111 PEERLESS TRANSAXLE MODEL NUMBER 206 545C 157 d 8 706A 11 150 13 79 29 48 ...

Page 49: ...h 18 786102 Spacer 1 130 X 695 61 778345 Spur Gear 25 teeth 20 792077A Bell 5 16 dia 65 780189 FlatWasher 563 ID x 062W 21 792078 Set Screw 3 8 16 x 3 8 66 776422 InputShaft 22 792079 Spring 310 OD x 625 L 67 776396 Shifter BrakeShaft 25 792073A Screw 1 4 20 x 1 1 4 69 792170 RetainingRing 25A 792177 Screw 1 4 20 x 1 3 8 70 786187 Spacer 890 26 792125 RetainingRing pkgof 2 71 788069 Square Cut Rin...

Page 50: ...TRACTOR MODEL NUMBER 917 271111 KOHLER ENGINE MODEL NUMBER CV16 TYPE NUMBER PS 43513 CYLINOER HEAD VALVE AND BREATHER I 24 7 s S 12 13 14 CRANKCASE I 12 _m_4 5O ...

Page 51: ...l0 Retainer breather reed Reed breather 1 2 3 4 5 6 7 8 9 10 11 12 13 14 15 16 17 18 19 2O 21 22 23 24 12 032 O3 Seal crankshaft Block cylinder Use ShortBlock 12 522 18 12 445 02 M 0839025 12 380 17 12 755 49 12 089 18 12 422 08 12 422 09 12 422 10 12 422 11 12 422 12 12 422 13 12 422 07 12 144 19 12 874 07 12 874 08 12 874 09 12 018 02 12 108 07 12 108 08 12 108 09 12 067 05 12 067 06 12 380 01 1...

Page 52: ...TRACTOR MODEL NUMBER 917 271111 KOHLER ENGINE MODEL NUMBER CV16 TYPE NUMBER PS 43513 IGNITION ELECTRICAL I _ 4 ll 20 1 is _ 4 _t BLOWER HOUSING AND BAFFLES I 4 I s _i II t 6 52 ...

Page 53: ...D 25 515 29 Lead 25 518 05 Lead 12 175 31 Harness X 25 5 Washer plain5 16 12 155 02 Connector KEY PART NO NO DESCRIPTION 1 M 0545010 2 24 468 10 3 12 146 07 4 M 0645020 5 24 096 05 6 220534 7 12 027 54 8 12 063 05 9 25 154 02 10 SM 0545020 11 M 0645016 12 12 063 08 13 12 063 01 Screw hex flange M5x0 8xl0 8 Washer plain 1 4 Plate blower housing Screw hex flange M6xl 0x20 Cover pinion Washer plain 5...

Page 54: ...TRACTOR MODEL NUMBER 917 271111 KOHLER ENGINE MODEL NUMBER CV16 TYPE NUMBER PS 43513 STARTING SYSTEM I 0 3 o O ENGINE CONTROLS I 54 ...

Page 55: ... oil fillcap Includes3 O Ring oil fillcap O Ring upperoilfilltube Tube oilfill Screw hex flangeM5x0 8x20 O Ring loweroil filltube Screen oilpickup Cover oilpickupscreen Screw hex flange MSxO 8x16 Valve oil pressurerelief Plug pipe Filter oil Plug sq hal solid3 8 Pump oil assembly O Ring oilpump cover Cover oil pump Screw hex flange M5xO 8x16 3 Seal oil RTO end Screw hex flange M8x1 25x45 11 Screw ...

Page 56: ...TRACTOR MODEL NUMBER 917 271111 KOHLER ENGINE MODEL NUMBER CV16 TYPE NUMBER PS 43513 CRANKSHAFT 2 B1 FUEL SYSTEM I 56 ...

Page 57: ... 8 qty 1 Gasket air cleaner Carburetorassembly For informationonly not available separately Gasket carburetor 2 Deflector heat Clamp hose 2 Line fuel 12 Filter fuel Kit fuel pump w gaskets Includes 16 18 Sleeve insulating Kit float Kit carburetorrepair Gasket carburetor Gasket air cleaner Gasket bowl Gasket bowl screw Seal solenoid Kit solenoid Gasket bowl screw CRANKSHAFT KEY PART NO NO 1 12 014 ...

Page 58: ...58 ...

Page 59: ...DE ONLY RIDE UP AND DOWN HILL NOT ACROSS HILL _n _D i Operate your Tractor up and down the face of slopes not I greater than 15 never across the face Make turns gradu I ally to prevent tipping or loss of control Exercise extreme caution when changing direction on slopes ...

Page 60: ... reparaci6n a domicilio 1 800 676 5811 For the location of a Sears Parts and Repair Center in your area Call 24 hours a day 7 days a week 1 800 488 1222 For information on purchasing a Sears Maintenance Agreement or to inquire about an existing Agreement Call 9 am 5 pm Monday Saturday 1 800 827 6655 n n i mmmmmm When requesting servic e or ordering parts always provide the following information Pr...

Reviews: