8
ASSEMBLY
Assembly
INSPECT STANDS BEFORE EACH USE.
DO NOT USE IF BENT, BROKEN OR
CRACKED COMPONENTS ARE NOTED.
ENSURE THAT ALL PARTS MOVE FREELY.
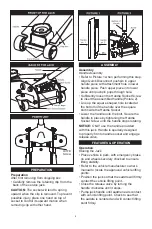
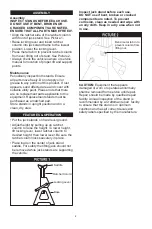
• Align the ratchet side of the ratchet column
with front of jack stand. See Picture 1.
• Raise locking lever and insert ratchet
column into jack stand frame to the lowest
position. Lower the locking lever.
• Press metal tab in to prevent ratchet column
from ever lifting out of stand. See Picture 2.
• Always check the vehicle owners or service
manual for location of proper lift and support
points.
Maintenance
Periodically inspect both stands. Ensure
all parts move freely. Do not apply oil or
grease to any portion of this product. If rust
appears, sand affected area and cover with
suitable utility paint. Please note that there
are no replacement parts applicable to this
equipment. Replacement stands must be
purchased as a matched pair.
Store stands in upright position and in a
clean, dry area.
Inspect jack stand before each use.
DO NOT use if bent, broken or cracked
components are noted. To prevent
corrosion, clean as needed and wipe with
an oily cloth. Keep in a dry area when not
in use.
CAUTION:
Equipment that appears
damaged or worn or operates abnormally
shall be removed from service until repair.
Repair should be made by qualified repair
facility. Annual inspection of the stand is
recommended by a Craftsman repair facility
to ensure that the stand is in optimum
condition and has all correct decals and
safety labels specified by the manufacture
• Put the jack stands on hard level ground.
• Adjust height by pulling up on ratchet
column to raise the height. To lower height,
lift locking lever, lower ratchet column to
desired height, then lower lever. Be sure the
ratchet column locks securely in place.
• Place load on the center of jack stand
saddle. For safety the lifting jack should not
be removed while jack stands are supporting
the vehicle.
FEATURES & OPERATION
Saddle
Ratchet Column
Locking Lever
Base
Bend metal tab in to
prevent column from
lifting out.
Summary of Contents for 48181
Page 11: ...11 NOTE ...


