background image

2

SAFETY INSTRUCTIONS

GENERAL OPERATION

• 

Read, understand, and follow all instructions on the machine and in the 

manual(s) before attempting to assemble and operate. Keep this manual in a 

safe place for future and regular reference and for ordering replacement parts. 

• 

Be familiar with all controls and their proper operation. Know how to stop 

the machine and disengage them quickly.

• 

Never allow children under 14 years of age to operate this machine. Children 

14 and over should read and understand the instructions and safe operation 

practices in this manual and on the machine and should be trained and 

supervised by an adult. 

• 

Never allow adults to operate this machine without proper instruction. 

• 

To help avoid blade contact or a thrown object injury, keep bystanders, 

helpers, children and pets at least 75 feet from the machine while it is in 

operation. Stop machine if anyone enters the area.

• 

Thoroughly inspect the area where the equipment is to be used. Remove 

all stones, sticks, wire, bones, toys, and other foreign objects which could 

be picked up and thrown by the blade(s). Thrown objects can cause serious 

personal injury. 

• 

Plan your mowing pattern to avoid discharge of material toward roads, 

sidewalks, bystanders and the like. Also, avoid discharging material against 

a wall or obstruction which may cause discharged material to ricochet back 

toward the operator. 

• 

Always wear safety glasses or safety goggles during operation and while 

performing an adjustment or repair to protect your eyes. Thrown objects 

which ricochet can cause serious injury to the eyes. 

• 

Wear sturdy, rough-soled work shoes and close-fitting slacks and shirts. 

Loose fitting clothes and jewelry can be caught in movable parts. Never 

operate this machine in bare feet or sandals. 

• 

Be aware of the mower and attachment discharge direction and do not point 

it at anyone. Do not operate the mower without the discharge cover or entire 

grass catcher in its proper place.

• 

Do not put hands or feet near rotating parts or under the cutting deck. 

Contact with the blade(s) can amputate hands and feet.

• 

A missing or damaged discharge cover can cause blade contact or thrown 

object injuries. 

• 

Stop the blade(s) when crossing gravel drives, walks, or roads and while not 

cutting grass. 

• 

Watch for traffic when operating near or crossing roadways. This machine is 

not intended for use on any public roadway. 

• 

Do not operate the machine while under the influence of alcohol or drugs. 

• 

Mow only in daylight or good artificial light.

• 

Never carry passengers.

• 

Back up slowly. Always look down and behind before and while backing 

to avoid a back-over accident. Be aware and pay attention to the safety 

system function that stops power to the  blades when driving in reverse. 

If not functioning properly, contact an authorized dealer for safety system 

inspection and repair. 

• 

Slow down before turning. Operate the machine smoothly. Avoid erratic 

operation and excessive speed.

• 

Disengage blade(s), set parking brake, stop engine and wait until the 

blade(s) come to a complete stop before removing grass catcher, emptying 

grass, unclogging chute, removing any grass or debris, or making any 

adjustments. 

• 

Never leave a running machine unattended. Always turn off blade(s), place 

drive control levers  in neutral, set parking brake, stop engine and remove 

key before dismounting.

• 

Use extra care when loading or unloading the machine into a trailer or truck. 

This machine should not be driven up or down ramp(s), because the machine 

could tip over, causing serious personal injury. The machine must be pushed 

manually on ramp(s) to load or unload properly.

• 

Muffler and engine become hot and can cause a burn. Do not touch.

• 

Check overhead clearances carefully before driving under low hanging tree 

branches, wires, door openings etc., where the operator may be struck or 

pulled from the machine, which could result in serious injury.

• 

Disengage all attachment clutches, set the parking brake to the ‘on’ position 

and move the  RH and LH drive control levers to the neutral position before 

attempting to start the engine.

 WARNING

This symbol points out important safety instructions which, if not 
followed, could endanger the personal safety and/or property of 
yourself and others. Read and follow all instructions in this manual 
before attempting to operate this machine. Failure to comply with these 
instructions may result in personal injury. When you see this symbol, HEED 
ITS WARNING!

 WARNING

CALIFORNIA PROPOSITION 65

Engine Exhaust, some of its constituents, and certain vehicle components 
contain or emit chemicals known to State of California to cause cancer and 
birth defects or other reproductive harm. 
Battery posts, terminals, and related accessories contain lead and lead 
compounds, chemicals known to the State of California to cause cancer and 
reproductive harm. Wash hands after handling.

 DANGER

This machine was built to be operated according to the safe operation 
practices in this manual. As with any type of power equipment, 
carelessness or error on the part of the operator can result in serious injury. 
This machine is capable of amputating fingers, hands, toes and feet and 
throwing debris. Failure to observe the following safety instructions could 
result in serious injury or death.

 WARNING

Your Responsibility

—Restrict the use of this power machine to 

persons who read, understand and follow the warnings and instructions in 
this manual and on the machine. 

SAVE THESE INSTRUCTIONS!

Summary of Contents for 247.20411 SERIES

Page 1: ...ion Hoffman Estates IL 60179 U S A Visit our website www craftsman com CAUTION Before using this equipment read this manual and follow all safety rules and operating instructions 5 6 Safe Operation Practices 2 Slope Gauge 6 Assembly 7 Operation 11 Service and Maintenance 20 Off Season Storage 30 Troubleshooting 31 Español 33 Warranty Service See Separate Supplement NOTE This Operator s Manual cove...

Page 2: ... pay attention to the safety system function that stops power to the blades when driving in reverse If not functioning properly contact an authorized dealer for safety system inspection and repair Slow down before turning Operate the machine smoothly Avoid erratic operation and excessive speed Disengage blade s set parking brake stop engine and wait until the blade s come to a complete stop before...

Page 3: ...opes greater than 5 degrees When going down hill the extra weight tends to push the riding mower and may cause you to loose control e g riding mower may speed up braking and steering ability are reduced attachment may jack knife and cause riding mower to overturn CHILDREN Tragic accidents can occur if the operator is not alert to the presence of children Children are often attracted to the machine...

Page 4: ...ir proper operation regularly After striking a foreign object stop the engine disconnect the spark plug wire s and ground against the engine Thoroughly inspect the machine for any damage Repair the damage before starting and operating Never attempt to make adjustments or repairs to the machine while the engine is running Grass catcher components and the discharge cover are subject to wear and dama...

Page 5: ...R SAFETY DEVICES Keep safety devices guards shields switches etc in place and working WARNING BYSTANDERS Keep bystanders helpers children and pets at least 75 feet from the machine while it is in operation WARNING SLOPE OPERATION Do not operate this machine on a slope greater than 15 degrees Do not mow up and down slopes Mow across slopes no greater than 15 degrees Avoid sudden turns Use low speed...

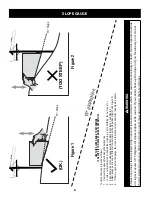
Page 6: ...until the left corner touches the slope See Figure 1 and Figure 2 5 If there is a gap below the gauge the slope is too steep for safe operation See Figure 2 above 1 5 d a s h e d l i n e Figure 2 Figure 1 15 Slope 15 Slope WARNING Slopes are a major factor related to tip over and roll over accidents which can result in severe injury or death Do not operate machine on slopes in excess of 15 degrees...

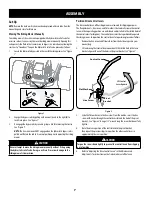
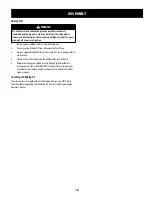
Page 7: ... levers of the riding mower are lowered for shipping purposes The flange lock nuts hex screws and flat washers that normally secure the control levers in their operating position are unfastened and installed in the slotted holes of the control levers for shipment The control levers must be repositioned to operate the riding mower To reposition the control levers for operation proceed as follows 1 ...

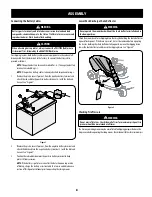
Page 8: ...attach the black cable to the negative battery terminal with the bolt and hex nut See Figure 3 3 Position the red rubber boot over the positive battery terminal to help protect it from corrosion NOTE If the battery is put into service after the date shown on top or side of battery charge the battery as instructed in the Service and Maintenance section of this Operator s Manual prior to operating t...

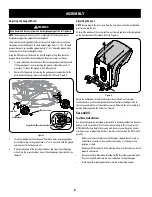
Page 9: ...he index hole of the just adjusted wheel and adjust the other gauge wheels into the respective index holes of the other gauge wheel brackets on the deck Adjusting the Seat NOTE Be sure to push the excess wire from the wire harness into the seat box hole prior to lowering the seat To adjust the position of the seat pivot the seat forward and locate the clamp knobs on the front portion of the seat p...

Page 10: ... 3 Using an approved red GASOLINE container add fuel slowly being careful to avoid spilling 4 Fill the tank until the fuel reaches the bottom of the fuel tank neck 5 Replace the fuel cap and tighten securely Wipe up spilled fuel before starting engine If fuel is spilled DO NOT start engine Move riding mower away from area of spillage Avoid creating any source of ignition until fuel vapors are gone...

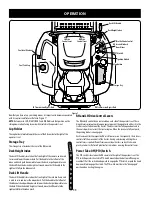
Page 11: ...ht of the seat box frame and is used to raise and lower the mower deck Pullthehandletotheleftoutof theindexnotchandpushdownwardtolowerthedeck orpullupwardtoraise thedeck Whenthedesiredheightisattained movethelifthandletothe rightuntilfullyintheindexnotch RH and LH Drive Control Levers The RH and LH control levers are located on each side of the operator s seat These hinged levers pivot outward to ...

Page 12: ... onto the fuel tank after removing WARNING Never fill the fuel tank when the engine is running If the engine is hot from recently running allow to cool for several minutes before refueling Highly flammable gasoline splashing onto a hot engine could cause a fire LCD Service Minder Hour Meter When the ignition key is rotated out of the STOP position but not into the START position the LCD Service Mi...

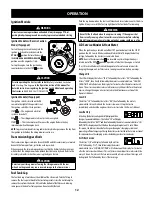
Page 13: ...not fill the fuel tank when the engine is running or while the engine is hot Allow the engine several minutes to cool before refueling Tighten the fuel cap securely CHOKE FAST SLOW Before Operating Your Riding mower Beforeyouoperatetheridingmower studythismanualcarefullytofamiliarize yourselfwiththeoperationofalltheinstrumentsandcontrols Ithasbeen preparedtohelpyouoperateandmaintainyourridingmower...

Page 14: ...rting the Engine Using Jumper Cables To Start Engine WARNING Batteries contain sulfuric acid and produce explosive gasses Make certain the area is well ventilated wear gloves and eye protection and avoid sparks or flames near the battery If the battery charge is not sufficient to crank the engine recharge the battery If a battery charger is unavailable and the riding mower must be started the aid ...

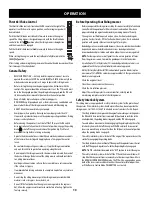
Page 15: ... Driving the Riding mower Forward WARNING Keep all movement of the drive control levers slow and smooth Abrupt movement of the control levers can affect the stability of the riding mower and could cause the riding mower to flip over which may result in serious injury or death to the operator 1 Slowly and evenly move both drive control levers forward The riding mower will start to move forward See ...

Page 16: ... always stop the vehicle before executing a zero turn Driving the Riding mower In Reverse WARNING Always look behind and down on both sides of the riding mower before backing up Always look behind while traveling in the reverse direction 1 Slowly and evenly move both drive control levers rearward The riding mower will start to move in the reverse direction See Figure 13 Neutral Position Slower Fas...

Page 17: ...or in the REVERSE CAUTION MODE Always look down and behind before and while backing Do not operate the tractor when children or others are around Stop the tractor immediately if someone enters the area To use the REVERSE CAUTION MODE NOTE The operator MUST be seated in the tractor seat 1 Start the engine as instructed on the previous page 2 Turn the key from the NORMAL MOWING Green position to the...

Page 18: ...n Slopes Refer to the slope gauge in the Safe Operation Section to help determine slopes where you may not operate safely WARNING Do not operate on inclines with a slope in excess of 15 degrees a rise of approximately 2 1 2 feet every 10 feet The riding mower could overturn and cause serious injury 1 Always drive across slopes never up and down Control the speed and direction of the riding mower u...

Page 19: ...tionthatthe stripsaremowedbyapproximately45 forthenextandeachsubsequentmowing WARNING Be careful when crossing gravel paths or driveways Disengage the PTO and raise the deck to the highest position before crossing NOTE When stopping the riding mower for any reason while on a grass surface always Place the control levers in neutral parking brake on Shut engine off and remove the key Doing so will m...

Page 20: ...e and clean 2 Check and secure Every season Before storage 1 Pivot points 2 Control handle 3 Extension spring 1 Lubricate 2 Lubricate 3 Lubricate After mowing 1 Mower and exhaust area 2 Wear points 1 Clean 2 Lubricate Once Monthly 1 Spindle Pulleys 2 V Belt 1 Clean 2 Clean WARNING Before performing any maintenance or repairs disengage the PTO move the drive control levers fully outward in the neut...

Page 21: ...the oil filter and refill the engine with new oil as instructed in the engine operator s manual 8 To refill the oil re install the plug at the end of the tube and refer to the engine operator s manual for refilling instructions oil type and amount NOTE Maintenance repair or replacement of the emission control devices and systems which are being done at owner s expense may be performed by any engin...

Page 22: ... post marked POS 4 Carefully lift the battery out of the tractor 5 Install the battery by repeating the above steps in the reverse order WARNING Always connect the positive lead to the battery before connecting the negative lead This will prevent sparking or possible injury from an electrical short caused by contacting the riding mower body with tools being used to connect the cables Charging the ...

Page 23: ...Transmission Bypass Rods If for any reason the riding mower will not drive or you wish to move the riding mower the two hydrostatic transmissions are equipped with a bypass rod that will allow you to manually move the riding mower short distances CAUTION Do not tow the riding mower even with the bypass rod engaged Serious transmission damage will result from doing so 1 Locatethehydrostaticbypassro...

Page 24: ...screw at the bottom of the control lever 2 Tighten the hex screw to fix the control lever in the adjusted position 3 Repeat the above procedure to adjust the other control lever into the same position Adjust so that both levers are even with each other when in the neutral position Deck Leveling NOTE Check the tractor s tire pressure before performing any deck leveling adjustments Refer to Tires fo...

Page 25: ...NG Keep hands and feet away from the discharge opening of the cutting deck NOTE The deck gauge wheels are an anti scalp feature of the deck and are not designed to support the weight of the cutting deck The mower deck cutting height can be set in any of six height settings using the riding mower s deck lift handle The deck heights range from 1 1 2 to 4 The deck gauge wheel position should be appro...

Page 26: ...parking brake 2 Move the deck gauge wheels to their highest setting lowest deck setting 3 Remove the V belt from the PTO pulley located on the bottom of the engine using one of the following two methods WARNING The muffler at the rear of the tractor may be extremely hot and could cause serious burns Use extreme caution when near the muffler Allow the muffler to fully cool before removing the belt ...

Page 27: ...k under the tractor on the right side of the tractor lining up the deck hanger brackets and the deck lift arms 3 Once the deck is under the tractor move the deck lift handle to the lowest mowing position NOTE To line the brackets up properly it may be necessary to place a small block of wood under each side of the deck 4 Pull the deck release pins outward and maneuver the deck as necessary to alig...

Page 28: ...nd Figure 36 for 42 Decks Belt Cover Hex Washer Screws Idler Pulley Belt Guard Idler Pulley Idler Arm Figure 35 Hex Washer Screws Idler Pulley Belt Guard Idler Pulley Idler Bracket Belt Guard Belt Cover Figure 36 3 For 54 Decks a Loosen but do not remove the movable idler pulley and belt guard by only loosening the flange lock nut securing the idler pulley to the idler arm See Figure 37 Flange Loc...

Page 29: ...rp at all times Sharpen the cutting edges of the blades evenly so that the blades remain balanced and the same angle of sharpness is maintained If the cutting edge of a blade has already been sharpened many times or if any metal separation is present it is recommended that new blades be installed New blades may be obtained through Sears Parts Repair or by calling 1 888 331 4569 The blades may be r...

Page 30: ... to spread the oil evenly on the cylinder walls Replace the spark plugs 4 Clean the engine and the entire riding mower thoroughly NOTE Use of a pressure washer or garden hose is not recommended to clean your riding mower They may cause damage to electrical components spindles pulleys bearings or the engine The use of water will result in shortened life and reduce serviceability 5 Sharpen the blade...

Page 31: ...Engage parking brake 3 Connect wire to spark plug 4 Place Throttle lever to FAST position 5 Fill tank with clean fresh less than 30 days old gas 6 Replace fuel line See a Sears or other qualified service dealer Replace fuel filter See the Service and Maintenance section 7 Clean adjust gap or replace plug 8 Crank engine with throttle in FAST position 9 Replace fuse Engine runs erratically 1 Riding ...

Page 32: ...ark plug and adjust gap Engine idles poorly 1 Fouled spark plug 2 Dirty air cleaner 1 Replace spark plug and adjust gap 2 Clean or replace air cleaner element and or clean pre cleaner Excessive vibration 1 Cutting blades loose or unbalanced 2 Damaged dull or bent cutting blade 1 Tighten blade and spindle Balance blade 2 Replace blade Uneven cut 1 Deck not leveled properly 2 Dull blade 3 Uneven tir...

Page 33: ...odelos de tractor y la máquina que se ilustra aquí puede diferir de la suya Último dígito del número de modelo varía Para obtener respuestas a sus preguntas acerca de este producto llame al 1 888 331 4569 Atención al Cliente Línea Caliente Este producto tiene un motor de bajas emisiones que funciona de forma diferente de los motores previamente construidas Antes de arrancar el motor lea y comprend...

Page 34: ...cto con las cuchillas o lesiones por objetos arrojados Detener la hoja s cuando atraviese senderos sendas o caminos y aunque no es el corte del césped Cuidado con el tráfico cuando se trabaja cerca de o carreteras Esta máquina no está diseñada para su uso en cualquier vía pública No haga funcionar la máquina bajo la influencia del alcohol o las drogas Corte el césped sólo con luz natural o luz art...

Page 35: ...a PENDIENTE DE LA OPERACIÓN Las pendientes son un factor importante relacionado con la pérdida de control y un accidente de vuelco que puede resultar en lesiones graves o la muerte Todas las pistas requieren mucha precaución Si no se puede retroceder en la pendiente o si se siente seguro no lo corte Para su seguridad use el indicador de pendientes que se incluye como parte de este manual para medi...

Page 36: ...RVICIO El manejo seguro de la gasolina Para evitar lesiones personales o daños materiales de uso extremo cuidado al manipular la gasolina La gasolina es altamente inflamable y sus vapores son explosivos Lesiones personales graves pueden ocurrir cuando la gasolina se ha derramado sobre ti mismo o sobre la ropa que se puede incendiar Lávese la piel y cámbiese de ropa inmediatamente Utilice sólo reci...

Page 37: ...se periódicamente para asegurarse de que las cuchillas se detengan por completo a un plazo aproximado de cinco 5 segundos después de que realice el control de la retirada de la hoja Si las cuchillas no se detienen en el marco de este tiempo ave de su máquina servicio profesional por Sears u otro proveedor calificado Compruebe regularmente el sistema de enclavamiento de seguridad para un funcionami...

Page 38: ...es personales graves ADVERTENCIA ESPECTADORES Mantenga a los observadores ayudantes niños y mascotas alejados al menos 75 pies de la máquina mientras está en funcionamiento ADVERTENCIA OPERACIÓN PENDIENTE No opere esta máquina en una pendiente superior a 15 grados No corte de arriba a abajo laderas Corte el césped a través de pendientes no superiores a 15 grados Evite giros repentinos Utilice baja...

Page 39: ...cia abajo hasta los toques esquina izquierda el pendiente consultar Figura 1 and Figura 2 5 Si hay un espacio por debajo de la pendiente de calibre el pendiente es demasiado escarpa por operación segura consultar Figura 2 above 1 5 l í n e a d i s c o n t i n u a Figura 2 Figura 1 15 Pendiente 15 Pendiente Las pendientes son un factor importante relacionado con un vuelco y renovación de los accide...

Page 40: ... césped se bajan para propósitos de envío Las tuercas de fijación tornillos hexagonales y arandelas planas que normalmente fijan las palancas de control en su posición operativa se aflojan y se instalan en los orificios ranurados de las palancas de control para el envío Las palancas de control deben volver a colocarse para operar la cortadora de césped Para cambiar la posición de las palancas de m...

Page 41: ...zando el perno y la tuerca hexagonal Vea la Figura 3 3 Coloque el capuchón de goma rojo por encima del borne positivo de la batería para protegerlo contra la corrosión NOTA Si la batería se pone en funcionamiento después de la fecha indicada en su parte superior o al costado de la misma cárguela siguiendo las instrucciones de la sección Servicio y mantenimiento de su Manual del Operador antes de u...

Page 42: ...guridad con brida 4 Observe el orificio de posicionamiento de la rueda que acaba de ajustar y ajuste la rueda de calibración trasera en el orificio de posicionamiento respectivo del otro soporte de rueda de calibración de la plataforma Ajuste del asiento NOTA Asegúrese de empujar el exceso de cable del mazo de cables en el orificio de la caja del asiento antes de bajar el asiento Para ajustar la p...

Page 43: ...ado de su césped con Smart Lawn la aplicación con tecnología Bluetooth de Craftsman Sugerencias de mantenimiento seguimiento del tiempo y más todo lo que usted necesita para cuidar del mejor jardín de la manzana lo encuentra ahora en un solo lugar Smart Lawn también le proporciona instrucciones detalladas y tutoriales en video para enseñarle a conservar su tractor cortacésped funcionando correctam...

Page 44: ...bajo para bajar la plataforma o tirar hacia arriba para levantar la plataforma Cuando se alcanza la altura deseada mueva la manija de elevación hacia la derecha hasta que esté completamente en la ranura de índice Manija de elevación de la plataforma Elmangodeelevacióndelaplataformaseencuentraenlapartefrontal derecha delmarcodelasiento yseutilizaparasubirybajarlaplataformadecorte Tire delapalancaal...

Page 45: ...neltanquedecombustibledespuésdelaeliminación ADVERTENCIA Nunca realice la recarga de combustible en el depósito si el motor está en funcionamiento Si el motor está caliente por haber funcionado hasta hace poco déjelo enfriar varios minutos antes de cargar combustible Si gasolina altamente inflamable salpica el motor caliente podría causar un incendio LCD avisador de servicio y medidor horario w Ac...

Page 46: ...eténgase completamente antes de cualquier maniobra de giro cero CHOKE FAST SLOW No detenga ni estacione el tractor cortacésped sobre materiales combustibles tales como pasto u hojas secas desechos etc No llene el tanque de combustible con el motor en funcionamiento o si el mismo está caliente Deje enfriar el motor varios minutos antes de la recarga de combustible Apriete el tapón de combustible co...

Page 47: ...sario para arrancar el motor 6 Deje que el motor funcione unos cuantos minutos a una aceleración intermedia antes de someterlo a la carga Arranque del motor en clima frío Al arrancar el motor a temperaturas cercanas o inferiores al punto de congelamiento asegúrese de que se use aceite de motor de viscosidad correcta y que la batería tenga carga completa Arranque el motor de la siguiente forma 1 As...

Page 48: ...es para ajustar las palancas de manera que queden niveladas 3 Mueva la palanca de control del acelerador estrangulador hacia adelante a la posición FAST velocidad rápida de aceleración máxima NOTA Sibienelmotordeltractorcortacéspedsehadiseñadoparafuncionara máximaaceleración cuandopracticaeltractordebefuncionaramenosdelmáximo Estoseaplicaúnicamentealfuncionamientodelmotordurantelapráctica ADVERTEN...

Page 49: ...nte o hacia atrás entre las dos palancas más cerrado será el giro que dará el tractor cortacésped 4 Para realizar un giro de radio cero mueva la palanca de control del lado de giro a la posición neutra hacia adentro mientras mueve la otra palanca de control hacia adelante NOTA Si se realiza un giro de radio cero mientras el vehículo está en movimiento se aumenta significativamente la posibilidad d...

Page 50: ...el tractor en marcha atrás con las cuchillas PTO enganchadas NOTA No se recomienda cortar el césped en marcha atrás ADVERTENCIA Tenga mucho cuidado cuando opere el tractor en MODO DE PRECAUCIÓN EN MARCHA ATRÁS Siempre mire hacia abajo y hacia atrás antes y mientras está retrocediendo No opere el tractor cuando haya niños u otras personas presentes Detenga el tractor inmediatamente si alguien entra...

Page 51: ...gilancia apague el motor girando la llave de encendido y retírela Operación en pendientes Consulte indicador de pendiente en la Sección Funcionamiento Seguro para determinar en qué pendientes no puede operar el tractor de manera segura ADVERTENCIA No utilice la unidad en pendientes con una inclinación mayor de 15 grados elevación aproximada de 2 1 2 pies cada 10 pies El tractor cortacésped podría ...

Page 52: ...ente 3 pulgadas 8 Oriente el tractor cortacésped en cada franja subsiguiente de modo que se alinee con la franja ya cortada 9 Para evitar la formación de surcos o ranuras en el césped en lo posible varíe la dirección de las franjas de corte aproximadamente 45º en cada corte subsiguiente WARNING Tenga sumo cuidado al atravesar senderos de grava o caminos de acceso Desenganche la toma de fuerza PTO ...

Page 53: ...mponentes 1 Retire y limpie 2 Compruebe y asegure Cada temporada antes de almacenar 1 puntos de giro 2 Palanca de control 3 primavera de Extensión 4 lubricar 5 lubricar 6 lubricar Después de cortar el césped 1 Área Mower y escape 2 Use puntos 1 limpiar 2 lubricar Una vez al mes 1 Las poleas del husillo 2 V Belt 1 limpiar 2 limpiar ADVERTENCIA Antes de realizar tareas de mantenimiento o reparacione...

Page 54: ...relaceite limpiecualquieraceiteresidualdela mangueradedrenajedeaceite Vuelvaacolocareltapóneneltubode descargayaprietecompletamente Vuelvaacolocarlamanguerade drenajedeaceiteenlapinzaycoloquelapinzaparaasegurar d Continue with Step 7 7 Vuelva a colocar el filtro de aceite y cargue el motor con aceite nuevo según las instrucciones del manual de operador del motor NOTA Coloque una toalla absorbente ...

Page 55: ... delgada de grasa o vaselina para protegerlos contra la corrosión Siempre mantenga limpios y libres de corrosión los cables y los bornes de la batería Evite inclinar la batería Hasta una batería sellada pierde electrolito si se la inclina Retiro de la batería ADVERTENCIA Los postes bornes y accesorios de la batería contienen plomo y compuestos de plomo Lávese las manos después de estar en contacto...

Page 56: ...Cuando use el sistema de lavado de la plataforma nunca enganche la plataforma desde otra posición que no sea la del asiento del operador del tractor cortacésped No use un asistente ni enganche la plataforma en presencia de ningún observador 1 Una el adaptador del pico a una manguera de jardín estándar conectada al suministro de agua 2 Desplace el tractor cortacésped a un área al alcance de la mang...

Page 57: ... de control se puede ajustar hacia arriba o hacia abajo y hacia adelante o hacia atrás para la comodidad del operador Las palancas de control se pueden colocar en cualquiera de las dos posiciones de altura y o se pueden mover hacia adelante o hacia atrás dentro de la gama de la ranura en cada brazo inferior Paraajustarlaalturadelapalancadeaccionamiento procedadelasiguientemanera 1 Retire el tornil...

Page 58: ...gura 26 NOTA El enlace de suspensión derecho de la cubierta trasera no es ajustable y se utiliza para ayudar a ajustar los otros enlaces de suspensión 7 Usando una llave levante o baje el lado izquierdo de la plataforma girando el engranaje de ajuste Ver Figura 26 8 La plataforma se encuentra correctamente nivelada cuando las dos mediciones puntas de las cuchillas son iguales Vuelva a apretar el t...

Page 59: ...io de posicionamiento de la rueda que acaba de ajustar y ajuste la rueda de calibración trasera en el orificio de posicionamiento respectivo del otro soporte de rueda de calibración de la plataforma Control de la palanca de la transmisión Ajuste del tope Cuando las palancas de control son a la vez completamente extendidos hacia delante a la posición de máxima velocidad y las derivas del tractor ha...

Page 60: ...a polea del PTO en la parte inferior del motor 5 La rueda de la correa de la polea del PTO a Usando la manija de elevación de la plataforma levante la plataforma a la posición que le ofrece mayor recorrido horizontal de la correa entre las poleas locas de la plataforma y la polea toma de fuerza en la parte inferior del motor b Sentado detrás del tractor mirando hacia adelante por debajo de alcanza...

Page 61: ...o alineado empuje cada pasador totalmente hacia adentro a través de los brazos de elevación para fijar los brazos en las ranuras del soporte de suspensión trasera 6 Vuelva a instalar la barra de elevación de la plataforma delantera y fíjela con el pasador Consulte la Figura 33 7 Asegúrese de que la correa en V se encuentra en las poleas del husillo en la cubierta a continuación la correa hacia atr...

Page 62: ...ra 36 3 Para 54 plataforma a Afloje pero no quite la polea loca móvil y protección de la correa por solo aflojar la tuerca de seguridad con brida de fijación de la polea loca para el brazo tensor Ver Figura 37 Brida Tuerca protector de la correa polea loca Figura 37 b Retire la correa de las poleas del husillo c Instalar la nueva correa alrededor de las poleas del eje como se muestra y vuelva a in...

Page 63: ...ar los bordes de corte de las cuchillas de forma pareja de manera que las cuchillas queden balanceadas y se mantenga el mismo ángulo de nitidez Si el borde de corte de una cuchilla ya ha sido afilado muchas veces o si existe una separación de metal está presente se recomienda que instalar cuchillas nuevas Nuevas hojas se pueden obtener a través de piezas y reparaciones Sears o llamando al 1 888 33...

Page 64: ...Vuelva a colocar las bujías 4 Limpie perfectamente el motor y toda la unidad NOTA No se recomienda el uso de una lavadora de presión ni de una manguera de jardín para limpiar el tractor cortacésped Pueden producir daños a los componentes eléctricos husillos poleas rodamientos o al motor El uso de agua acortará la vida útil de la máquina y reducirá su capacidad de servicio 5 Afile las cuchillas par...

Page 65: ...ST velocidad rápida 5 Llene el depósito con gasolina limpia y nueva que tenga menos de 30 días 6 Vuelva a colocar la línea de combustible Comuníquese con Sears u otro distribuidor de servicio calificado Reemplace el filtro de combustible Consulte el manual del operador del motor 7 Limpie ajuste la separación o cambie la bujía 8 Arranque el motor con el acelerador en posición FAST velocidad rápida ...

Page 66: ...l en marcha lenta 1 La bujía de encendido está sucia 2 El depurador de aire está sucio 1 Extraiga la bujía y regule la separación Consulte el manual del operador del motor 2 Limpie o reemplace el elemento del depurador de aire y o limpie el prefiltro Consulte el manual del operador del motor Vibración excesiva 1 Cuchillas de corte flojas o descentradas 2 Cuchilla dañada desafilada o doblada 1 Apri...

Page 67: ...NOTAS 67 ...

Page 68: ...NOTAS 68 ...

Reviews: