


Page 11
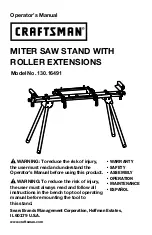
Mounting Non-Standard
Miter Saws
NOTICE:
T
his configuration
allows for miter saws on which
the 4 mounting holes holes form a
trapezoid pattern (some saws) and
the those on which the 3 mounting
holes form atriangular pattern
(few saws).
1. Place the two support bars (C)
on the mounting brackets (B).
Use the support bar mounting
bolts (D), washers (E), spring
washers (H) and locking nuts
(I) to pre-tighten the support
bars (C) on the quick-release
mounting brackets (B)
(Figs. 9 and 10).
2. Position your miter saw with
non-standard mounting holes
on the cross support bars (C).
Check the position and adjust
the support bars slowly so that
the mounting holes on miter
saw are aligned with the slots
on the cross support
bars (Fig. 11).
3. Use the miter saw mounting
bolts (F), washers (G), spring
washers (H) and locking nuts (I)
to securely tighten the saw to
support bars (C).
4. Tighten the locking nuts (I) to
fully tighten the support bar (C).
5. With the miter saw mounted
on the quick-release mounting
brackets (B), place the
assembly onto the work
stand (Fig. 12).
6. Attach the brackets to the
stand. See Installing the
Quick-Release Mounting
Brackets section.
Fig. 9
I
H
E
D
Fig. 10
C
B
Kerf
Fig. 12
Fig. 11
I
H
G
F
C
16491 Manual_Revised_1
-0
Summary of Contents for 130.16491
Page 34: ...Página 34 16491 Manual_Revisado_18 0828 ...
Page 35: ...Página 35 16491 Manual_Revisado_18 0828 ...
Page 36: ......