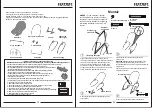
Cross Brace
2 Retainers with Lock Nut
2 Side Rails
Pad
Seat Back Tube
2 Feet
Vibrations Unit
Kickstand
Toy Bar
Button battery
INCLUDED
Battery
NOT INCLUDED
Manual for battery installation
and Notice for battery usage
Find the battery box on top of the vibration device.
Loosen the screw in the cover plate and open it.
Put in 2 1.5V AA alkaline batteries. Cover the plate back and tighten the screws.
If there is abnormal circumstance you may need to reopen power.
Turn off the power source and turn it on again.
Important!
Low battery can cause error: no vibration or fail to turn off. Remove
and dispel batteries and replace them with 2 new 1.5 AA alkaline batteries.
Hint: We recommend alkaline batteries for longer
useful life.
Find the battery box on the toy banister. Loosen the screw in the cover plate and open it.
Dispel used batteries and replace with 3 new alkaline button batteries.
Cover the plate back and tighten the screws.
When voice or light is fading out, adults need to replace the battery.
1. The rocking chair uses two pieces
1.5V "AA" batteries, Sunflower toys
use 3 pieces 1.5V button batteries.
2. How to remove and insert the
batteries
(
Look at the picture on
the right
)
.
3. Non-rechargeable batteries are not
to be recharged.
4. Rechargeable batteries are only to
be charged under adult supervision.
5. Rechargeable batteries are to be
removed from the toy before being
charged.
6. Different types of batteries or new
and used batteries are not to be
mixed.
7. Only batteries of the same or
equivalent type as recommended are
to be used.
8. Batteries are to be inserted with the
correct polarity.
9. Exhausted batteries are to be
removed from the toy.
10. The supply terminals are not to be
short-circuited.
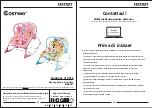
Multi-Function Baby Rocking Chair Operating Instructions
It is strongly recommended to keep the instructions.
Please read the instructions carefully before installation and operafion .
Applicable Age: 0-36months (No heavier than 18kgs)
Pictures on the packaging may be a little different from the real obieck, please keep the real
object in prevail.
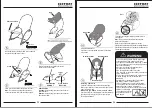
Foot
Side Rail
Assembly
Kickstand
Insert the ends of the kickstand into the socket in each foot.
M5x50 mm screw-2
M5 locknuts-2
Lift the top of the foot to fit the peg into the hole in the side rail.
Hint:
Each foot is designed to fit the side rails one way.
If a foot does not seem to fit, remove it and assemble it to
the other side rail.
Repeat this procedure to assemble the other foot to the
other side rail.
Slide the socket on a foot onto the tapered end of a side rail.
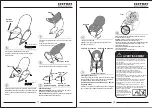
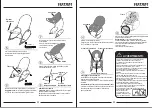
Position each side rail so that the button faces outward.
While pressing the tabs on the ends of the seat back tube,
insert it into the sockets in each side rail,
until the tabs
“Snap”
into place.
Make sure you hear a “snap” on each side.
Pull the seat back tube up to be
sure it is secure in the side rail
sockets.
Seat Back Tube
Side Rail Sockets
Button
Press Tabs
IMPORTANT!
Before assembly and each
use. inspect this product for damaged
hardware, loose joints, missing parts or
sharp edges.
DO NOT ues if any parts are missing or
broken.
M5x32 mm screw-2
M5x50 mm screw-2
M5x42 mm screw-2
M5 locknuts-2
03
04


