background image

Quick Guide 

Live Screen Configuration 

14 

3.2.1


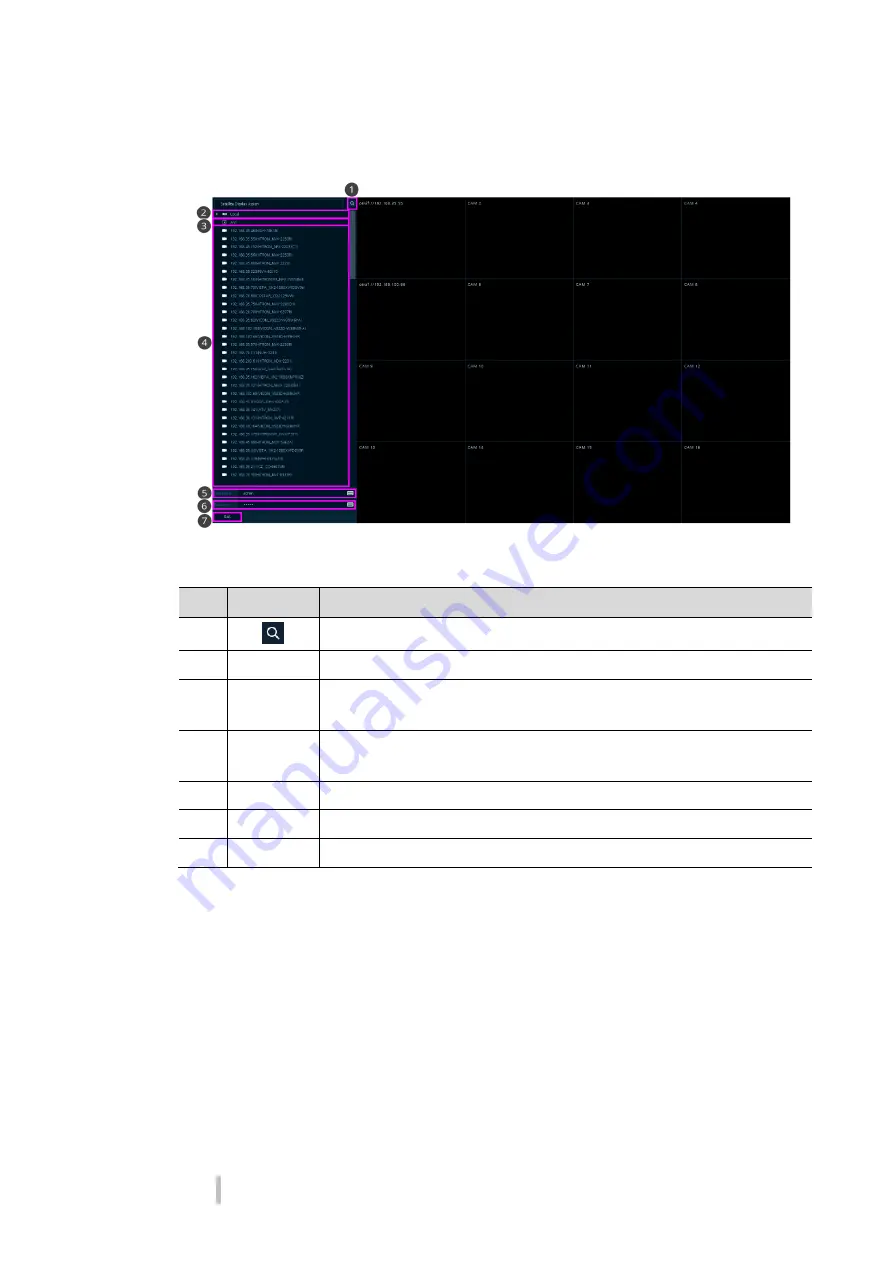
Channel Assign 

Users can assign the channel. 

Figure 3-4    Channel Assign 

Table 3-4    Camera Registration 

No. 

Item 

Description 

Search the device registered. 

Local 

Display registered image list. 

AVI 

Display media file list. Drag & drop the desired media file. 
Drag the screen and drop it on the AVI to unregister the selected media file. 

List 

Displayed registered device list. Drag & drop the desired channel. 
Drag the screen and drop it on the list to unregister the selected channel. 

Username 

Enter the ID of the device. 

Password 

Enter the password of the device. 

Exit 

Close the window after save. 

Summary of Contents for CR16PVM

Page 1: ...Quick Guide 4K Decoder Please read this manual thoroughly before use and keep it handy for future reference ...

Page 2: ...to the presence of dangerous voltage within the products enclosure that may be of sufficient magnitude to constitute a risk of electric shock to persons The exclamation point within an equilateral triangle is intended to alert the user to the presence of important operating and maintenance servicing instructions in the literature accompanying the product CAUTION RISK OF ELECTRIC SHOCK DO NOT OPEN ...

Page 3: ...f not installed and used in accordance with the in struction manual may cause harmful interference to radio communications Operation of this equipment in a residential area is likely to cause harmful in terference in which case the user will be required to correct the interference at his own expense CAUTION Changes or modifications not expressly approved by the party responsible for compliance cou...

Page 4: ...rom the apparatus 11 Only use attachments accessories specified by the manufacturer 12 Use only with the cart stand tripod bracket or table specified by the manufacturer or sold with the apparatus When a cart is used use caution when moving the cart apparatus combination to avoid injury from tip over 13 Unplug this apparatus during lightning storms or when unused for long periods of time 14 Refer ...

Page 5: ... 2 5 Easy Installation Wizard 10 3 Live Screen Configuration 11 3 1 Icons in Live screen 12 3 2 Quick menu 13 3 2 1 Channel Assign 14 4 Setup menu 15 4 1 General buttons in Setup menu 4 2 SYSTEM 4 2 1 System 4 2 2 Time Date 4 2 3 Account User 4 2 4 Configuration Config 4 3 CAMERA 4 3 1 Channel 4 4 DEVICE 4 4 1 Display 4 4 2 Serial Device 4 5 EVENT 4 5 1 Alarm In 4 5 2 Motion 4 5 3 Video Loss 4 6 N...

Page 6: ...uttons in Setup menu 17 5 3 SYSTEM 5 3 1 System 5 3 2 Time Date 5 4 CAMERA 5 4 1 Channel Assign 5 5 DEVICE 5 5 1 Display 5 5 2 External 5 6 EVENT 5 6 1 Alarm In 5 6 2 Motion 5 6 3 Video Loss 5 7 NETWORK 5 7 1 Basic 6 Product Specification ...

Page 7: ...This product is a device that displays images transmitted from an IP camera on monitor The device features include the following Convenient UI from user s viewpoint 16 IP camera input Providing H 264 H 265 compression Support dashboard display 4K resolution support Remote control through a network or local monitor ...

Page 8: ...ide 6 Program CD 1 2 Decoder Description Each part is listed in the below Figure 1 1 Name and Connection of each front section Table 1 2 Name and Function of each front section No Name Function 1 USB port USB port is connected for USB mouse or firmware upgrade 2 Micro SD Store media file 3 LAN LED Pointing out network in connection 4 Power status LED Pointing out device on off 5 USB port USB port ...

Page 9: ...on Table 1 3 Name and Function of rear section No Name Function 1 NETWORK Network connector for IP Camera and CMS 2 AUDIO OUT Audio output port 3 CVBS CVBS Spot Video output port 4 HDMI HDMI output port 5 ALARM OUT Alarm output connector 6 DC12V Power supply connector ...

Page 10: ...e bracket Figure 2 1 Dimension 2 1 Starting System Power supply begins with system operation as follows 1 Switching on initialize with below icons in order 2 With buzzer sounds the start screen is presented 3 In Log in screen enter the ID Password and press OK Note Default ID Password is admin admin Attention Please change password after login due to security ...

Page 11: ...Quick Guide Installation 7 2 2 Quick Setup Select to Run for easy installation 2 2 1 Account 1 Set ID and Password Note Default ID Password is admin admin Change the password for security ...

Page 12: ... item in System setting screen Language Select system language Device Name Enter the device name Keyboard ID Default keyboard ID is 1 HDMI Set resolution of a monitor connected to the device 2 Press Save button to save set value 3 Press Next to end System setting and move the next setting phase ...

Page 13: ...ve the next setting phase 2 2 4 Time Date How to set the time date of Easy Installation 1 Set each item in Time Date setting screen Network Time Sync Select network for synchronizing with time server System Time Not for synchronizing with network time server set the device time otherwise applying for Daylight saving time select DST Time Zone Select time zone for the system being installed DST Star...

Page 14: ...Quick Guide Installation 10 2 2 5 Easy Installation Wizard 1 Select to run Easy Installation every time when the system start 2 Press Save button to save set value and end Easy Installation ...

Page 15: ...Screen Configuration Table 3 1 Items and Description of UI Screen Configuration No Item Description 1 Live screen Show live video of connected cameras 2 Quick menu Clicking the right button of a mouse displays Quick menu See 3 4 Quick Menu to display detailed information about the quick menu 3 Time Date Display time and date ...

Page 16: ... present setting status or a function UI screen consists of like below Note Chosen live screen is marked as a blue frame mouse located live screen is marked as yellow one Figure 3 2 Live screen icon Table 3 2 Live screen icon and its description No Icon Description 1 Display channel number 2 Speaker on off ...

Page 17: ...creen When the order is changed the Save Sequence menu appears in the screen mode and user can select Save to save the sequence 2 Zoom in Magnifying selected live screen Zoom out 2 times 4 times and 8 times 3 Sequence Set the sequence 4 Speaker Output Mute Turning on off a sound speaker 5 Stop Alarm Set the Stop Alarm 6 Setup Opens the main set up menu For more information about setting menu see s...

Page 18: ...stered image list 3 AVI Display media file list Drag drop the desired media file Drag the screen and drop it on the AVI to unregister the selected media file 4 List Displayed registered device list Drag drop the desired channel Drag the screen and drop it on the list to unregister the selected channel 5 Username Enter the ID of the device 6 Password Enter the password of the device 7 Exit Close th...

Page 19: ...p screen is available to click Setup in Quick menu by clicking the right button of the mouse Table 4 1 Setup menu Item and Description No Item Description 1 SYSTEM Setting the system environment 2 CAMERA Setting the camera 3 DEVICE Setting the devices connected to the decoder 4 EVENT Setting the event type 5 NETWORK Setting the network environment ...

Page 20: ...16 5 Web Setup 5 1 Log In Enter ID and Password Figure 5 1 Web Setup Log In Table 5 1 Web Setup Log In Item and Description Note Default ID Password is admin admin Change the password for security Max character length is 12c ...

Page 21: ...ns in Setup menu Table 5 2 Item and Description of General buttons in Setup menu No Item Description 1 Save Save the set content 2 Cancel Cancel the set value 3 Default Reverse changed setting value to default in factory 4 Restore Cancel the set value and reverse it to default 5 Apply Apply the content set 6 Logout Logout the account ...

Reviews: