


21
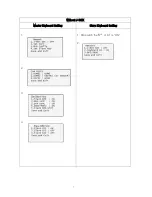
Chapter 4
— Slave Keyboard Setup
Master keyboard
should be setup as following procedure.
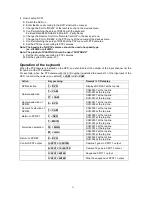
1. Check for dip switch
the 8
th
of S1
“
OFF
”.
2. Press
CTRL + MENU
. Check Slave KBD setting
“ON”.
Network
▶
Set Slave KBD
▶
Slave KBD : ON
Network
▶
Set Slave KBD
▶
Slave KBD Unit: ON for the desired slave keyboard
Slave keyboard
need to be setup with the following procedure.
1. Check for dip switch the
8
th
of S1
is
“
ON
”.
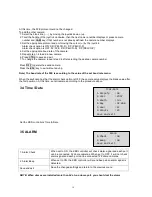
2. If you setup all connection correctly and turn on slave keyboard, you should see following screen.
←
Current Device ID = 1
←
Default setting is
9 9 9 9
for administrator,
1 1 1 1
for user
←
means that the controller is not connected to master keyboard
3. Press
CTRL + MENU
. Set the Slave ID to 01
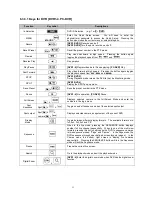
Ver x.x Slave1
Password : xxxx
Not connected
MAIN MENU
1.Configuration
2.Network
3.LCD
4.Initialization
Exit(ESC)
Configuration
1.Key Beep : ON
2.key Lock : OFF
3.Chg User PW
4.Chg Admin PW
Save and Exit
Network
1.J-BOX Set : OFF
2.Keyboard ID : 01
3.BPS:9600
Save and Exit
LCD
1.Bright
:03
2.Backlight :ON
Save and Exit
Summary of Contents for CDC2500LX
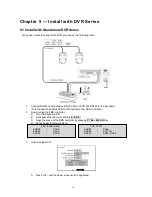
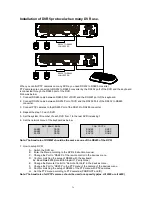
Page 10: ...4 2 2 Configuration with DVR Figure 3 installation diagram with DVR ...
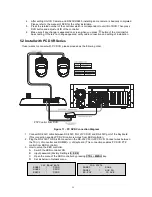
Page 11: ...5 2 3 Configuration with MUX Figure 4 installation diagram with MUX ...
Page 49: ...MEMO ...
Page 50: ......
Page 51: ...50302196D PRINTED IN KOREA I n s t r u c t i o n M A N U A L Keyboard Controller ...


