33
MYDENS 60
COSMOGAS
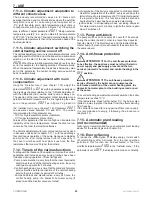
6.4 - Conversion of the appliance
from one type of gas to another
ATTENTION
!!!
Read these instructions carefully
before changing the gas:
- The gas appliance must be installed, calibrated or
modified by specialised staff in compliance with legal
terms;
- Check and be certain that the type of gas which
is powering the appliance is compatible with the
adjustment kit in your possession;
- Do not power the boiler with gases different from those
envisioned.
Follow the instructions given below to change the gas:
1 - disconnect the electric power supply upstream from the
appliance;
2 - open the boiler casing as reported in chapter 8.2;
3 - access the control and command board as reported in
chapter 8.2;
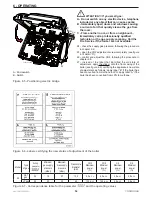
4 - move the microswitch “B” of switch “A” from left to right
to the “ON” position (see figure 6.5);
5 - apply electric power to the boiler;
6 - the parameter
3001
will appear on the boiler’s visual
display, followed by its value;
7 - using the keys
and
access the
parameter
3002.
8. - press the RESET key to make the
3002
parameter
flash;
9. - using the
and
keys, set the value of
the parameter
3002
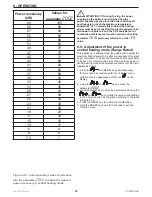
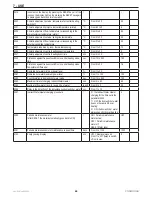
to the new corresponding value
according to the table in figure 6.7.
10. - press the RESET key to confirm the modification.
11.- remove voltage from the boiler, re-position the microswitch
“B” of switch “A” from right to left in “OFF” position (see figure
6.5).
12. - close the gas supply;
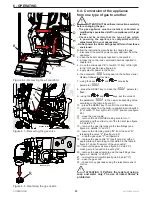
13. - remove the air manifold making sure to turn it
externally and then slide it out of the fan inlet (see figure
6.2, detail “C”);
15. - remove the gas inlet pipe via the two fittings (see
figure 6.2, details “H” and “L”);
16. - remove the clamping spring “M” from the seat “N”
releasing the valve “P” (See figure 6.3);
17. - slide the gas valve “P” out upwards;
18. - replace the gas nozzle “R” (see figure 6.4) with an
appropriate one according to that stated in the table in
figure 6.7 under “Diameter of the gas nozzle”;
19. - remount the gas valve (see figure 6.3, detail “P”),
making sure to reposition the spring “M”;
20. - remove the gas supply pipe via the two fittings (see
figure 6.2, details “H” and “L”);
21. - re-mount the air manifold (see figure 6.2, detail “C”);
22. - open the gas cock;
23. - check for any gas leaks using the relevant means of
control.
ATTENTION !!!
Perform the leak test using a
soap and water only. The use of naked flames is
prohibited.
B
F
G
L
D
E
H
C
A
020005.01.014
N
P
M
Q
O
020002.01.041
R
020002.01.042
Figure 6.4 - Replacing the gas nozzle
Figure 6.3 - Removing the gas valve
Figure 6.2 - Removing the air manifold
6 - OPERATING


