background image

18

!

OPERATION

k

1. Plug the unit into a correct mains socket. (Please 

refer to the rating label at the rear of the unit.)

2. Press button ON/OFF to turn on the unit. The 

compressor will start to work in continuous mode.

3. Press button HUMIDITY to set the room humidity 

you need: continuous de-humidifying , 50%, 60%,
70% or 80%  

4. Press the speed button to choose the ventilation 

speed, high or low.

5. To turn off the unit, press button ON/OFF again.

6. The direction of the air outlet can be adjusted by 

hand.

DRAINAGE

While the water tank is full, the compressor will stop
for self-protection and:

■ 

The sign of water full          will flash.

■ 

The unit will buzz. * For stopping the buzz, you 
may press the ON/OFF button to turn off the unit

■ 

The water level display will turn into red.

To move the water tank, pull it out squarely from the
unit by using the handle at the water tank.
After empting the water tank, place the water tank
into space. Make sure it is properly positioned, in
order for the 'water full' sign to go out and your
dehumidifier is operating.

Please note, in case, the water tank has not
been positioned well, the water level window
will turn into red and the unit will buzz, too.

7. OPERATION
8. DRAINAGE

To move the water
tank, pull it out
squarely from the
unit by using the
handle at the water
tank.

As the water
tank is full or has
not been positio-
ned well, the
water level win-
dow will turn into
red.

Summary of Contents for DC16ET

Page 1: ...LUFT ENTFEUCHTER DC16ET Bedienungsanleitung KBN CCEDC16ET AIR DEHUMIDIFIER DC16ET Instruction Manual Stand 2009 ...

Page 2: ...2 ...

Page 3: ...e Zeit und lesen Sie sorgfältig diese Anleitung bevor Sie die Anlage benutzen und ver wahren Sie sie zum Nachschlagen PAGE 1 Model no reference 14 2 Specification 14 3 How it works 15 4 Where to position 15 5 Before use 16 6 Parts 16 7 Operation 17 18 8 Drainage 18 19 9 Maintenance 20 10 Trouble shooting 20 11 Parts 21 22 CONTENTS Please take time to read this manual care fully before use and save...

Page 4: ...en können aus tech nischen Gründen abweichen Genauere Daten finden Sie auf dem Etikett am Produkt 1 MODELL NR REFERENZ 2 SPEZIFIKATION Stromversorgung 220V 240V 50Hz Feuchtigkeitsentzugsleistung 16 l Tag Strom Ampere Verbrauch bei PTC Verwendung nicht zutreffend N A Strom Ampere Verbrauch 280W 1 3A Kompressor rotierend Kühlmittel R134a Betriebstemperatur 5 35 C Wassertankvolumen 5 5 l Größe BxTxH ...

Page 5: ...fstellen und ihn später an einen zentraleren Ort bringen Bei der Aufstellung des Luftentfeuchters soll ten Sie darauf achten dass er auf einer ebenen Fläche aufgestellt wird um einen effizienten Luftdurchfluss zu gewährleisten und zu jeder Seite der Anlage min destens 10 cm Raum ist Dieser Luftentfeuchter ist mit Laufrollen ausgestattet damit Sie ihn leicht bewegen können Bevor Sie die Anlage vers...

Page 6: ...ehen Schalten Sie die Anlage immer über den Schalter auf dem Bedienungsfeld ein und aus Bevor Sie die Anlage verschieben schalten Sie sie erst aus ziehen Sie dann den Stecker heraus und leeren Sie den Wassertank Verwenden Sie für die Reinigung der Anlage kein Insektenspray oder entzündbare Reinigungsmittel Sprühen oder gießen Sie niemals Wasser über die Anlage WICHTIG Diese Anlage darf nicht bei T...

Page 7: ...t Heizfunktion Wenn Sie die Heiztaste drücken und die Umgebungstemperatur unter 25 C ist wird die Heizanzeige aufleuchten und der Heizer startet den Betrieb Zu dieser Zeit arbeitet der Lüfter nur mit hoher Geschwindigkeit Wenn jedoch die Umgebungstemperatur über 25 C liegt wird die Heizanzeige nicht aufleuchten und der Heizer wird nicht in Betrieb genommen Dieser PTC Heizer ist durch einen Thermos...

Page 8: ... blinkt Die Anlage wird summen Zum Stoppen des Summtons drücken Sie die Taste ON OFF 7 Abb Seite 7 um die Anlage auszuschalten Die Wasserstandsanzeige wird rot Zur Entnahme des Wassertanks fassen Sie den Griff des Tanks und ziehen ihn vollständig aus der Anlage heraus Nach Entleerung des Wassertanks setzen Sie ihn in den Zwischenraum ein Er muss richtig eingesetzt sein damit das Wasser voll Zeiche...

Page 9: ...ssen wird kann das Abflusswasser nicht in den Wassertank fließen 2 Verbinden Sie das Abflussloch mit einem Wasser schlauch der einen Durchmesser von 12mm hat ABB 2 Bitte beachten Sie dass der Wasserschlauch nicht zum Lieferumfang der Anlage gehört 3 Stellen Sie sicher dass das Wasser frei ablaufen kann und der Schlauch an seinem Platz bleibt Hinweis Bei sehr kalten Wetterbedingungen sollten Vorsic...

Page 10: ...ines mittelstarken Reinigungsmittels zuge ben Bei Aktivkohlefiltern Dieser Filter ist nicht waschbar Seine Lebensdauer ist variabel und hängt von den Umgebungsbedingungen ab unter denen das Gerät verwendet wird Der Filter sollte regelmäßig über prüft ca alle 6 Monate und wenn notwendig ersetzt werden LAGERUNG Wenn Sie die Anlage über längere Zeit nicht benut zen schalten Sie sie bitte ab ziehen Si...

Page 11: ...uslass nicht versperrt sind DIE ANLAGE SCHEINT NICHT ZU ARBEITEN Ist der Filter staubig kontaminiert Ist der Lufteinlass oder Luftauslass blockiert Ist die Zimmerfeuchtigkeit bereits sehr niedrig DIE ANLAGE SCHEINT NUR GERINGFÜGIG ZU FUNKTIONIEREN Sind zu viele Fenster oder Türen offen Produziert etwas im Raum sehr große Mengen an Feuchtigkeit DIE ANLAGE IST ZU LAUT Kontrollieren Sie ob die Anlage...

Page 12: ...117 FAN BLADE 1 118 MIDDLE SPACER 1 119 WIND FUNNEL 1 120 RUBBER STOPPER 1 Teile Nr Bezeichnung Menge A Plastik Teile Stück Set 121 CASTERS 4 123 TOP COVER FOR SENSOR 1 124 BOTOM COVER FOR SENSOR 1 B Elektrische Teile 201 COMPRESSOR 1 201A OVERLOAD PROTECTOR 1 201B WIRE CONNECTING BOX 1 201C ANTI VIBRATION SOCKET 3 201D RUBBER GROMMET 1 201E CLIP 1 202A MOTOR 1 202B MOTOR CAPACITOR 1 202D MOTOR WA...

Page 13: ...RY 1 408 DRYER 1 411 ACTIVE CARBON FILTER 1 E Kabel 501 WIRE SET 1 Teile Nr Bezeichnung Menge F Foam parts Stück Set 601 FOAM FOR ACCUMULATOR 1 602 WATERPROOF FOAM FOR EVAPORATOR 1 G Screws 701 SCREW SET 1 711 Bakelite Washer 8 H Verpackungs Material 801 GIFT BOX 1 802 POLYFOAM UP 1 803 POLYFOAM DOWN 1 804 PVC BAG FOR UNIT 1 805 PVC BAG FOR I M 1 806 INSTRUCTION MANUAL 1 807 RATING LABEL 1 808 LIG...

Page 14: ... reasons For greater precision please refer to the rating label placed on the product 1 MODEL NO REFERENCE 2 SPECIFICATION Power supply 220V 240V 50Hz Moisture removal capacity 16L day Power Ampere consumption for PTC use N A Power Ampere consumption 280W 1 3A Compressor Rotary Refrigerant R134a Working range 5 35 C Water tank capacity 5 5 L Size WxDxH 410 x 210 x 545 mm N W 12 kgs Model no DC 16E...

Page 15: ...begin by positioning the dehumidifier close to this area and later moving it to a more cen tral point When positioning the dehumidifier ensure that it is placed on a level surface and that there is a minimum of 10 cm 4 of space on either side of the unit to allow for efficient airflow This dehumidifier is fitted with castors for extra mobility if you move the unit it should first be switched off a...

Page 16: ...on in order to avoid a hazard Never use the plug to start and stop the unit Always use switch on the control panel Before moving the unit first switch off then unplug and empty the water tank Don t use bug sprays or other flammable cleaners on the unit Never pour or spray water over the unit IMPORTANT Do not use this unit at ambient temperatures below 5 C to prevent the possibility of a heavily ic...

Page 17: ...ressor is not in progress water full 4 Heat indicator only for the model with heat func tion While you press the heat button and the ambient temperature is lower than 25 C the heat indicator will light on and the heater will work At this time the fan speed will keep at high speed only However if the ambient temperature is higher than 25 C the heat indicator will not light on and the heater will no...

Page 18: ... water full will flash The unit will buzz For stopping the buzz you may press the ON OFF button to turn off the unit The water level display will turn into red To move the water tank pull it out squarely from the unit by using the handle at the water tank After empting the water tank place the water tank into space Make sure it is properly positioned in order for the water full sign to go out and ...

Page 19: ...g If cover the said portion by plug the drainage water cannot go down to the water tank 2 Connect the drain hole with a water tube of inner diameter 12mm FIG 2 Please note the water tube is not supplied with the unit 3 Ensure the water will always drain away freely and the tube will remain in place NOTE In very cold weather conditions precautions should be taken to prevent the water tube from free...

Page 20: ...nit off unplug and tidy AC cord Completely empty the water tank and wipe it clean Cover the unit and store where it will not receive direct sunlight THE UNIT DOES NOT OPERATE Is the unit plugged in Is the house electricity on Is the room temperature below 5 C or above 35 C If so then it is out of the working range of the unit Ensure the humidistat or ON OFF switch is turned on Check the water tank...

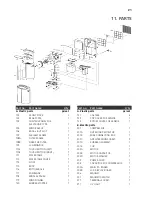
Page 21: ...SE 1 117 FAN BLADE 1 118 MIDDLE SPACER 1 119 WIND FUNNEL 1 120 RUBBER STOPPER 1 Part no Part name Q ty A Plastic parts pc set 121 CASTERS 4 123 TOP COVER FOR SENSOR 1 124 BOTOM COVER FOR SENSOR 1 B Electric parts 201 COMPRESSOR 1 201A OVERLOAD PROTECTOR 1 201B WIRE CONNECTING BOX 1 201C ANTI VIBRATION SOCKET 3 201D RUBBER GROMMET 1 201E CLIP 1 202A MOTOR 1 202B MOTOR CAPACITOR 1 202D MOTOR WASHER ...

Page 22: ...LLARY 1 408 DRYER 1 411 ACTIVE CARBON FILTER 1 E Wires 501 WIRE SET 1 Part no Part name Q ty F Foam parts pc set 601 FOAM FOR ACCUMULATOR 1 602 WATERPROOF FOAM FOR EVAPORATOR 1 G Screws 701 SCREW SET 1 711 Bakelite Washer 8 H Packing materials 801 GIFT BOX 1 802 POLYFOAM UP 1 803 POLYFOAM DOWN 1 804 PVC BAG FOR UNIT 1 805 PVC BAG FOR I M 1 806 INSTRUCTION MANUAL 1 807 RATING LABEL 1 808 LIGHT COND...

Page 23: ..._____________________________________________________________________ Mitgeliefertes Zubehör ____________________________________________________________________________ Fehlerbeschreibung ________________________________________________________________________________________________ ________________________________________________________________________________________________ _________________...

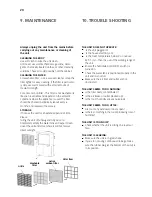
Page 24: ...kt Maß und Ausführungsangaben entsprechen dem Tag der Drucklegung Technische Änderungen vorbehalten Modell und Produktansprüche können nicht geltend gemacht werden Instruction Manual Dehumidifier DC 16ET 1 0 03 09 COSMO KG ...

Reviews: