background image

47

R

4

3

2

1

R

R

4

3

2

1

R

4

3

2

1

R

4

3

2

1

R

19

20

c

a

b

Group 0+/1

0-18 kg

Summary of Contents for All in All Rotate

Page 1: ...se in vehicles fitted with ISOFIX anchorages systems This Child Restraint system is classified for Semi universal use It will fit vehicles with positions approved as ISOFIX positions as detailed in the vehicle handbook depending on the category of the child restraint system and of the fixture The mass group and the ISOFIX size class for which this device is intended is Forward facing Group 1 9 18k...

Page 2: ...Group 0 0 1 2 3 Car Seat all in all Rotate R44 04 Group 0 0 1 2 3 0 36 kg DE IT FR EN ...

Page 3: ......

Page 4: ...omenclature DE Teilelisteabbildung IT Diagramma della lista delle parti EN Spare part list diagram 39 FR Schéma de pièces détachées DE Ersatzteillisteabbildung IT Diagramma della lista delle parti di ricambio EN Instruction diagram 40 56 FR Schéma d instructions DE Anleitungsdiagramm IT Diagramma di istruzioni ...

Page 5: ...n in cars of children from 9 kg approximately 9 months old up to maximum weight of 36 kg approximately 12 years old IMPORTANT Do not use forward facing before the child s weight exceeds 9 kg WARNING Never use this child car seat with its side facing the vehicle seat WARNING Never use this child car seat on passenger seat fitted with active airbag WARNING Any rigid items and plastic parts of the ch...

Page 6: ... is fitted in accordance with these instructions Safely secure any luggage or other objects that might cause injuries to the occupant of the child car seat in the event of a collision Failure to comply with the instructions would be dangerous and will automatically void the warranty and exempt Cosatto from any liability The harness buckle has been designed to be released quickly in an emergency IT...

Page 7: ...e Group 2 3 This Child Restraint system is classified for Semi universal use Care Maintenance Store your child car seat in a dry safe place Storing a damp child car seat will encourage mildew to form so after exposure to damp conditions dry off with a soft cloth and allow to dry thoroughly before storing Avoid leaving the child car seat in sunlight for prolonged periods as this may cause fabrics t...

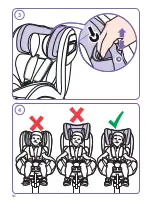
Page 8: ...cation 1 IMPORTANT Never use the child car seat on a seat where an airbag is fitted and active Refer to your vehicle user manual for information on de activating the airbag Backrest recline 2 Adjusting Important Only use the specified recline position s for each mode Rearward facing modes Group 0 0 1 R Forward facing modes Group 1 1 2 3 4 Forward facing modes Group 2 3 1 Headrest 3 Adjusting 4 Sat...

Page 9: ...hildren from 9 kg up to maximum weight of 36 kg ISOFIX arm 15 Location The two ISOFIX low anchorage anchor points are usually located between the vehicle seat base and back a Some vehicles have ISOFIX indicator near the ISOFIX low anchorage anchor points b 16 Fitting the ISOFIX guides Optional The ISOFIX guides can help identify the vehicle ISOFIX anchor points and make installation easier They ca...

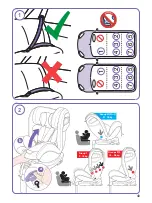
Page 10: ...ientation refer to step 13 Recline the backrest to position R refer to step 1 Position the child car seat on the vehicle seat rearward facing Open the harness refer to step 8 and lift up the lower seat liner a Pull the vehicle belt over the child car seat b and fasten the vehicle belt buckle c The lap vehicle belt should position below the waist harness d Tension the lap vehicle belt e Pull the di...

Page 11: ...with support leg Fitting 26 Convert the seat unit to forward facing orientation refer to step 13 Recline the backrest to position 1 2 3 or 4 refer to step 1 Position the child car seat on the vehicle seat forward facing Feed the vehicle belt between the harness and backrest a behind the seat liners Engage the buckle b 27 Tension the lap vehicle belt a Fit the diagonal vehicle belt between the head...

Page 12: ...T EXCEEDS 9 KG Belted only 33 Fitting Convert the seat unit to forward facing orientation refer to step 13 Recline the backrest to position 1 Refer to step 1 Position the child car seat on the vehicle seat forward facing Place your child into the child car seat Pull the vehicle belt out and around the child a and fasten the buckle b Fit the diagonal vehicle belt through the headrest diagonal vehic...

Page 13: ...cure your child with vehicle belt refer to step 33 b Softgoods 35 Removing If fitted remove the chest pads seat liners buckle and crotch pad refer to step 28 30 Release the elastic loops on either side of the headrest a Remove the headrest cover b Release the fabric from hooks c and sides d of the seat unit Remove the seat cover e Reverse the procedures above to refit the softgoods ...

Page 14: ... ans IMPORTANT N orientez pas le siège auto face à la route si l enfant ne pèse pas au moins 9 kg AVERTISSEMENT n utilisez JAMAIS ce siège auto en position latérale AVERTISSEMENT n utilisez JAMAIS ce siège auto sur le siège passager si l airbag est activé AVERTISSEMENT tous les éléments rigides et les pièces en plastique du siège auto doivent être situés et installés de sorte qu ils ne soient pas ...

Page 15: ...des marques laissées sur la garniture des sièges du véhicule La sécurité n est garantie que si le siège auto est installé conformément à ces instructions Attachez solidement les bagages ou autres objets qui pourraient blesser l occupant du siège auto en cas d accident Le non respect de ces instructions crée une situation dangereuse annule automatiquement la garantie et dégage Cosatto de toute resp...

Page 16: ...mément au règlement no 16 de la CEE ou à une norme équivalente Ceinture avec pied de soutien télescopique Groupe 0 1 Mode ISOFIT Groupe 2 3 Ce dispositif de retenue pour enfant a été classé comme produit semi universel Entretien Rangez le siège auto dans un endroit sûr et sec Le rangement du siège auto humide favorise la formation de moisissures S il est humide séchez le avec un chiffon doux et la...

Page 17: ...pièces Reportez vous aux schémas P1 Appui tête P7 Cale P2 Réducteur supérieur P8 Réducteur inférieur P3 Rembourrages de bretelle paire P9 Bouclier latéral P4 Harnais P10 Compartiment de rangement P5 Rembourrage d entrejambe P11 Pied de soutien télescopique P6 Bras ISOFIX P12 Guide ISOFIX x2 Pièces de rechange Les pièces de rechange ci dessous sont disponibles pour votre produit Pour le Royaume Uni...

Page 18: ...route IMPORTANT N ORIENTEZ PAS LE SIÈGE AUTO FACE À LA ROUTE SI L ENFANT NE PÈSE PAS AU MOINS 9 KG Lorsque le siège auto est utilisé dos à la route il convient au transport en voiture des enfants dès leur naissance et jusqu à 18 kg maximum A Orientation face à la route Lorsque le siège auto est utilisé face à la route il convient au transport en voiture des enfants à partir de 9 kg et jusqu à 36 k...

Page 19: ...points d ancrage ISOFIX inférieurs et pied de soutien télescopique Groupe 0 1 jusqu à 18 kg 20 Installation Mettez le siège en mode dos à la route voir l étape 13 Placez le dossier en position R voir l étape 1 a Placez le siège auto sur le siège du véhicule dos à la route Fixez les bras ISOFIX aux points d ancrage voir les étapes 14 à 16 Engagez le pied de soutien voir l étape 18 Procédez dans l o...

Page 20: ...sé AVEC les réducteurs et la cale Modes face à la route Groupe 1 de 9 à 18 kg de 9 mois à 4 ans environ 24 Emplacement IMPORTANT N ORIENTEZ PAS LE SIÈGE AUTO FACE À LA ROUTE SI L ENFANT NE PÈSE PAS AU MOINS 9 KG Option ISOFIX avec points d ancrage ISOFIX inférieurs et pied de soutien télescopique 25 Installation Mettez le siège en mode face à la route voir l étape 13 Placez le dossier en position ...

Page 21: ...inverse pour le retrait Modes face à la route Groupe 2 3 de 15 à 36 kg de 4 mois à 12 ans environ Préparation 28 Ouvrez la porte du compartiment arrière a Détachez les sangles des rembourrages de bretelle et les bretelles b c puis tirez les d Détachez les sangles des rembourrages de bretelle e 29 Ouvrez le harnais voir l étape 8 Retirez les rembourrages de bretelle a les agrafes de harnais b les r...

Page 22: ...e pour enfant pourrait ne pas protéger correctement votre enfant Après avoir serré la ceinture du véhicule si la boucle se trouve dans la position indiquée X essayez d installer le dispositif de retenue pour enfant à une autre place dans votre véhicule Procédez dans l ordre inverse pour le retrait Ceinture avec bras ISOFIX uniquement 34 Installation Mettez le siège en mode face à la route voir l é...

Page 23: ... kg ca 4 Jahre geeignet Wenn der Kindersitz in Gruppe 1 2 3 in Vorwärtsrichtung verwendet wird ist er für Kinder ab einem Gewicht von 9 kg ca 9 Monate bis zu einem Gewicht von 36 kg ca 12 Jahre geeignet WICHTIG Den Kindersitz nicht in Vorwärtsrichtung verwenden bevor Ihr Kind mindestens 9 kg wiegt WARNUNG Den Kindersitz NIE mit der Seite zum Fahrzeugsitz verwenden WARNUNG Den Kindersitz NIE auf ei...

Page 24: ...hrleistet werden WARNUNG Den Kindersitz NIE zu Hause verwenden Der Kindersitz ist nicht für den Heimgebrauch sondern nur für die Verwendung im Auto vorgesehen Cosatto rät davon ab Kindersitze weiterzuverkaufen oder aus zweiter Hand zu kaufen Viele der auf diesem Wege erworbenen Kindersitze wurden als gefährlich eingestuft HINWEIS Der Kindersitz kann auf dem Fahrzeugsitzpolster Abdrücke hinterlasse...

Page 25: ...geeignet ist Dieses Kinderrückhaltesystem wurde unter strikteren Bedingungen wie die Systeme älteren Designs welche nicht über diesen Hinweis verfügen als universell eingestuft Nur geeignet für die Verwendung mit den genannten Fahrzeugen wenn diese über Becken 3 Punkt statische Aufrollsicherheitsgurte verfügen und wenn die Sicherheitsgurte nach ECE Bestimmung Nr 16 oder anderen gleichwertigen Norm...

Page 26: ...deren Seite wiederholen Komponentenliste Siehe Abbildungen P1 Kopfstütze P7 Keil P2 Obere Sitzeinlage P8 Untere Sitzeinlage P3 Brustpolster zwei P9 Seitenaufprallschutzblock P4 Kindersitzgurt P10 Aufbewahrungstasche P5 Schrittpolster P11 Stützfuß P6 ISOFIX Rastarm P12 ISOFIX Führung x2 Ersatzteile Für dieses Produkt sind die unten aufgeführten Ersatzteile erhältlich Kunden in Großbritannien Irland...

Page 27: ...instellen Ziehen und halten Sie den Einstellhebel für die Sitzdrehung a und drehen Sie dann den Sitz b 14 Sitzausrichtung B C Seitenrichtung Die Seitenrichtung ermöglicht das Hineinsetzen und das Herausnehmen des Kindes aus dem Sitz nachdem der Kindersitz installiert wurde WARNUNG Nicht mit dem Kindersitz in dieser Position fahren D Rückwärtsrichtung WICHTIG KINDERSITZ NICHT INVORWÄRTSRICHTUNG VER...

Page 28: ...n vollständig herausziehen a ISOFIX Rastarme einrasten b und prüfen ob die Sicherheitsanzeige für den ISOFIX Rastarm grün anzeigt c Das Gestell nach hinten schieben bis es fest an der Ru ckenlehne des Fahrzeugsitzes sitzt d Zum Entfernen diesen Vorgang in umgekehrter Reihenfolge wiederholen Stützfuß 18 Befestigen Den ISOFIX Stützfuß öffnen a Den Stu tzfuß b einstellen bis er festen Kontakt mit dem...

Page 29: ...urt über den Kindersitz ziehen b und den Fahrzeuggurtverschluss befestigen c Der Fahrzeugbeckengurt sollte unter dem Bauchgurt positioniert sein d Den Beckengurt spannen e Den Fahrzeug Schulterschräggurt über die Rückenlehne des Kindersitzes ziehen f 22 Schultergurt spannen a b Wenn richtig befestigt sollte der Fahrzeuggurt die Gurtführungsmarkierungen auf dem Kindersitzbezug bedecken c d WICHTIG ...

Page 30: ...sition des Kindersitzes im Fahrzeug in Vorwärtsrichtung a Die ISOFIX Arme an den Verankerungspunkten befestigen Siehe Schritt 14 16 b Den stützfuß einrasten lassen siehe Schritt 18 Zum Entfernen diesen Vorgang in umgekehrter Reihenfolge wiederholen Nur mit stützfuß Befestigen 26 Die Sitzeinheit in vorwärtsgerichtete Ausrichtung konvertieren Siehe Schritt 13 Rückenlehne in die Position 1 2 3 oder 4...

Page 31: ...ge wiederholen Vorwärtsgerichtete Modi Gruppe 2 3 15 bis 36kg ca 4 bis 12 Jahre Vorbereitung 28 Den Deckel des Fachs an der Rückseite öffnen a Die Brustpolster und Schultergurtanschlüsse lösen b c dann diese von der Vorderseite des Sitzes wegziehen d Das Brustpolsterverbindungsstück e entfernen 29 Zum Öffnen des Gurtgeschirrs siehe Schritt 8 Die Brustpolster a Verschlussclips b Futter wenn zutreff...

Page 32: ...tem Ihr Kind eventuell nicht so schützen wie vorgesehen Befindet sich der Verschluss nach dem Festziehen des Fahrzeuggurts in der markierten Position X muss das Kinderrückhaltesystem auf einem anderen Fahrzeugsitz eingebaut werden Zum Entfernen diesen Vorgang in umgekehrter Reihenfolge wiederholen Nur mit ISOFIX Armen gegurtet 34 Befestigen Die Sitzeinheit in vorwärtsgerichtete Ausrichtung konvert...

Page 33: ...avanti prima che il peso del bambino superi i 9 kg AVVERTENZA Non usare MAI il seggiolino sul sedile del passeggero con airbag attivo Il seggiolino deve essere posizionato sempre verso l interno AVVERTENZA Non usare MAI il seggiolino con il lato verso il sedile del veicolo AVVERTENZA Tutte le parti rigide e in plastica del seggiolino devono essere posizionate in modo tale che nell utilizzo giornal...

Page 34: ...ranzia ed esonera la Cosatto da qualsiasi responsabilità L ancoraggio della cintura è stato progettato per un facile rilascio in caso di emergenza NON È A PROVA DI BAMBINI Bambini di natura più curiosa possono imparare a slacciare le cinture Si consiglia di insegnare ai propri figli di non giocare mai con la fibbia o con qualsiasi altra parte del seggiolino La cintura subaddominale deve essere all...

Page 35: ...ovati smettere di usarlo Non smontare o tentare di smontare il seggiolino per pulirlo non è necessario e potrebbe essere pericoloso Le parti in plastica e in metallo possono essere pulite con una spugna acqua tiepida e un detergente delicato Per la pulizia fare riferimento alle istruzioni per il lavaggio dei materiali duttili Rimuovere la fodera il rivestimento del sedile prima della pulizia Non l...

Page 36: ...ificate per ciascuna modalità Modalità rivolta all indietro Gruppo 0 0 1 R Modalità rivolta in avanti gruppo 1 1 2 3 3 4 Modalità rivolta in avanti Gruppo 2 3 1 Poggiatesta 3 Adattamenti 4 Posizione corretta del poggiatesta Imbracatura 5 Regolare la posizione delle cinture inguinali 6 Allentare Attenzione Tirare solo la cintura dell imbracatura 7 Stringere NOTA BENE L imbracatura deve essere stret...

Page 37: ...A Posizione rivolta in avanti Se usato come seggiolino per bambini rivolto in avanti è adatto per il trasporto in auto di bambini da 9 kg fino al peso massimo di 36 kg Braccio ISOFIX 15 Posizionamento I due punti di ancoraggio inferiori ISOFIX si trovano solitamente tra la base del sedile e lo schienale a Alcuni veicoli hanno l indicatore ISOFIX vicino ai punti di ancoraggio inferiore ISOFIX b 16 ...

Page 38: ...imento al punto 13 Riportare lo schienale in posizione R fare riferimento al punto 1 a Posizionare il seggiolino sul sedile rivolta all indietro Fissare i bracci ISOFIX ai punti di ancoraggio fare riferimento ai punti 14 16 Attiva la gamba di supporto fare riferimento al punto 18 Per rimuovere seguire il processo inverso Cinghie solo con gamba di supporto Gruppo 0 0 13 kg Montaggio 21 Convertire l...

Page 39: ...izionamento ATTENZIONE NON UTILIZZARE RIVOLTO IN AVANTI PRIMA CHE IL PESO DEL BAMBINO SUPERI I 9 KG Opzione ISOFIX in dotazione con punti di ancoraggio inferiori ISOFIX e gamba di supporto 25 Montaggio Convertire l unità seduta in un orientamento rivolto in avanti fare riferimento al punto 13 Riportare lo schienale in posizione 1 2 3 o 4 fare riferimento al punto 1 Posizionare il seggiolino sul se...

Page 40: ... da 15 a 36 kg circa 4 12 anni Prima di iniziare 28 Aprire la porta posteriore dello scomparto a Staccare il cuscinetto addominale e i connettori delle cinghie sulle spalle b c poi sfilarle dal sedile d Rimuovere il connettore del cuscinetto toracico e 29 Aprire l imbragatura fare riferimento allo step 8 Rimuovere i cuscinetti toracici a le clip delle fibbie b le fodere se del caso c e la fibbia d...

Page 41: ...l seggiolino di proteggere il tuo bambino nel miglior modo possibile Una volta assicurata la cintura di sicurezza se la fibbia si trova in posizione X provare a sistemar il seggiolino su un altro sedile Per rimuovere seguire il processo inverso Cinghie solo con bracci ISOFIX 34 Montaggio Convertire l unità seduta in un orientamento rivolto in avanti fare riferimento al punto 13 Fissare i bracci IS...

Page 42: ...38 P1 P2 P3 P4 P5 P11 P12 P10 P8 P7 P6 P9 ...

Page 43: ...39 S5 S4 S3 S2 S1 S7 S6 S8 ...

Page 44: ...40 1 1 2 3 4 5 6 7 1 2 3 4 5 6 7 1 1 Group 0 0 1 0 18kg Group 1 9 18kg Groups 2 3 15 36kg 4 3 2 1 R R 1 4 3 2 1 R 4 3 2 1 R 4 3 2 1 R 2 a b ...

Page 45: ...41 3 a 4 ...

Page 46: ...42 6 5 a a b b 7 b a ...

Page 47: ...43 11 12 a a 10 8 9 a b c a b c ...

Page 48: ...44 360 a a b b c d 13 14 ...

Page 49: ...45 15 16 b a a R 4 3 2 1 R 4 3 2 1 R 4 3 2 1 17 a d d c b ...

Page 50: ...46 a c 18 b ...

Page 51: ...47 R 4 3 2 1 R R 4 3 2 1 R 4 3 2 1 R 4 3 2 1 R 19 20 c a b Group 0 1 0 18 kg ...

Page 52: ...48 e g d c f 21 22 a b Group 0 0 13 kg ...

Page 53: ...49 a b 22 c d ...

Page 54: ...50 R 4 3 2 1 R R 4 3 2 1 R 4 3 2 1 24 0 9kg 9kg R R 23 ...

Page 55: ...51 4 3 2 1 R 4 3 2 1 4 3 2 1 R 4 3 2 1 26 a b 27 25 a b c c ...

Page 56: ...52 27 a b d d c b 28 a 29 c ...

Page 57: ...53 29 a b c d 30 30 a c c 31 b ...

Page 58: ...54 R 4 3 2 1 R 4 3 2 1 R R 4 3 2 1 1 32 31 a b c d ...

Page 59: ...55 33 a b d e c f ...

Page 60: ...56 R 1 2 3 4 1 34 a b 35 a b c d e e ML21092019 ...

Reviews: