background image

B.


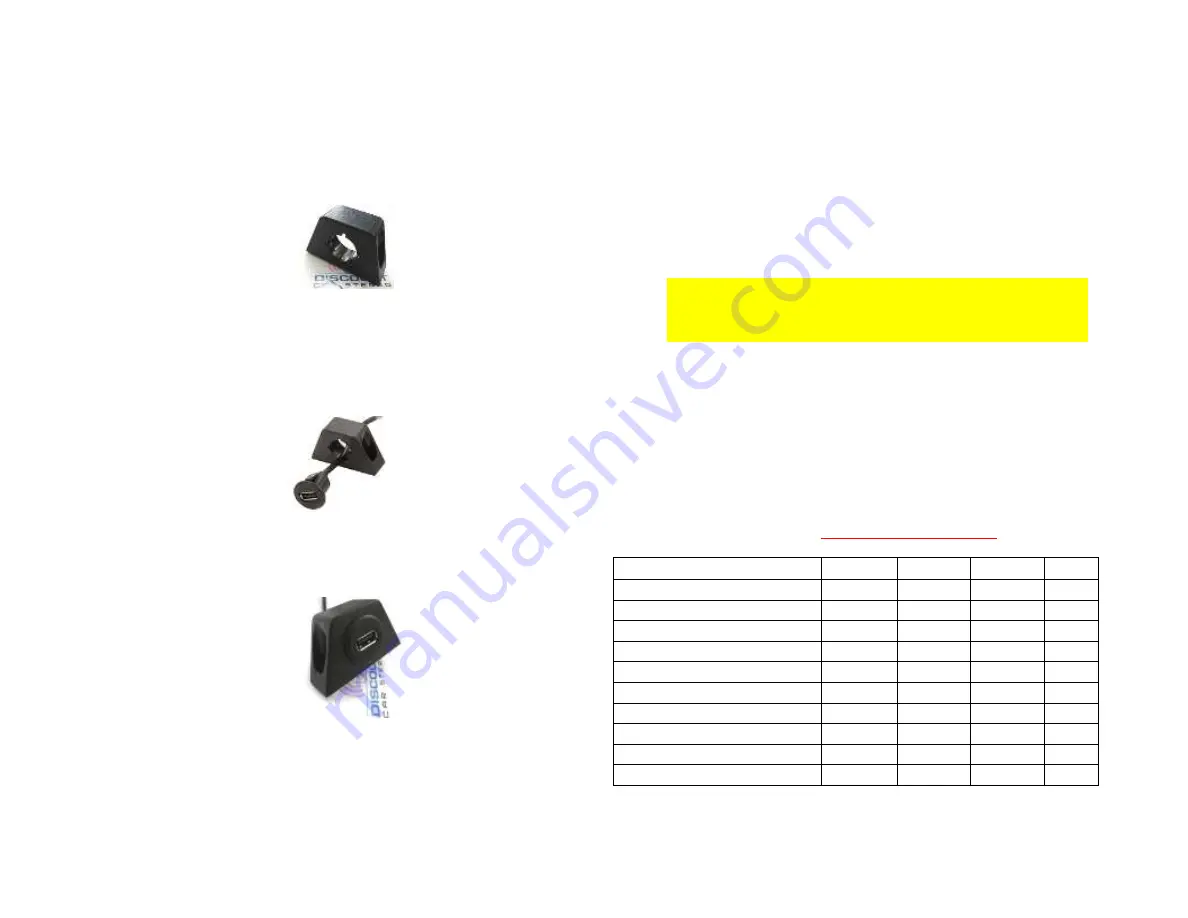
Bracket Mount 

(No drilling)


1.


Locate a flat surface at location of choice within 3.2 ft. of radio to 
mount USB support bracket (See 

Fig. 14

) with tape backing or screws.  


Fig. 14 

mounting bracket 


2.


Insert USB male terminal through hole in bracket (See 

Fig. 15

) and 

connect to USB port on harness (See

 Fig. 12


Fig. 15 


3.


Push USB head until it snaps in place and flush (See 

Fig. 16


Or simply connect audio device charging cable directly to USB port on 
harness (See 

Fig. 12

) and route the plug to dash area or where audio device 

will reside. 


Test Operation: 

1.


Turn Radio “ON”


2.


Press “

TAPE/AUX

” or “

CD/AUX

” button on radio 


3.


Launch Smartphone or tablet audio streaming application.  

4.


Turn volume up on phone and use radio volume control button to set 
playback level. 

Warning!


Playlist and Track selection is *NOT* possible from the 

Radio. Use audio device built-in controls or optional wireless remote to 
access and control the audio files.


5.


If correct operation is confirmed go ahead and reinstall the Radio. 

Product feature comparison:  

Use chart below to learn what these products will or will not do. These Bluetooth 
products are built exclusively for C5 Corvettes with original radio. 

Noteworthy!!

 Hands-free kits are able to stream music and phone calls; 

however, music streaming kits are 

not able to make phone calls.


Features/Requirements 

A2D-C5 

BLU-C5 

C5CD-HF  C5-HF 

Retains/requires changer 

YES


NO


YES* 

NO 

Requires working CD changer 

YES 

NO


YES 

NO 

Audio input jack (Aux in) 

NO


NO


YES* 

YES 

USB charging port 

Optional

**

  Optional

**


YES 

YES 

Supports Hands-free calls 

NO 

NO


YES 

YES 

Connect to radio (behind dash) 

YES 

YES 

YES 

YES 

Connects to changer in trunk/hatch 

YES 

YES 

NO


NO 

Supports voice activation (e.g. Siri) 

NO 

NO 

YES


YES 

Optional wireless remote control 

YES 

YES 

NO


NO 

Controls music from radio buttons 

NO 

NO 

NO 

NO 

 *Aux input or retain CD changer playback 
**Optional USB charging port available only on PXHGM4 harness (to radio) 


Summary of Contents for BLU-C5

Page 1: ...Courtesy of DiscountCarStereo com BLU C5 Quick Start Audio Streaming Installation Guide for select 1997 04 Corvette without 12 disc Changer Created January 16 2013 Revised September 21 2019 ...

Page 2: ... if present if must be disconnected Alert If your kit includes the black module click here for installation instructions See Frequently Asked question at the end of this guide Installation 1 To Radio It is possible to install this module to the radio or CD Changer location in trunk hatch See installation 2 below Remove Radio from dashboard to gain access to the connectors Click link below for radi...

Page 3: ...rior to final install To aid the install we include a mini tap add a fuse circuit seen in Fig 4 Fig 4 Crimp accessory wire to add a fuse circuit and insert blade to fuse box e g fuse 22 etc If fuse position is occupied remove fuse from fuse box and insert to vacant slot on add a fuse circuit Ensure proper crimp otherwise module will not power up upon turning ignition car to ON position Fig 5 C5 in...

Page 4: ...tory 10 pin plug in trunk hatch Alert The 12 disc Changer if present must be disconnected 1 Locate factory 10 pin CD Changer plug in trunk hatch or if vehicle has 12 disc CD Changer disconnected 10 pin plug See Fig 7 from Changer See Fig 6 Fig 6 Factory CD Changer 2 Connect factory 10 pin plug See Fig 7 to 10 pin connector white on installation harness See Fig 8 Fig 7 10 pin plug Fig 8 10 pin conn...

Page 5: ...ear and select it Red LED inside adapter peephole will glow steady paired Optional equipment The following options are not required for the module to work however these two options enhance user experience To add remote to order simply tick box on product page 1 Remote Control This wireless remote is not required for adapter to work however instead of fumbling audio device you simply press the fami...

Page 6: ...location and discover how this charger is a massive improvement over cars built in charging ports and many anemic aftermarket cigar lighter chargers To add USB Charging kit simply select installation harness with USB port For example 1 PXHGM4 to radio USB connects module at the radio and includes USB charging port extension cable and mounting plate 2 PXHGM4 to radio connect module at the radio but...

Page 7: ...rill a hole in the dash or panel using a step drill bit or equivalent See Fig 9 Fig 9 Step drill bit 2 Insert 3ft USB cable male terminal See Fig 10 through hole created in step 1 and plug into USB port on harness See Fig 11 Fig 10 Flush mount 3 ft USB cable Fig 11 3 Push USB head See Fig 12 until it snaps in place and flush with mounting surface See Fig 13 Fig 12 Flush mount USB Terminal Fig 13 F...

Page 8: ... or optional wireless remote to access and control the audio files 5 If correct operation is confirmed go ahead and reinstall the Radio Product feature comparison Use chart below to learn what these products will or will not do These Bluetooth products are built exclusively for C5 Corvettes with original radio Noteworthy Hands free kits are able to stream music and phone calls however music stream...

Page 9: ...nstalling everything radio does not go into AUX mode What would cause this If module dip switches 3 and 8 were already set the module was tested prior to shipping but if for some reason radio does not recognize the module and does not enter AUX Mode then a reset may have them talk to each other To reset radio module follow these steps 1 disconnect the PXHGM4 or PXHGM2 installation harness from rad...

Reviews: