9
IV. ASSEMBLY INSTRUCTIONS
ASSEMBLY INSTRUCTIONS |
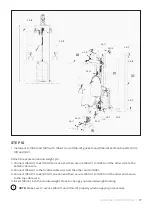
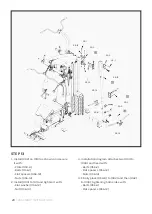
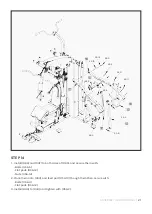
1. Place the bolts (#56-2) and the gaskets (#56-12) from below the part (#1) as shown.
2. Place (#2) and (#4) on both sides of (#1) as shown, and secure with:
- Bolts (#56-1)
- Gaskets (#56-12)
- Nuts (#56-14)
3. Place two (#6) on both sides of (#2) as shown, and secure them with:
- Bolts (#56-1)
- Spacers (#56-12)
- Nuts (#56-14)
4. Connect part (#3) to part (#2) with:
- Bolts (#56-1)
- Gaskets (#56-12)
- Nuts (#56-14) as shown
5. Pre-install bolts (#56-2), gaskets (#56-12) onto (#2) in advance.
6. Install (#5) to (#3) as shown and connect it with (#27).
STEP 1 - INSTRUCTIONS
ATTENTION:
1. The gasket shall be placed at both ends of the bolts (against the bolt head and nut), if indicated
otherwise.
2. Preliminary assembly is hand tightening all bolts and nuts and tightening with wrench for
complete assembly.
3. Some spare parts have been pre-assembled in the factory.
4. This product is recommended to install by more than two people.
2
4
1
6
6
3
5
27
56-12
56-14
56-1
56-2
56-14
56-12
56-2
56-1
56-12
56-14
56-1
56-2
56-12
Summary of Contents for GS7
Page 27: ......
Page 28: ...WWW LIFESPANFITNESS COM AU ...


