


6
5
FRANÇAIS
A
L
M
N
P
G
E
D
H
B
F
C
O
R
Q
I J K
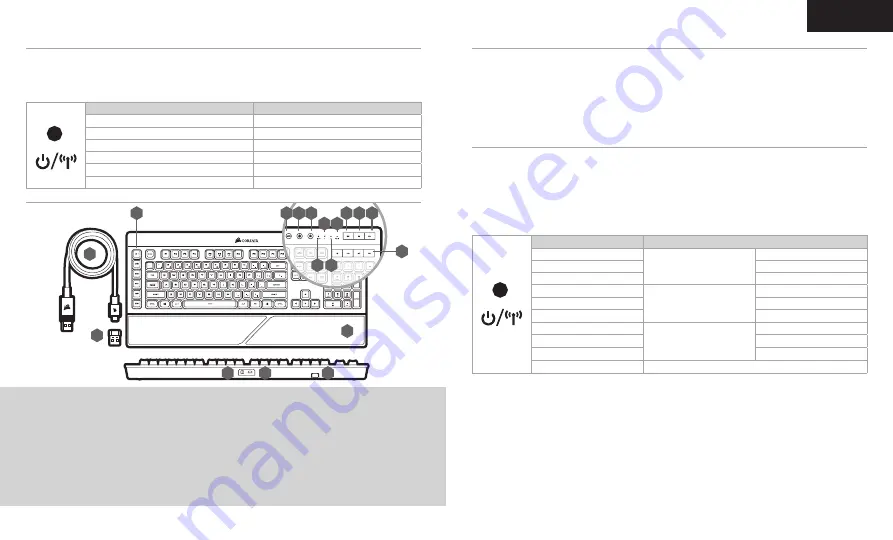
A
– SIX TOUCHES DE MACRO PROGRAMMABLES
B
– TOUCHE ENREGISTRER UNE MACRO
C
– TOUCHE DE LUMINOSITÉ DU RÉTROÉCLAIRAGE
D
– DÉSACTIVATION DE LA TOUCHE DE VERROUILLAGE WINDOWS
E
– VOYANT D’ÉTAT DE LA BATTERIE / DE LA CONNEXION SANS FIL
F
– VOYANT À LED DU VERROUILLAGE DU PAVÉ NUMÉRIQUE
G
– VOYANT À LED DU VERROUILLAGE DES MAJUSCULES
H
– VOYANT D’ÉTAT DES MACROS / DU VERROUILLAGE WINDOWS
I
– TOUCHE SILENCE
J
– TOUCHE BAISSE DU VOLUME
K
– TOUCHE HAUSSE DU VOLUME
L
– TOUCHES MULTIMÉDIAS DÉDIÉES
M
– BOUTON MARCHE / ARRÊT
N
– PORT DE DONNÉES ET DE CHARGEMENT USB
O
– RÉCEPTEUR SANS FIL USB
P
– SUPPORT DU RÉCEPTEUR SANS FIL USB
Q
– CÂBLE DE CHARGEMENT ET DE DONNÉES USB
R
– REPOSE-POIGNET
La batterie du clavier K57 RGB WIRELESS doit être complètement chargée avant la première utilisation.
> Branchez le clavier sur un port USB 2.0 ou 3.0 disponible de votre ordinateur avec le câble USB de
chargement / données.
> Le voyant à LED d’état de la batterie / de la connexion sans fil commence à clignoter en vert pour signaler le
chargement de la batterie. Une fois le chargement terminé, il s’allume fixement.
CHARGEMENT DU CLAVIER
PRÉSENTATION DU CLAVIER
Cette connexion sans fil ultrarapide inférieure à 1 ms est conçue pour offrir d’exceptionnelles performances de
qualité gaming.
> Appuyez sur le bouton marche / arrêt pour allumer le clavier.
> Branchez le récepteur sans fil USB à un port USB 2.0 ou 3.0 disponible situé sur la façade de votre PC.
> Le voyant à LED d’état reste allumé en blanc une fois la connexion établie.
Si une reconnexion est nécessaire, lancez l’appariement du récepteur sans fil USB via les paramètres du logiciel iCUE et
maintenez les touches FN et F5 du clavier enfoncées pendant 2 secondes.
CONFIGURATION DE LA CONNEXION SLIPSTREAM WIRELESS 2,4 GHz
Le mode sans fil Bluetooth est idéal pour les applications de bureau et de productivité et les tâches informatiques
quotidiennes.
> Lancez l’appariement Bluetooth sur votre appareil compatible avec le mode Bluetooth 4.0 ou version supérieure.
> Appuyez sur le bouton marche / arrêt pour allumer le clavier.
> Maintenez les touches FN et F6 enfoncées jusqu’à ce que le voyant à LED d’état clignote en bleu.
> Suivez les instructions pour connecter correctement votre appareil.
Le K57 RGB WIRELESS possède deux touches Bluetooth (F6 et F7) permettant d’enregistrer deux appareils hôtes
Bluetooth et de basculer entre ceux-ci.
CONFIGURATION DU
BLUETOOTH
®
VOYANT À LED D’ÉTAT
ÉTAT DE LA CONNECTIVITÉ
BLANC CLIGNOTANT RAPIDE
SLIPSTREAM WIRELESS
APPARIEMENT
BLANC ALLUMÉ
APPAIRÉ
BLANC CLIGNOTANT LENT
ÉCHEC DE L’APPARIEMENT
BLEU CLIGNOTANT RAPIDE
BLUETOOTH SANS FIL #1
APPARIEMENT
BLEU ALLUMÉ
APPAIRÉ
BLEU CLIGNOTANT LENT
ÉCHEC DE L’APPARIEMENT
CYAN CLIGNOTANT RAPIDE
BLUETOOTH SANS FIL #2
APPARIEMENT
CYAN ALLUMÉ
APPAIRÉ
CYAN CLIGNOTANT LENT
ÉCHEC DE L’APPARIEMENT
JAUNE ALLUMÉ
CONNECTÉ VIA USB
VOYANT À LED D’ÉTAT
ÉTAT DE LA BATTERIE
VERT CLIGNOTANT LENT
EN CHARGE
ROUGE CLIGNOTANT LENT
CRITIQUE
ROUGE FIXE
FAIBLE
AMBRE CLIGNOTANT RAPIDE
MOYEN
VERT CLIGNOTANT RAPIDE
ÉLEVÉ
VERT FIXE
RECHARGÉE


