Corsair 837149 Manual Download Page 4

4

3

ENGLISH

K57 RGB WIRELESS gaming keyboard has dedicated G1-G6 macro keys. Those keys can be assigned to perform certain 
single or multi-key press actions for quick access during gaming or everyday computing. 

MACRO FUNCTIONS

K57 RGB WIRELESS features dynamic per-key lighting, fully-programmable with iCUE software to enable virtually unlimited 
lighting customization. It also comes with 11 built-in onboard lighting modes for instant illumination.  
Those modes can be accessed by FN combo key. 

BUILT-IN LIGHTING MODES

LIGHTING MODE

FN + KEY COMBO

LIGHTING EFFECT

LIGHTING MODE

FN + KEY COMBO

LIGHTING EFFECT

1

FN + 1

SPIRAL RAINBOW

7

FN + 7

COLOR SHIFT

2

FN + 2

RAIN

8

FN + 8

COLOR PULSE

3

FN + 3

RAINBOW WAVE

9

FN + 9

COLOR WAVE

4

FN + 4

VISOR

10

FN + 0

STATIC

5

FN + 5

TYPE LIGHTING (KEY)

11

FN + -

NO LIGHTING

6

FN + 6

TYPE LIGHTING 

(RIPPLE)

BRIGHTNESS LEVEL

BATTERY LIFE, UP TO 

0 (LIGHTING OFF)

175 HOURS

1

35 HOURS

2

20 HOURS

3 (MAX. BRIGHTNESS)

8 HOURS

On a full charge, the K57 RGB WIRELESS keyboard lasts for up to 170 hours of continuous use and may vary depending 
on the usage, lighting brightness, wireless mode and other factors. Refer to the table below for estimated, maximum 
battery life you may expect. 

LIGHTING AND BATTERY LIFE

Dynamic lighting modes can be further customized for speed, duration and direction.

LIGHTING MODES

FN + KEY COMBO

FUNCTION

1

2

3

4

5

6

7

8

9

x

x

i

SPEED (FAST, MEDIUM, SLOW)

x

x

x

x

x

x

x

DURATION (LONG, MEDIUM, SHORT)

x

x

h

SPEED (SLOW, MEDIUM, FAST)

x

x

x

x

x

x

x

DURATION (SHORT, MEDIUM, LONG)

x

x

x

x

x

x

x

f

DIRECTION (LEFT)

x

x

x

x

x

x

x

x

DIRECTION (COUNTER-CLOCKWISE)

x

x

x

x

x

x

x

g

DIRECTION (RIGHT)

x

x

x

x

x

x

x

x

DIRECTION (CLOCKWISE)

SPECIAL MACRO KEY FUNCTIONS:

>   Press and hold MR key for 2 seconds to enter Special Macro Key Functions mode. The macro status LED indicator 

will turn solid yellow to confirm the new mode of operation. While in this mode, you have access to three macro key 
functions.

TO ENABLE ANY G1-G6 MACRO KEY:

>   Press any G1-G6 key again to enable the macro key. The macro status LED indicator will blink rapidly once to confirm 

selected key is now enabled.

DISABLE ANY G1-G6 MACRO KEY:

>   Press any G1-G6 key to disable the macro key without deleting action (if previously assigned). The macro status LED 

indicator will blink rapidly twice to confirm selected key is now disabled.

TO DELETE MACRO ASSIGNED TO G1-G6 MACRO KEY:

>   Press and hold any G1-G6 key for 3 seconds to delete macro previously assigned to the key. The macro status LED 

indicator will blink rapidly three times to confirm macro has been deleted.

To exit Special Macro Key Functions mode, press and hold MR key for 2 seconds. The macro status LED indicator will turn 
off to confirm.

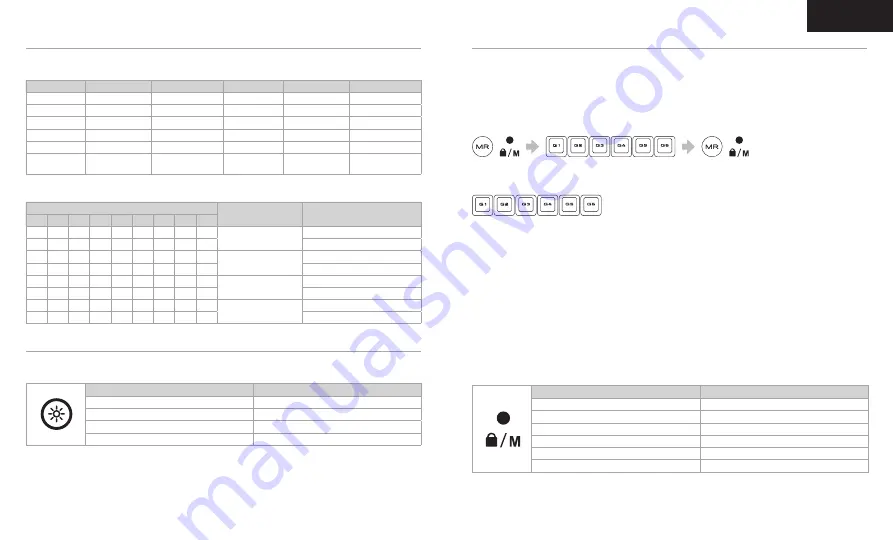
STATUS LED INDICATOR

MACRO STATUS

SOLID YELLOW

MACRO CONFIGURE MODE

BLINKING YELLOW

MACRO RECORDING READY

RAPID BLINKING YELLOW

MACRO RECORDING IN PROGRESS

RAPID BLINK YELLOW x1

ENABLE MACRO

RAPID BLINK YELLOW x2

DISABLE MACRO

RAPID BLINK YELLOW x3

DELETE MACRO

TO RECORD MACRO:

>   Press MR key. The macro status LED indicator will start blinking yellow to confirm macro recording mode is now on. 
>   Select G-key you want the macro assigned to. The macro status LED indicator will start blinking rapidly to indicate 

macro recording is now in progress. Up to 50 key events can now be recorded.

>  Press MR key to stop macro recording. The macro status LED indicator will stop blinking.

TO EXECUTE MACRO:

>  Press any G1-G6 key to play previously recorded macro.

Summary of Contents for 837149

Page 1: ...corsairhowto 2019 CORSAIR COMPONENTS INC All rights reserved CORSAIR and the sails logo are registered trademarks in the United States and or other countries All other trademarks are the property of t...

Page 2: ...ENGLISH 1 FRAN AIS 5 DEUTSCH 9 NEDERLANDS 13 ITALIANO 17 ESPA OL 21 PORTUGU S 25 POLSKI 29 P 33 37...

Page 3: ...r 3 0 port located on the front panel of your PC The status LED indicator will turn solid white when connected If reconnection is required initiate USB wireless receiver pairing via the iCUE software...

Page 4: ...x x x x x x DIRECTION CLOCKWISE SPECIAL MACRO KEY FUNCTIONS Press and hold MR key for 2 seconds to enter Special Macro Key Functions mode The macro status LED indicator will turn solid yellow to confi...

Page 5: ...sur la fa ade de votre PC Le voyant LED d tat reste allum en blanc une fois la connexion tablie Si une reconnexion est n cessaire lancez l appariement du r cepteur sans fil USB via les param tres du l...

Page 6: ...touche s lectionn e est maintenant activ e D SACTIVATION D UNE DES TOUCHES DE MACRO G1 G6 Appuyez sur une des touches G1 G6 pour d sactiver la touche de macro sans supprimer l action si elle a t pr al...

Page 7: ...an Wenn die Verbindung aktiv ist leuchtet die LED Statusanzeige durchgehend wei Wenn ein Neuaufbau der Verbindung erforderlich ist starten Sie das Koppeln des USB Drahtlosempf ngers ber das Einstellun...

Page 8: ...chnell um zu best tigen dass die ausgew hlte Taste jetzt aktiviert ist SO DEAKTIVIEREN SIE EINE DER MAKROTASTEN G1 G6 Dr cken Sie eine der Tasten G1 G6 um die jeweilige Makrotaste zu deaktivieren ohne...

Page 9: ...panel of your PC De statusindicator brandt continu wit wanneer verbinding is gemaakt Als er opnieuw verbinding moet worden gemaakt start dan het koppelingsproces van de draadloze USB ontvanger op via...

Page 10: ...ets in te schakelen De statusindicator voor macro s knippert n keer snel om aan te geven dat de geselecteerde toets nu is ingeschakeld EEN VAN DE MACROTOETSEN G1 G6 UITSCHAKELEN Druk op een van de toe...

Page 11: ...si illuminer di bianco fisso una volta connesso Se richiesta una nuova connessione inizializza l accoppiamento del ricevitore wireless USB mediante il menu delle impostazioni del software iCUE e tieni...

Page 12: ...DIREZIONE SENSO ORARIO FUNZIONI SPECIALI TASTI MACRO Tenere premuto il tasto MR per 2 secondi per accedere alla modalit Funzioni speciali tasti macro L indicatore LED di stato macro si illuminer di gi...

Page 13: ...estado se iluminar con una luz blanca fija cuando se conecte Si es necesario volver a establecer la conexi n inicie el emparejamiento del receptor inal mbrico USB mediante el men de configuraci n del...

Page 14: ...ndicador LED de estado de la macro parpadear con rapidez una vez para confirmar que se ha habilitado la tecla seleccionada PARA DESHABILITAR CUALQUIERA DE LAS TECLAS MACRO G1 A G6 Pulse cualquiera de...

Page 15: ...passar a branco cont nuo assim que a liga o for estabelecida Se for necess rio voltar a estabelecer a liga o inicie o emparelhamento do recetor sem fios USB atrav s do menu de defini es do software i...

Page 16: ...z para confirmar que a tecla selecionada est agora ativada PARA DESATIVAR QUALQUER TECLA DE MACRO G1 G6 Prima qualquer tecla G1 G6 para desativar a tecla de macro sem eliminar a a o se tiver sido ante...

Page 17: ...i g ym Je li trzeba b dzie po czy urz dzenia ponownie zainicjuj parowanie odbiornika bezprzewodowego USB w menu ustawie oprogramowania iCUE i przytrzymaj klawisze FN F5 przez 2 sekundy KONFIGURACJA CZ...

Page 18: ...Y KLAWISZ MAKRA G1 G6 Aby w czy dowolny klawisz makra G1 G6 naci nij go ponownie Wska nik LED stanu makra szybko mignie jednokrotnie aby potwierdzi w czenie wybranego klawisza ABY WY CZY DOWOLNY KLAWI...

Page 19: ...CAPS LOCK H WINLOCK I J K L M N USB O USB P USB Q USB R K57 RGB USB 2 0 USB 3 0 USB 1 USB USB 2 0 3 0 USB iCUE 2 FN F5 SLIPSTREAM WIRELESS 2 4 Bluetooth Bluetooth Bluetooth 4 0 FN F6 K57 RGB Bluetooth...

Page 20: ...9 FN 9 4 FN 4 10 FN 0 5 FN 5 11 FN 6 FN 6 FN 1 2 3 4 5 6 7 8 9 x x i x x x x x x x x x h x x x x x x x x x x x x x x f x x x x x x x x x x x x x x x g x x x x x x x x 2 MR G1 G6 G1 G6 G1 G6 G1 G6 G1 G...

Page 21: ...WINLOCK D E NUM LOCK LED F CAPS LOCK LED G WINLOCK H I K57 RGB USB USB 3 0 USB 2 0 LED 1 3 0 USB 2 0 USB LED FN F5 iCUE USB 2 4 SLIPSTREAM WIRELESS Bluetooth 4 0 Bluetooth LED FN F6 Bluetooth F7 Bluet...

Page 22: ...VISOR FN 4 4 FN 11 FN 5 5 FN 6 6 FN 9 8 7 6 5 4 3 2 1 i x x x x x x x x x h x x x x x x x x x f x x x x x x x x x x x x x x x g x x x x x x x x x x x x x x x LED MR G1 G6 LED G1 G6 G1 G6 LED G1 G6 G1...

Reviews: