background image

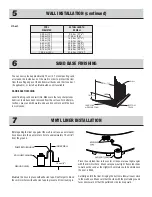
Add sand.
Before uncoiling the wall, make sure the pre-punched holes for the
skimmer and pump return are at the top and facing the planned lo-
cation of your filter.

Begin inserting the wall into the bottom wall tracks in the middle of
a joiner plate. At first, the wall is kept in place with one or two stakes
and strings (or extra persons). One person uncoils the wall on a
beam or a plank, while a second person inserts it in the bottom wall
tracks. Do not uncoil more than 3 m (10') of wall before you install
a support bar or stake and string to reinforce the structure.

Once the wall is completely uncoiled, you may find that it is too long
or that both ends do not meet by a few centimetres. If such is the
case, adjust tracks and joiner plates until wall holes line up. If this
does not work, roll up the wall again, check measurements as per
chart 1.1, adjust tracks and plates, if applicable, and uncoil the wall
again. If the spread is too wide, measure the wall and check it
against the chart below.

Join the ends of the walls by orienting folds outward to hide the ex-
clamation icon. (Illustration 8.1)

Note: If the wall is attached properly, you should no longer see

the exclamation icon. If you can always see the icon, you must
reverse the overlap.

Insert bolts and nuts in every hole and tighten with wrench (screw
head on water side of wall). Tape over screw heads with duck tape.

WALL INSTALLATION

5

SAND

STAKE AND STRING

PLANKS

BOTTOM PLATE

BOTTOM TRACK

PUMP RETURN

HOLE

WALL

SKIMMER HOLE

End

Illustration 5.1

Do not use impact gun for wall
screws.
Minimum torque force of 60 inch 
pounds to maximum of 85 inch pounds.

Outside of pool 

Inside of pool 

Fold 

Fold 

BOLT

E

nd

Start

NUT

Inside of pool

Outside of pool

!

IMPORTANT! Installing the wall joint in non-compliance with the specifications dictated by the manufacturer will void the warranty. 
A faulty installation will cause the wall/joint to split which could result in serious and/or fatal injuries!

Summary of Contents for E 10'

Page 1: ...st pas conçue pour le plongeon et ou les sauts tête première Pour votre sécurité abstenez vous de plonger car ceci pourrait causer de graves lésions ou entraîner la mort INSTRUCTIONS D ASSEMBLAGE PISCINES RONDES MODÈLE E Choisissez l emplacement idéal pour votre piscine en tenant compte des lois municipales sur la distance des clôtures celles des services publics sur la distance des fils électriqu...

Page 2: ...e quantité suffisante de sable pour la fi nition du fond PRÉPARATION DE L EMPLACEMENT suite 1 DIAMÈTRE RÉEL DU MUR D ACIER LIMITE DE DÉTERREMENT MATÉRIAUX NÉCESSAIRES RAYON 3 69 m 12 1 1 8 2 03 m 6 8 4 06 m 13 4 4 58 m 15 1 8 2 50 m 8 2 5 00 m 16 4 5 43 m 17 9 7 8 2 95 m 9 8 5 90 m 19 4 6 37 m 20 10 3 4 3 40 m 11 2 6 80 m 22 4 7 29 m 23 10 3 4 3 85 m 12 8 7 70 m 25 4 8 19 m 26 10 1 2 4 30 m 14 2 8...

Page 3: ... se termine avec la fin de la pous sière de roche ou de sable On calcule le rayon de la piscine plus 15 cm 6 à partir du centre du drain Placez le drain de fond assemblé dans le trou de façon à ce qu il soit environ 1 3 cm 1 2 plus haut que la terre de surface Enterrez le tuyau en plaçant le drain le plus possible de niveau Compactez avec les pieds et le pilon Mélangez trois pelletées de poussière...

Page 4: ...écart est trop grand mesurez la longueur du mur d acier et com parez la au tableau ci dessous Joindre les bouts des murs en orientant les plis vers l extérieur de façon à cacher l icône d exclamation voir l illustration 8 1 Note Si le mur est joint correctement vous ne devriez plus voir l icône d exclamation Si vous pouvez toujours voir l icone vous devez inverser le chevauchement Sécurisez le ave...

Page 5: ...soit bien lisse FINITION DU FOND 6 INSTALLATION DU MUR D ACIER suite 5 TOILE MUR D ACIER 30 cm 12 10 cm 4 DOUCINE DE SABLE OU PRÉFABRIQUÉE RAINURE DU BAS Avant de placer la toile contre la paroi introduisez le boyau d un as pirateur dans l orifice du retour d eau jusqu à environ 15 cm 6 du sol Fixez le boyau en place à l aide de ruban adhésif Bouchez égale ment l orifice de l écumoire avec du ruba...

Page 6: ... introduire l eau et la laisser monter jusqu au bas du mur avant d arrêter l aspirateur et de le retirer RETOUR D EAU Vous pouvez installer le retour d eau une fois l aspirateur retiré Placer l anneau de retour d eau contre la toile et ajustez le de façon à ce qu il soit parfaitement aligné avec le trou du mur Une fois l anneau ajusté et maintenu en place coupez la toile au cen tre de l anneau Ins...

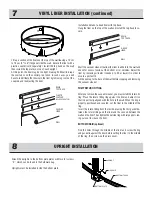
Page 7: ...oit bien insérée dans les trous oblongs de la plaque Déposez tous les sièges sur les poteaux avant de les fixer Assurez vous de vérifier la verticalité des poteaux avant de fixer les sièges Installez les sièges en vous assurant d avoir un espace égal entre chacun Maintenez les sièges en place à l aide de quatre 4 vis Z aux endroits indiqués INSTALLATION DU COUVRE JOINT 11 Accrochez le dessus du co...

Page 8: ...ond le retour d eau et le système de filtration selon les instructions d assemblage des manufacturiers Note Voir les Informations de sécurité Installez les quatres 4 étiquettes de sécurité DANGER fournies avec votre piscine comme suit deux 2 étiquettes visible à l entrée de la piscine et deux 2 visibles à partir de l accès principal de la cour arrière Important Si vous désirez des étiquettes suppl...

Page 9: ...0 10 10 10 10 10 10 10 1 11 58 m 38 80 25 29 1 10 10 10 10 10 10 10 10 10 10 1 14 38 m 47 2 80 25 29 1 12 12 12 12 12 12 12 12 12 12 1 17 07 m 56 96 25 29 1 14 14 14 14 14 14 14 14 14 14 1 20 02 m 65 8 112 25 29 1 16 16 16 16 16 16 16 16 16 16 1 22 89 m 75 1 128 25 29 1 18 18 18 18 18 18 18 18 18 18 1 25 73 m 84 5 144 25 29 1 DESCRIPTION 12 15 18 21 24 27 20 20 20 20 20 20 20 20 20 20 1 28 60 m 93...

Page 10: ...AVANT TOUT PAR LA SÉCURITÉ CONSIGNES DE SÉCURITÉ Veuillez lire ceci avant de procéder à l installation de votre piscine hors terre 12 775 rue Brault Mirabel Québec Canada J7J 0C4 Téléphone 1 800 448 7384 Télécopieur 1 866 777 0167 ...

Page 11: ...s avec votre piscine Ils doivent être ap posés sur la paroi intérieure de votre piscine au dessus du niveau de l eau Toute personne entrant dans la piscine devrait pouvoir voir ces autocollants Si vous désirez obtenir des autocollants addition nels vous pouvez en commander à www corneliuspools com con tact ou par téléphone au 1 800 448 7384 Nous ne fabriquons pas d échelles ni de marches de piscin...

Page 12: ...ge près de la piscine 12 Assurez vous qu un téléphone fonctionnel soit à la portée de la main du surveillant NOTE si le service 911 n est pas disponible dans votre localité veuillez vous assurer que le numéro des services de secours soit facilement accessible 13 Certains accidents causés par le système de filtration peu vent survenir lors de la baignade Les cheveux peuvent être aspirés par le drai...

Page 13: ...nd durability To achieve the best possible results follow the instructions carefully Failure to follow the installation procedures may result in damage to your pool or property and void your warranty We recommend that you make a preliminary study of the instruction booklet to familiarize yourself with the different parts of your pool Make sure that you understand each step thoroughly before you be...

Page 14: ...ent quantity of sand to the base finishing inside the circle See Step 6 3 69 m 12 1 1 8 2 03 m 6 8 4 06 m 13 4 4 58 m 15 1 8 2 50 m 8 2 5 00 m 16 4 5 43 m 17 9 7 8 2 95 m 9 8 5 90 m 19 4 6 37 m 20 10 3 4 3 40 m 11 2 6 80 m 22 4 7 29 m 23 10 3 4 3 85 m 12 8 7 70 m 25 4 8 19 m 26 10 1 2 4 30 m 14 2 8 60 m 28 4 1 3 tonne 1 2 tonne 3 4 tonne 1 tonne 1 1 2 tonne 1 3 4 tonne 1 tonne 1 1 4 tonne 1 1 2 to...

Page 15: ...us from the center of the drain then add 15 cm 6 Place the assembled bottom drain in the hole so that it is approxi mately 1 3cm 1 2 higher than the surface soil Bury the hose levelling the drain as much as possible Compact the soil using your feet and a tampering tool as well Mix three 3 shovels of stone or sand dust with one half shovel of pure cement adding a small quantity of water then pour t...

Page 16: ...es if applicable and uncoil the wall again If the spread is too wide measure the wall and check it against the chart below Join the ends of the walls by orienting folds outward to hide the ex clamation icon Illustration 8 1 Note If the wall is attached properly you should no longer see the exclamation icon If you can always see the icon you must reverse the overlap Insert bolts and nuts in every h...

Page 17: ...h adhesive tape Don t forget to block the skimmer hole with adhesive tape to prevent air from leaking in Place the unfolded liner in the center of the pool area at right angles with the skimmer hole Make sure you wear light flat soled shoes to walk on the sand as the slightest heel mark could be visible once the pool is filled Carefully unfold the liner bringing the bottom sidewall seam close to t...

Page 18: ... wall before stopping and removing the vacuum cleaner PUMP RETURN FITTING After you remove the vacuum cleaner you may install the return fit ting Place the return fitting ring against the liner and adjust it so that it is perfectly aligned with the hole in the wall When the ring is properly positioned and secured cut the liner in the middle of the ring Insert the return fitting from the inside pla...

Page 19: ...nto the oblong holes in the top plate Be sure to have a vertical plumb upright before fixing the top seat Evenly distribute the top seats all around the pool Secure the top seat in place using four 4 Z screws where indicated SEAT CAP INSTALLATION 11 Snap the seat cap on the top seat starting outside the pool Then snap the other side inside the pool Snap the plastic cap in the middle of the top sea...

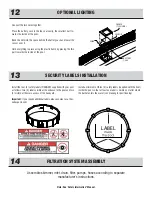
Page 20: ...ION SYSTEM ASSEMBLY 14 Assemble skimmer inlet drain filter pumps hoses according to separate manufacturer s instructions Note See Safety Information Manual Install the four 4 safety labels DANGER supplied with your pool as follows two 2 labels visible at the entrance to the pool and two 2 visible at the main access of the backyard Important if you require additional labels please contact us at Cor...

Page 21: ... m 38 80 25 29 1 10 10 10 10 10 10 10 10 10 10 1 14 38 m 47 2 80 25 29 1 12 12 12 12 12 12 12 12 12 12 1 17 07 m 56 96 25 29 1 14 14 14 14 14 14 14 14 14 14 1 20 02 m 65 8 112 25 29 1 16 16 16 16 16 16 16 16 16 16 1 22 89 m 75 1 128 25 29 1 18 18 18 18 18 18 18 18 18 18 1 25 73 m 84 5 144 25 29 1 DESCRIPTION 12 15 18 21 24 27 20 20 20 20 20 20 20 20 20 20 1 28 60 m 93 1 160 25 29 1 22 22 22 22 22 ...

Page 22: ...SAFETY AND FUN GO TOGETHER SAFETY INFORMATION Read this before installing your above ground pool 12 775 Brault Street Mirabel Quebec Canada J7J 0C4 Phone 1 800 448 7384 Fax 1 866 777 0167 ...

Page 23: ...ol above the water line or any places where the pool users can see them clearly before enter the pool If you need more stickers or if some are missing you can order these at www corneliuspools com contact or by calling 1 800 448 7384 Although we do not manufacture pool ladders every pool must have an ANSI APPROVED pool ladder for proper entering and exiting of the pool The proper use of the pool l...

Page 24: ...ease consult you municipality to get a rescue equipment list 12 An emergency phone number such as nearest available police fire ambulance and or rescue unit must be visible from pool area A functioning and or cellular phone must be reachable within 10 seconds 13 Avoid entrapments Suction from a pool drain or skimmer can trap an adult or children underwater Hair can get caught in faulty drain cover...

Reviews: