background image

106  

EM 9250 

Operator’s manual

3 Apply the adhesive weight manually in the position in which the relative plane was 

measured, using the centre of gravity of the weight itself as reference. In this phase, one 
display shows the unbalance value of the side to be balanced and the other shows the 
message "H.6" that indicates the correct position of application as shown in figure 19.

•  Adhesive weights applied manually without the weight-holder device (CLIP adhesive 

weight application position enabled)

1  Select the first side to be balanced.
2  Turn the wheel until the central element of the corresponding position indicator lights 

up. Keeping the wheel in position with the clamping brake, a display will now show the 
quantity of the weight to be applied in gr/ounces and the other will display the distance 
in mm alternatively to the plane identification abbreviation (A-1 for Inner Plane/A-2 for 
Outer Plane).

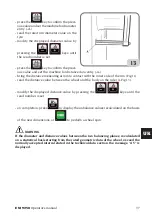
IN THE MACHINE VERSION WITH AUTOMATIC SENSOR 

move the sensor until it 

reaches the indicated position. During this phase, the unbalance value of the side to be 
balanced is shown on one display, whereas the numerical value updated according to 
the sensor position, which becomes zero when the position for application of the weight 
is reached, is shown on the other display.


IN THE MACHINE VERSION WITH MANUAL SENSOR 

with the wheel in a centred 

position, the machine indicates the unbalance value on a display, whereas the other 
display shows the message "d1" or "d2" alternately to the distance value of the plane 
corresponding to the body. 

  Move the sensor to the position shown on the display in which the message "d1" or "d2" 

appears alternately to the distance value (the distance is read on the rule)

4  Apply the adhesive weight manually, using the centre of the notch in the holder as the 

reference for the centre line of the weight.

“Shift planes” programme (only with ALU P programmes)

This function is automatically enabled when an ALU P programme is selected. 

It modifies the former selected positions for the application of adhesive balancing weights, 
in order to allow perfect wheel balancing using commercially available adhesive weights 
in multiples of five grams.

The accuracy of the machine is thereby improved, avoiding rounding-off or cutting the weights 
to be applied to come closer to the actual unbalance values.

10. PROGRAMME FOR POSITIONING THE WEIGHTS 

BEHIND THE SPOKES “HIDDEN WEIGHT”  

(ONLY WITH ALU 1P AND ALU 2P PROGRAMMES)

For alloy wheels, use the Hidden Weight programme in conjunction with the ALU 1P or ALU 
2P programme to conceal the external weight behind two spokes for aesthetic reasons.
The Hidden Weight programme can only be activated if there is an unbalance on the outer side.
This programme divides the outer weight Pe into two weights P1 and P2 located in any posi-
tion chosen by the operator. The only condition is that the two weights and the original outer 

Summary of Contents for CompactLine EM 9250

Page 1: ...Cod 4 119438 del 09 2015 EM 9250 CompactLine...

Page 2: ...BALANCING PROGRAMMES ALU1P OR ALU2P 98 5 ENTERING DIMENSIONS IN THE MOTORCYCLE PROGRAMMES 101 6 WHEEL SPIN 101 7 UNBALANCE DISPLAY WITHOUT ROUNDING OFF 102 8 APPLYING BALANCING WEIGHTS 102 9 APPLYING...

Page 3: ...E WEIGHT APPLICATION POSITION H3 H6 H12 119 15 10 SET UP LED LIGHT IF PROVIDED 120 15 11 SET UP LASER INDICATOR IF PROVIDED 121 15 12 AUTOMATIC POSITION SEARCH 121 16 UNBALANCE CALIBRATION WITH CALIBR...

Page 4: ...hine in a folder near it where it is readily ac cessible for consultation by the operators The technical documentation supplied is considered an integral part of the machine in the event of sale all r...

Page 5: ...n be moved by placing the packaging on a wheeled trolley or inserting the forks of a fork lift truck in the relative slots in the pallet Fig 1 1 Packaging dimensions Length Depth Height Weight Packagi...

Page 6: ...are when unpacking assembling lifting and setting up the machine as indicated below Failure to observe these instructions can damage the machine and compromise the operator s safety Removetheoriginalp...

Page 7: ...nce instruc tions consult the related operator manuals provided with the documentation of the machine CAUTION The machine must not be operated in potentially explosive atmospheres The machine is suppl...

Page 8: ...singandthethreeLbrackets thesebrack ets will be used to fasten the machine to the floor Refit the brackets on the machine in the original positions without tightening the screws Positionthemachineonth...

Page 9: ...ultrasonic sensor cable inside the slots in the metal pipe see fig 7 fixing the cable using the supplied hose clamp A fig 7 Fasten the ultrasonic sensor to the guard pipe with the three supplied M8 s...

Page 10: ...he place of installation The set up data for each machine are given on themachinedataplateandonaspeciallabelattachedtothepowersupplyconnectioncable CAUTION Any operations for hooking up to the worksho...

Page 11: ...operatedswitchorsuitablelock outdevice to restrict machine use exclusively to qualified personnel CAUTION For the machine correct functioning it is vital to have a good ground connection NEVER connec...

Page 12: ...that they are adequately supervised during work do not touch power lines or the inside of electric motors or any other electrical equip ment before making sure that they have been powered off read th...

Page 13: ...ergy Automatic sensor for distance and diameter measurement Automatic mechanical sensor for width measurement if present AWD AutoWidthDevice programmeformeasuringthewidthusinganultrasonicsensor if pre...

Page 14: ...apid optimisation of operating noise reduction FSP Fast Selection Program programme for the automatic selection of the balancing programme General utility programmes calibration service diagnostics In...

Page 15: ...t sensor 1293 mm width with guard with automatic width measurement sensor 1389 mm height with guard closed 1392 mm height with guard open 1645 mm depth without guard without the automatic sensor for m...

Page 16: ...r from 1 to 35 max wheel machine distance 360 mm max wheel width with guard 600 mm Max wheel diameter with guard 1117 mm Max wheel weight 75 kg Machine weight with guard without accessories and withou...

Page 17: ...essional use only CAUTION Only one operator at a time can work with the machine The wheel balancers described in this manual must be used exclusively to measure the extent and position of car wheel un...

Page 18: ...o know your machine The best way to prevent accidents and obtain top perfor mance from the machine is to ensure that all operators know how the machine works Learn the function and location of all the...

Page 19: ...heels for cars and lightweight transport vehicles Motorcycle environment Motorcycle environment active the balanc ing programmes are dedicated to motorcycle wheels Hidden weight Hidden Weight function...

Page 20: ...o select the type of weight to use on the inner side of the wheel 2 In the menu press this key to navigate 3 When entering dimensions manually press this key to decrease the displayed value 4 Menu Ent...

Page 21: ...r 14 distance 150 mm Now the operator can set the data of the wheel to be balanced or select one of the pro grammes available 2 BALANCING PROGRAMME SELECTION Before starting a balancing operation the...

Page 22: ...ock position clip weight to apply manually at the 12 o clock position STA clip or adhesive weight to apply manually at the 12 o clock position either on the outer or inner side or at the centre of the...

Page 23: ...e machine allows for the diameter and distance values to be entered automati cally the width value can be entered using the keypad Bring the automatic measuring arm into contactwiththeinnersideoftheri...

Page 24: ...lancing Programme moving the arm to the rest position the machine will set up for the manual WIDTH entry inthisphase itispossibletoperformanadditional acquisition of the rim diameter and distance Meas...

Page 25: ...nternal automatic measuring arm into contact with the inner side of the rim fig 11 During this phase the graphic shown in figure 11a will appear on the display Take great care to position the arm corr...

Page 26: ...e obviously inside the rim The values measured are with reference to external planes and as a result are smaller than the nominal values due to the thickness of the rim itself The correction value the...

Page 27: ...et order Pay maximum attention to the measured data since they are influenced by the stored ones After setting geometric dimensions correctly and returning the sensors to the rest posi tion the unbala...

Page 28: ...inner side of the rim Fig 11 read the distance value between the wheel and the body on the rule A Fig 13 modify the displayed distance value by pressing the keys until the read number is set on comple...

Page 29: ...re of the notch in the holder is used as the reference for the centre line of the weight fig 14 In Alu 2P refer to the rim edge since the inner weight is of the clip type Fig 15 Keep the arm in positi...

Page 30: ...uity so that the weight can be applied in that position Read the internal distance d1 from the body on the rule Modify the value on the right display by pressing the keys to get the previously read di...

Page 31: ...value displayed on the right display by pressing the keys to get the previously measured nominal diameter Press to display the unbalance values recalculated according to the new dimensions or perform...

Page 32: ...eft side and hold them down until the braking phase starts If one of the two contacts or both is released during the wheel start up or reading phase the message A Cr will appear and the brake will be...

Page 33: ...ounce if visualised in ounces In this condition the first four grams of unbalance are not displayed since an appropriate threshold indicated by illumination of the LED on the display panel is activate...

Page 34: ...e position is activated This function is described at length in the AUTOMATIC POSITION SEARCH section Manually applied adhesive weights Select the first side to be balanced Turn the wheel until the ce...

Page 35: ...distance in mm alternatively to the plane identification abbreviation A 1 for Inner Plane A 2 for Outer Plane 3 Position the adhesive weight inside the cavity of the weight holder device Fig 18 a b 4...

Page 36: ...hase one display shows the unbalance value of the side to be balanced and the other shows the message H 12 that indicates the correct position of application as shown in figure 19 WARNING The machine...

Page 37: ...wheel in a centred position the machine indicates the unbalance value on a display whereas the other display shows the message d1 or d2 alternately to the distance value of the plane corresponding to...

Page 38: ...weight holder device is present turn the wheel again until the central element of the outer side Pe position indicator lights up 4 Turn the wheel to the point where the first outer weight P1 should b...

Page 39: ...n is combined with the SHIFT PLANES function to allow the use of balancing weights in multiples of 5 grams Notes The Hidden Weight procedure can be quit at any time by simply pressing the key The Hidd...

Page 40: ...resent on the vehicle while running even after accurate balancing thus minimising the rim tyre coupling run out Based on our experiences the programme can be recalled every time it is convenient to mi...

Page 41: ...he tyre at the 12 o clock position Note in this phase press the key to display the first time the key is pressed the actual unbalance values of the wheel as currently mounted on the wheel balancer the...

Page 42: ...if doing so is impossible press the key and the machine will provide the instructions for completing the programme without reversing the tyre 13 ENABLING THE OTHER OPERATOR This programme makes it po...

Page 43: ...ogramme press the key use the keys to search for SP in press the key to display the total number of spins performed by the machine since its first start up tot SPi press the key to display the number...

Page 44: ...uration menu press the key use the keys to search for SEt UP press the key 15 1 SET UP SELECTING VEHICLE TYPE CAR MOTORCYCLE Configuration used for enabling motorcycle wheel balancing functions Procee...

Page 45: ...ng the securing cones to the threaded part of the shaft mount the relative extension A Fig 22 on the internal measuring arm set the wheel data as shown in the paragraph En tering wheel dimensions Impo...

Page 46: ...the inside of the rim to be accessed freely To enter the dimensions and apply the weights refer to the paragraphs with ALU 1P ALU2P or ALU St to memorise the rated dimensions of the rim Self adhesive...

Page 47: ...ed to the gram or tenth of an ounce if displayed in ounces Proceed as follows to modify this configuration press the key use the keys to search for SEt UP press the key to confirm use the keys to sear...

Page 48: ...to change the setting OPt on to activate the display of the alarm indicator light or OPt oFF to deactivate the display of the alarm indicator light press the key to confirm and exit 15 6 SET UP RIM D...

Page 49: ...s configuration press the key use the keys to search for SEt UP press the key to confirm use the keys to search for b in b MM if the display in millimetres is enabled press the key to change the setti...

Page 50: ...operator to select where the adhesive weight should be applied based on his needs To select this configuration proceed as described below press the key use the keys to search for SEt UP press the key...

Page 51: ...atistic ALU programs 12 o clock press the key to confirm and exit 15 10 SET UP LED LIGHT IF AVAILABLE The machine allows the operator to disable or modify the lighting mode Proceed as follows to make...

Page 52: ...irm use the keys to search for LAS on LAS oFF if previously set press the key to change the setting LAS on to enable the laser device or LAS oFF to disable the laser device press the key to confirm an...

Page 53: ...to disable the automatic position search programme press the key to confirm and exit 16 UNBALANCE CALIBRATION WITH CALIBRATION WEIGHT This programme allows sensitivity calibration whenever calibratio...

Page 54: ...spins in automatic mode At the end of the spin the message End CAL will appear on the display if the cali bration has been successful an acoustic consent signal goes off at the end of the spin otherwi...

Page 55: ...shaft as sembly bell fig 25 4 Press the key to confirm the securing of the template 5 Once confirmed CAL rot is shown on the display 6 Slowly turn the template towards the operator to automatically en...

Page 56: ...nd the actual rim widths differ Proceed as follows to recall this programme press the key use the keys to search for GAU CAL press the key to perform calibration proceeding as follows 1 Themachinewill...

Page 57: ...e Dynamic Motorcycle ALU or if selected in the Motorcycle Programme but with the wheel NOT in the centred position A 41 Incorrect wheel spin procedure on the wheel balancer without guard The warning a...

Page 58: ...resent Visualisation of this error can be disabled by performing the following procedure press the key use the keys to search for GAU CAL press the key E 6 Error condition when executing optimisation...

Page 59: ...h respect to the previous position 12 o clock Out 2 This message is displayed when the improvement obtained by optimi sation is not sufficient Press the key to exit the program or the key to continue...

Page 60: ...e unbalance calibration programme at the end of the second spin End CAL Thismessageindicatestheendoftheunbalancecalibrationprogramme GO ALU Spin with ALU programme selected GO d15 Spin with Motorcycle...

Page 61: ...cer TROUBLESHOOTING Below is a list of faults that may occur and that the user can solve if the cause is found among those indicated For any other malfunction or fault call in the technical support ce...

Page 62: ...he machine was jolted during the spin Repeat the spin taking care not to disturb the machine while measuring is in progress The machine does not firmly rest on the floor Make sure that the floor suppo...

Page 63: ...as to avoid accidental dropping and subsequent damage that would affect centring accuracy Afteruse storeconesandflangesinaplacewheretheyaresuitablyprotectedfromdustanddirt If necessary use ethyl alcoh...

Page 64: ...ed product Any disposal of the product performed in a different way from that described above will be liable to the penalties provided for by the national regulations in force in the country where the...

Page 65: ...e which when inserted on the wheel balancer shaft is used to centre the wheels having central holes with a diameter ranging between maxi mum and minimum values DYNAMIC BALANCING Procedure for unbalanc...

Page 66: ...h ULTRASONIC SENSOR Electroniccomponentthat togetherwiththeinformationcollectedbytheinternalsensor makes it possible to measure the wheel width This measurement is taken by transmitting and receiving...

Page 67: ...P1 Internal pick up BP2 External pick up FU1 Fuse FU2 Fuse M1 Motor QS1 Main switch RP3 Outer distance potentiometer SQ1 Safety guard micro switch start key XS1 Power supply socket BR2 Diameter measur...

Page 68: ...EM 9250 Operator s manual 137 UK...

Page 69: ...translated stored in an electronic retrieval system repro duced or partially or totally adapted by any means including microfilm and photostats without prior permission The information contained herei...

Page 70: ...138 EM 9250 Operator s manual Notes...

Page 71: ...COMIM Cod 4 119438 09 2015 CORGHI S p A Strada Statale 468 n 9 42015 CORREGGIO R E ITALY Tel 39 0522 639 111 Fax 39 0522 639 150 www corghi com info corghi com...

Reviews: