background image

Cooper Lighting Solutions   


                               EG-2      9850-000776-01 

              7

Change IP address via the Ethernet port

EG2 is supplied from the factory without DHCP enabled; therefore, it is necessary that the Ethernet 
port of the PC is set to the correct IP Address and Subnet Mask. For details of setting the IP address 
of your computer consult information on line. This will depend on your Operating System.

Example

IP Address: 

192.168.0.99

Subnet mask: 

255.255.255.0

Gateway:      

192.168.0.254

To connect the EG2 directly to the PC, it may be necessary to use a Crossover Cable, however, most 
modern computers are able to connect directly to another Ethernet device without a crossover 
cable.

The Ethernet port of your computer will need to configured to a compatible IP address.

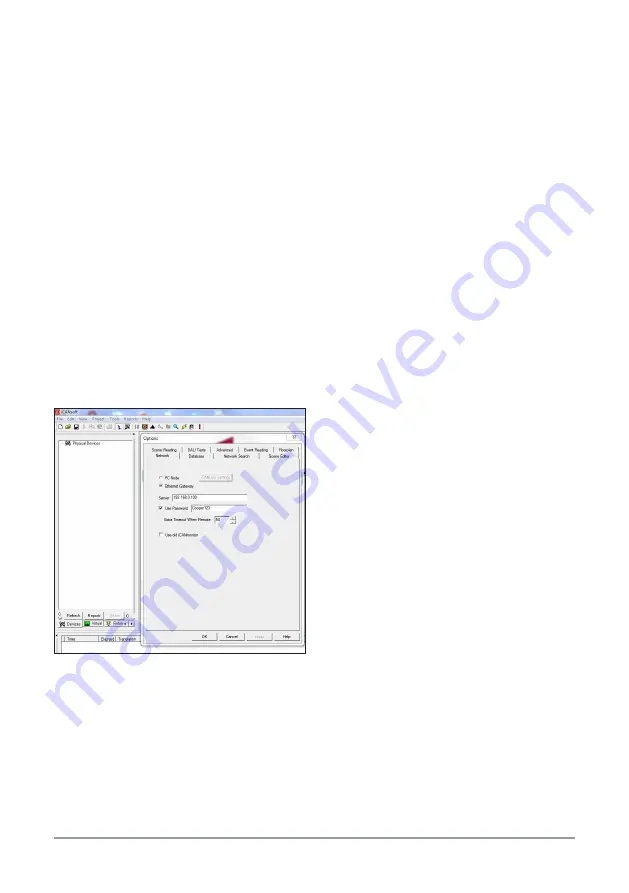
Open iCAN programming software. It will be required to set the software to communicate using the 
Ethernet Port.
This is done by selecting from the Tool bar Tools>Options>Network.
Select Ethernet Gateway and change the IP address to 192.168.0.100. Also ensure the ‘Use 
Password’ check box is ticked. The detault password is Cooper123 (Case sentitive).

Select OK to confirm and set the address. 

The software can now be used to configure any 

items connected on the network. 

Set the IP address of the EG2 as described 
in section opposte. The new IP address will 
become valid when the EG2 is reset or power to 
the device is removed and re-instated.

Reset to factory defaults

Factory defaults may be reset by the following procedure:

Remove power from the board.

Press the CAN ID button and reapply power. Keep the button pressed until the CAN LED flashes 

then stays on. At this point the Ethernet settings will have been restored to defaults.

After setting to factory defaults, the IP address of the device will revert to 192.168.0.100

Summary of Contents for EG-2

Page 1: ...EG 2 Ethernet Gateway Installation Guide ...

Page 2: ...utions EG 2 9850 000776 01 2 Contents Introduction 3 Basic Schematic 3 Installation 3 Product Overview 4 Connecting the Supply 5 iCAN Network Connections 5 Set Up Instructions 6 Configuration 6 Setting the IP address 6 7 ...

Page 3: ...l and configure the iCAN system using iCANsoft on a LAN network PC or via the internet rather than by connecting directly into iCANnetTM Where a wireless LAN is in place or by connecting a wireless router into the Ethernet Gateway the user can access the network with a Wi Fi enabled PC running iCANsoft The Ethernet Gateway is also the host for the iCAN series of remote applications including iOS i...

Page 4: ...error iCAN IDENT Switch that causes the EG2 to send a message on the CAN BUS to identify itself iCAN status Green flashing LED indicates normal operation Product Overview The label on the enclosure identifies the position of the status LEDS switches connectors iCAN Network For connection see Page 5 for wiring details TIMECLOCK Set through iCAN programming software LED on when timeclock active RESE...

Page 5: ...r Consult Cooper Lighting Solutions for information on alternative cable types IMPORTANT NOTE Connecting a mains potential cable to the iCAN Network terminals is likley to damage the unit and others connected and invalidate warranty V 0V CAN L SHIELD CAN H 0V VDC iCAN devices are daisy chained on the network Spurs from the Network are not permitted and will result in communications problems Device...

Page 6: ...ttings are to use a fixed IP address of 192 168 0 100 Any device used to communicate with the EG2 will need to be located within the 192 168 0 x subnet Power up The EG2 takes approximately 60 seconds to be ready for use once power is applied Wait for the Green CAN LED to flash slowly The Green Power LED will double flash continuously while EG2 is on If Ethernet is connected the Link and Data LEDs ...

Page 7: ...ll be required to set the software to communicate using the Ethernet Port This is done by selecting from the Tool bar Tools Options Network Select Ethernet Gateway and change the IP address to 192 168 0 100 Also ensure the Use Password check box is ticked The detault password is Cooper123 Case sentitive Select OK to confirm and set the address The software can now be used to configure any items co...

Page 8: ...RANTY OF MERCHANTABILITY AND THE IMPLIED WARRANTY OF FITNESS No employee agent dealer or other person is authorised to give any warranties on behalf of the Seller or to assume for the Seller any other liability in connection with any of its goods except in writing and signed by the Seller The Seller makes no representation that the goods comply with any present or future federal state or local reg...

Reviews: