5
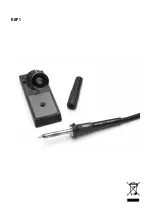
Thank you for buying the Weller HAP 1. The apparatus has
been subjected in the production process to the most strin-
gent quality requirements, which will ensure faultless appa-
ratus operation.
1. Caution
Please read these Operating Instructions and the Safety
Information carefully prior to initial operation of the appara-
tus. Failure to observe the safety regulations results in a risk
to life and limb.
The manufacturer shall not be liable for damage or injury
resulting from use that deviates from these Operating
Instructions and from unauthorised modifications.
Safety Informations
●
Always place the soldering iron in the original holder.
●
Remove all inflammable objects from the proximity of the
hot soldering tool.
●
Use suitable protective clothing. Risk of burns from liquid
solder.
●
Never leave the hot soldering iron unsupervised.
Do not point the hot air soldering tool at persons or flam-
mable objects
●
Never work on voltage-carrying parts.
●
In case of usage of nitrogen, ensure adequate ventilation
(Only on units with external compressed air supply)
2. Description
100 W hot air soldering tool with integrated finger switch,
suitable for soldering and desoldering surface mounted com-
ponents. A wide range of nozzles makes the tool of universal
application.
The air flow is controlled using the finger switch integrated
in the handle. The hot air flowing out of the soldering tool is
free of static charges. Hose and handle are of anti-static
design. The temperature-regulated hot air can be set to bet-
ween 50°C and 550°C using the control unit employed.
3. Placing in Operation
Ensure that the control unit is switched off. Place the hot air
pencil in the safety stand. Plug the electrical connector into
the 7-pole connecting socket on the control unit and lock.
Slide the hose onto the „AIR“ nipple on the control unit.
Switch on unit and set temperature and air flow rate.
4. Potential balance
The hot air soldering tool is equipped with an equipotential
bonding wire that can be configured as per the operating
instructions for the control unit used.
5. Soldering Notes
The hot air nozzles are screwed into the heater element. To
change the nozzle use the 8 AF socket spanner and lock the
heater element using open-ended spanner.
Attention:
The thread depth is max. 5 mm (0.2”). A longer thread
will cause irreparable damage to the heater element
Replacement hot air tools are supplied adjusted and can be
connected without further adjustment.
To check the temperature of the hot air, it is recommended
to use a special measuring nozzle (0058727808) through
which a sheathed thermocouple ø 0.5mm can be connected.
The operating instructions for the control unit used are
also applicable in addition to these operating instruc-
tions
6. Items Supplied
Hot Gas Pencil
005 27 115 99
KH-holder
005 15 027 99
Nozzle 1,2 mm ø
005 87 270 59
Socket spanner SW8
005 87 488 61
Operating Instructions
Subject to technical change without notice!
English
Technical Data:
Heater rating:
100 W
Heater voltage:
24 V AC
Max. air flow rate:
10 l / min.
Temperature range:
50°C – 550°C
Precision:
+/- 30 °C


