


OPERATION INSTRUCTIONS
(continued)
B. PROGRAMMING - SETTING A FAVORITE POSITION (MY
BUTTON)
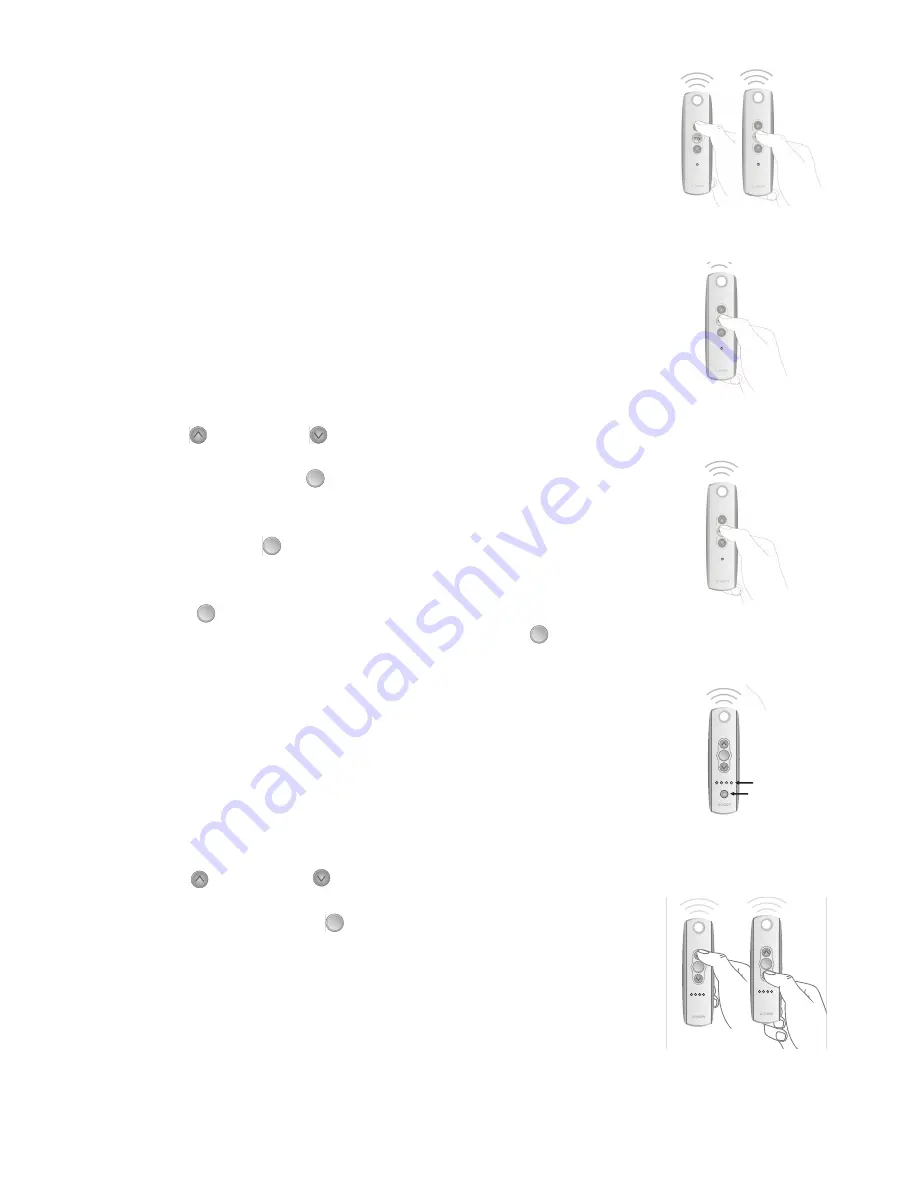
In addition to standard OPEN and CLOSE features, the Telis
remote enables the user to pre-establish a favorite stop location.
a.k.a. “MY” (stop) favorite position. An example could be to
command the RTS motorized window covering to a 50% or 75%
open or closed position when the “MY” button is briefly pressed.
1. TELIS 1 RTS TRANSMITTER ONLY:
a. Using the
UP
( ) or
DOWN
( ) buttons, activate the window
covering to a desired position, for example halfway Open or
Closed. Briefly press the “
MY
” ( ) (stop) button to stop the
window covering once position is reached. (fig. 1)
b.
Press and hold the “
MY
” ( ) button until the window covering
“jogs.” Favorite position is now recorded.
(fig. 2)
c. Favorite “
MY
” ( ) position can be activated from any previous
window covering position.
Example:
Briefly press the “
MY
”( )
button while window coverings in a Open or Closed position. (fig.
3)
2. TELIS 5 RTS TRANSMITTER ONLY
a. Using the Telis 5 remote, select the appropriate channel using
the
CHANNEL SELECTOR BUTTON
. (The LED lights will illuminate
each time the Channel Selector Button is pressed, indicating the
selected channel) (fig. 4)
b. Using the
UP
( ) or
DOWN
( ) buttons, activate window
covering to a desired position, for example halfway Open
or Closed. Briefly press the “
MY
” ( ) (stop) button to stop the
window covering once position is reached. (fig. 5)
NOTE:
Activating window covering to a favorite position
while already “in-motion” will require two brief presses of the
“
MY
”(stop) button. - OR - Window covering MUST BE in a
stationary (Stopped) position before the “
MY
” favorite position
can be activated.
my
my
NOTE: IN CASE OF A LOST TRANSMITTER, PROFESSIONAL PROGRAMMING ASSISTANCE IS REQUIRED. PLEASE CONTACT SOMFY
AT [email protected] OR YOUR LOCAL DEALER AT www.somfysystems.com/locatedealer.
REPLACING THE BATTERY
1.
Using a small screwdriver loosen the
screws on the reverse side of the remote
control and remove the back cover.
2.
Replace the battery with one
2430 Lithium 3V battery.
PROGRAMMING - SETTING A FAVORITE POSITION (MY)
2.
Press ans hold the “MY” ( ) Button until the
window covering “jogs.” Favorite position is
now recorded.
Telis 1 RTS Transmitter only:
1.
Using the UP ( ) or DOWN ( ) Buttons,
activate the window covering to a desired
position, for example halfway Open or
Closed. Briefly press the “MY” ( ) (stop)
Button to stop the window covering
once position is reached.
C-0001
© Copyright SOMFY SYSTEMS, INC. 1/2010
PAGE 2 REV 6
In addition to standard OPEN and CLOSE features, the Telis remote enables the user to pre-establish a favorite stop location. a.k.a. “MY”
favorite position. An example could be to command the RTS motorized window covering to a 50% or 75% open or closed position
when the “MY” button is briefly pressed.
OR
Telis 5 RTS Transmitter only:
1a.
Using the Telis 5 remote, select the
appropriate channel using the CHANNEL
SELECTOR BUTTON. (The LED lights will
illuminate each time the Channel Selector
Button is pressed, indicating the selected
channel)
1b.
Using the UP ( ) or DOWN ( )
Buttons, activate window covering
to a desired position, for example
halfway Open or Closed. Briefly
press the “MY” ( ) (stop) Button
to stop the window covering once
position is reached.
Telis 1 RTS Transmitter only:
1.
Use the UP ( ) or DOWN ( )Buttons to
open or close the window covering.
If a specific position is necessary,
briefly press the “MY” ( ) (stop)
Button to stop the window covering
once position is reached.
Telis 5 RTS Transmitter only:
1.
Using the Telis 5 remote, select
the appropriate channel using the
CHANNEL SELECTOR BUTTON. (The LED
lights will illuminate each time the
Channel Selector Button is pressed,
indicating the selected channel)
2.
Using the UP ( ) or DOWN ( )
Buttons to open or close the
window covering. If a specific
position is necessary, briefly press
the “MY” (stop) ( ) Button to
stop the window covering once
position is reached.
my
Channel
Selector
LED Lights
my
Channel
Selector
LED Lights
my
my
my
my
my
my
my
my
3. Favorite “MY” ( ) position can be activated
from any previous window covering position.
Example: Briefly press the “MY”( ) button
while window coverings in a Open or Closed
position.
OPERATING THE MOTORIZED WINDOW COVERING
Note: Activating window covering to a
Favorite position while already “in-motion”
will require two brief presses of the “MY”
(stop) button.
Window covering MUST BE in a stationary
(Stopped) position before the “MY” favorite
position can be activated.
my
my
my
NOTE: IN CASE OF A LOST TRANSMITTER, PROFESSIONAL PROGRAMMING ASSISTANCE IS REQUIRED. PLEASE CONTACT SOMFY
AT [email protected] OR YOUR LOCAL DEALER AT www.somfysystems.com/locatedealer.
REPLACING THE BATTERY
1.
Using a small screwdriver loosen the
screws on the reverse side of the remote
control and remove the back cover.
2.
Replace the battery with one
2430 Lithium 3V battery.
PROGRAMMING - SETTING A FAVORITE POSITION (MY)
2.
Press ans hold the “MY” ( ) Button until the
window covering “jogs.” Favorite position is
now recorded.
Telis 1 RTS Transmitter only:
1.
Using the UP ( ) or DOWN ( ) Buttons,
activate the window covering to a desired
position, for example halfway Open or
Closed. Briefly press the “MY” ( ) (stop)
Button to stop the window covering
once position is reached.
C-0001
© Copyright SOMFY SYSTEMS, INC. 1/2010
PAGE 2 REV 6
In addition to standard OPEN and CLOSE features, the Telis remote enables the user to pre-establish a favorite stop location. a.k.a. “MY”
favorite position. An example could be to command the RTS motorized window covering to a 50% or 75% open or closed position
when the “MY” button is briefly pressed.
OR
Telis 5 RTS Transmitter only:
1a.
Using the Telis 5 remote, select the
appropriate channel using the CHANNEL
SELECTOR BUTTON. (The LED lights will
illuminate each time the Channel Selector
Button is pressed, indicating the selected
channel)
1b.
Using the UP ( ) or DOWN ( )
Buttons, activate window covering
to a desired position, for example
halfway Open or Closed. Briefly
press the “MY” ( ) (stop) Button
to stop the window covering once
position is reached.
Telis 1 RTS Transmitter only:
1.
Use the UP ( ) or DOWN ( )Buttons to
open or close the window covering.
If a specific position is necessary,
briefly press the “MY” ( ) (stop)
Button to stop the window covering
once position is reached.
Telis 5 RTS Transmitter only:
1.
Using the Telis 5 remote, select
the appropriate channel using the
CHANNEL SELECTOR BUTTON. (The LED
lights will illuminate each time the
Channel Selector Button is pressed,
indicating the selected channel)
2.
Using the UP ( ) or DOWN ( )
Buttons to open or close the
window covering. If a specific
position is necessary, briefly press
the “MY” (stop) ( ) Button to
stop the window covering once
position is reached.
my
Channel
Selector
LED Lights
my
Channel
Selector
LED Lights
my
my
my
my
my
my
my
my
3. Favorite “MY” ( ) position can be activated
from any previous window covering position.
Example: Briefly press the “MY”( ) button
while window coverings in a Open or Closed
position.
OPERATING THE MOTORIZED WINDOW COVERING
Note: Activating window covering to a
Favorite position while already “in-motion”
will require two brief presses of the “MY”
(stop) button.
Window covering MUST BE in a stationary
(Stopped) position before the “MY” favorite
position can be activated.
my
Fig. 1
Fig. 2
Fig. 3
Fig. 4
Fig. 5
19


