8
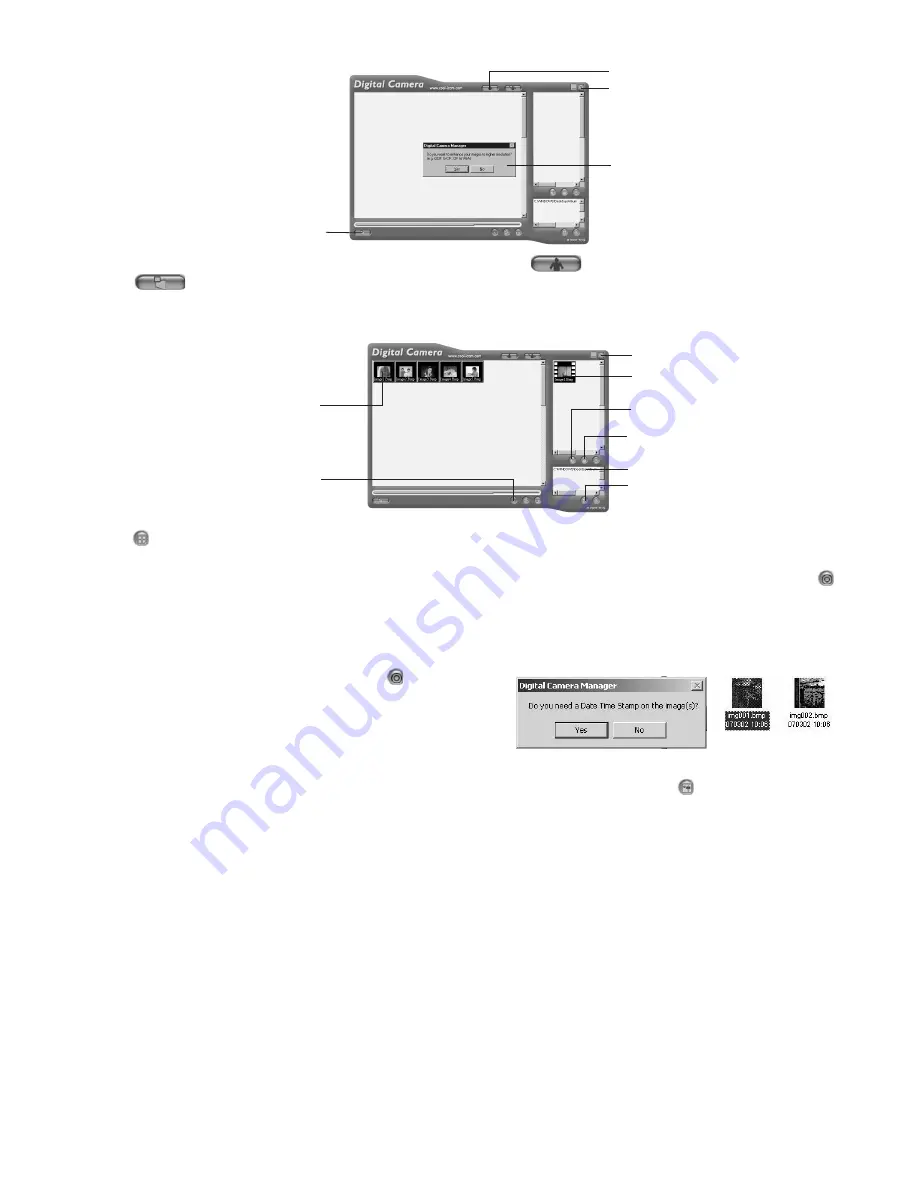
You are now able to enhance the resolution of your taken images by using the Digital Camera Manager. Before you start to
capture all stored images, a window will pop up and ask you if you want to convert all the stored images to High Resolution
(640x480) automatically.
1. Switch to DSC Mode
Close
2a. Enchance resolution
2b. Capture all stored images
1. Switch the interface to DSC (Digital Still Camera) Mode by clicking the
button.
2. Click
to capture all images stored in your
Pocket C@m
. A window will pop up and ask if you want to convert all
stored images to higher resolution (640 x 480 pixels).
• If you want all images to be converted to 640 x 480 pixels, click “Yes”.
• If you want all images remain unchanged, click “No”.
Saved images(s)
Close
Adjust image
E-mail saver image
Album
4. Create New Album
5. Save the selected image(s)
into the album
3. Highlight wanted image(s)
3. All uploaded images will be shown on the left panel.
4. click
to create a new album to hold your images. Name the album and save it to wherever you want in your PC.
5. If you have already created an album and you want to save image(s) in, click on the album.
6. TO SAVE ONE IMAGE
• To save 1 particular image and put in the selected album, select the image by clicking the image once and click the
Save Still Image button.
• Your computer will prompt you by giving you the option to save the images with Date Time Stamp.
• If you choose yes, all the images name will be sufx with date and time.
• The selected image will appear on the right panel and it will be saved to the album you created and or highlighted.
7. TO SAVE ALL IMAGES
• To save all images taken and put in the album, select all the images by holding the CTRL button down on keyboard with
the mouse click on each image and click the
button.
• Your computer will prompt you by giving you the option to save
the images with Date Time Stamp.
• If you choose yes, all the images name will be sufx with date
and time.
• All the selected images will appear on the right panel and they
will be saved to the album you created and highlighted.
8. To Adjust an Image
You can adjust an image (brightness, contrast, etc.) by highlighting the image and clicking the
button.
9. To retrieve images saved in an album, simply double-click the album and the images stored in the album will be shown on
the top right panel.
6.4 How to Install ArcSoft
®
Software
PhotoStudio
®
2000
PhotoStudio
®
2000 is a full-featured, easy-to-use digital
image-editing program that provides a complete set of photo editing
and retouching tools, plus a wide selection of special effects and enhancements. Its powerful features include a wide variety
of input and output options, layers, multiple undo and redo functions, image management tools, editable text, multiple le
format support and a lot more.
ArcSoft PhotoFantasy™ 2000
ArcSoft PhotoFantasy™ is an image entertainment application that enables users to create “photo fantasies” by combining
their personal photos with a wide variety of fantasy backgrounds. Users can get their own images from digital cameras,
scanners, disk drives and Photo CDs, and seamlessly combine them with just a few clicks of the mouse. The fantasy
backgrounds include ctional characters, classic works of art, Olympic heroes, 50’s funnies, bathing beauties, muscle men
and a lot more.
ArcSoft PhotoPrinter
®
2000
ArcSoft PhotoPrinter
®
is an easy-to-use printing utility that enables the user to layout and print multiple images in different
sizes quickly and easily on a single sheet of paper. The program offers a large selection of printing templates, including Kodak
Digital Science Inkjet Photo Paper Templates and Avery-brand paper products. It also includes commonly used image-editing
tools and a wide selection of templates for frames, edges and backgrounds for enhancing images.


