background image

10

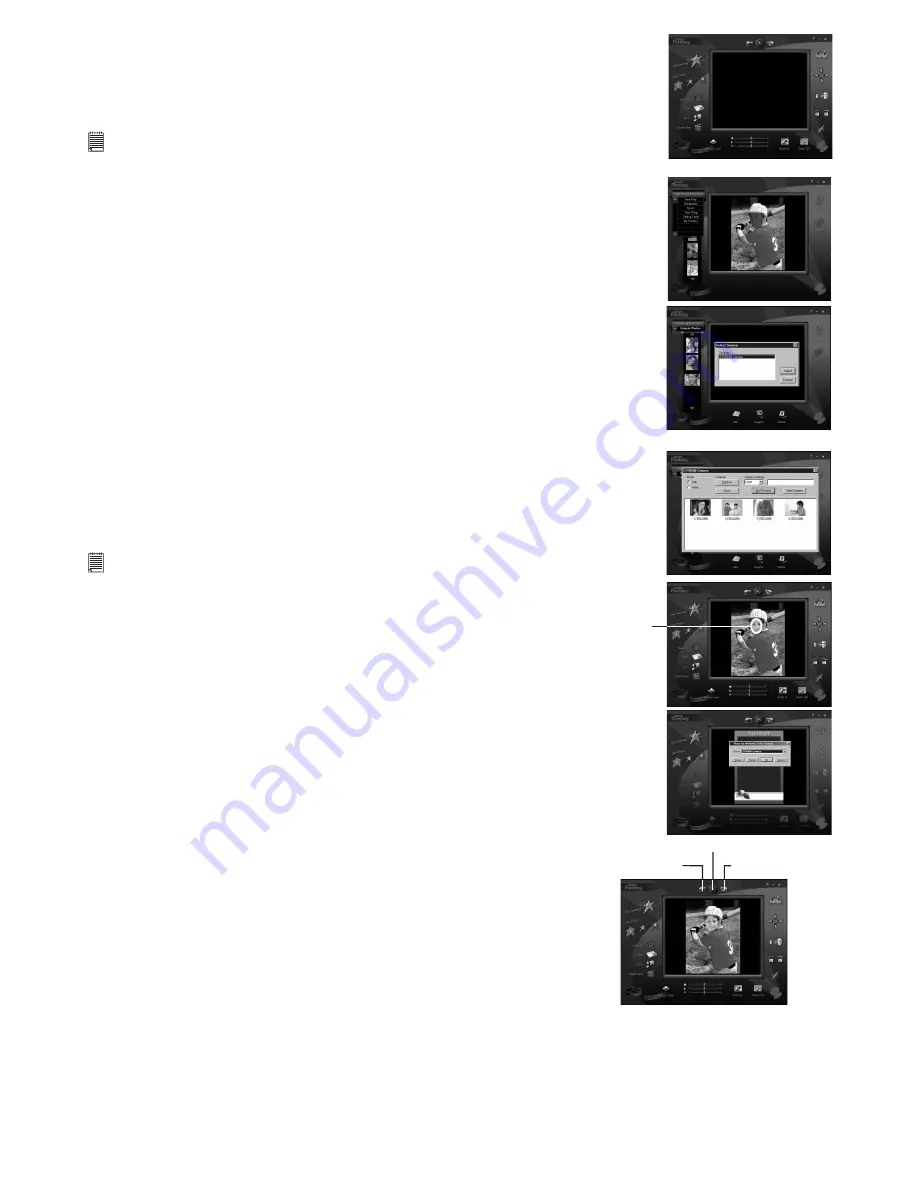
6.7 How to use ArcSoft PhotoFantasy™ 2000 


1.  Select the “PhotoFantasy™ 2000” icon from the “ArcSoft

®

 Camera Suite” program 


group on the Windows® Start Menu.

2.  Click “Get Fantasy” to select the template in the existing library and then click “OK” 


to conrm.


 Important! Make sure the “Digital Camera” CD-ROM is in the CD-ROM Drive.

Using the images stored in your 

Pocket C@m

:- 


3.  Double click on “Get Photo 1” and click “Acquire”. Select “STV0680 Camera’ or “USB 

Dual Mode Camera” (for XP user only) as the source. The capture interface will show 

up.

4.  To capture image(s), highlight the wanted image(s) and click “Capture”.


The captured images will be shown in the window.  Select the image you want and 


click “Capture”.

5.  The  selected  image  will  shown  within  the  “mask”  on  the  selected  template. 


You can play with the image by using the function icons. 

Using live images:- 


6.  You can also capture a live shot when your 

Pocket C@m

 is connected to your PC by 


the following steps:

7.  Click “Get Fantasy” to select the template in the existing library and then click “OK” 


to conrm.


   Important! Make sure the “Digital Camera” CD-ROM is in the CD-ROM Drive.


“Mask”


8.  Click the “Camera front icon” on the top to start the live shot mode.  A Video for 

Windows  Driver  Options  window  will  pop  up.    Select  “STV0680 Camera”  or  “USB 

Dual Mode Camera” (for XP user only) and click “OK”.


9.  Click the “Round icon” on the top to start live shooting.  The image captured will be 


shown within the “mask” on the selected template.  Click the “Camera Back icon” to 


capture the live shot you want.


10.You can resize, rotate or reposition the images by using the function icons shown 


on the right hand side or reposition the image using your mouse and dragging the 


image.

11. For further help on how to use ArcSoft PhotoFantasy™ 2000, go to “Help” to access 


the Help Topics.


Visit  http://www.arcsoft.com  for  all  your  FAQ’s,  tips  and  technical  support.  See 


Section 8 for more details. 


Capture Image

Start Live View

Select Camera Source

Summary of Contents for CIC-175

Page 1: ...erial Bus port You can also use your Pocket C m to capture not only snaps of your family and friends but also video clips of them in action for Windows Users only Your Pocket C m can also be used as a Web Cam If you have an internet connection and microphone not supplied you can chat face to face with friends and colleagues conferencing in real time Please note that your images are stored on your ...

Page 2: ...to use Arcsoft PhotoPrinter 2000 11 6 9 Creating and Uploading Movie Clips 11 6 10 Creating Live Movie Clips 11 6 11 How to use Arcsoft VideoImpression 1 6 12 6 12 How to use Microsoft NetMeeting 13 For Macintosh Users MAC 6 13 How to install Digital Camera Driver 13 6 14 How to install PhotoStudio 2000 14 6 15 How to install ArcSoft PhotoFantasy 2000 14 6 16 How to install Arcsoft PhotoPrinter 20...

Page 3: ...nge r Back View 1 Front View Side View 2 3 4 5 6 1 7 8 Pendant Strap Pocket C m Software CD ROM includes Digital Camera Manager PC Digital Camera Installer Mac PhotoStudio 2000 PC Mac ArcSoft PhotoPrinter 2000 PC Mac ArcSoft VideoImpression 1 6 PC 1 5 Mac ArcSoft Fantasy 2000 PC Mac Microsoft NetMeeting PC Cu SeeMe Mac Adobe Acrobat Reader PC Mac Quick User Guide Pocket Cam Pocket C m Notebook cli...

Page 4: ...reen displays the number of images remaining that can be taken before the Pocket C m s memory is lled It is also used in conjunction with the Mode Button to access and display the Pocket C m settings Images Remaining Clear Memory Mode Self Timer Mode Low Resolution Low Res Mode High Resolution Hi Res Mode Continuous Mode Low Battery Warning LCD will blink 5 4 Mode Button The Mode Button has 2 prim...

Page 5: ...t C m Attach your Pocket C m to your notebook computer Pull Adjust your Pocket C m to any suitble angle Adjust angle Important Notes To use as a web cam you will require Internet access To talk and listen you will require a sound card speakers and microphone not supplied 5 8 Power 5 8 1 Stand by Mode After a period of 30 seconds inactivity the Pocket C m will switch to Stand by Mode automatically ...

Page 6: ...a series of rapid beeps as each image is taken If the Shutter Button is not pressed within 5 seconds the Pocket C m will revert to the normal image taking mode Important Notes During the Continuous Mode the Pocket C m will allow images to be taken with insuf cient light Self Timer Mode To use the self timer feature press the Mode Button until appears in the LCD then press the Shutter Button to sta...

Page 7: ...stall Digital Camera Driver XP users only 1 Insert the CD ROM disc into the CD ROM drive and close the CD ROM drawer 2 An installation wizard will automatically launch 3 Click on the Digital Camera Driver XP only 4 Follow the on screen prompts 6 3 Uploading Images from Your Pocket C m You can use the Digital Camera Manager to upload images captured by your Pocket C m at any time whether or not the...

Page 8: ... you by giving you the option to save the images with Date Time Stamp If you choose yes all the images name will be suf x with date and time All the selected images will appear on the right panel and they will be saved to the album you created and highlighted 8 To Adjust an Image You can adjust an image brightness contrast etc by highlighting the image and clicking the button 9 To retrieve images ...

Page 9: ...the text based chat program and much more Using your PC and the Internet you can now hold face to face conversations with friends and family around the world To install the Microsoft NetMeeting 1 Insert the CD ROM disc into the CD ROM drive and close the CD ROM drawer 2 An installation wizard will automatically launch 3 Click the Microsoft NetMeeting icon 4 Follow the instructions presented on the...

Page 10: ...shot when your Pocket C m is connected to your PC by the following steps 7 Click Get Fantasy to select the template in the existing library and then click OK to con rm Important Make sure the Digital Camera CD ROM is in the CD ROM Drive Mask 8 Click the Camera front icon on the top to start the live shot mode A Video for Windows Driver Options window will pop up Select STV0680 Camera or USB Dual M...

Page 11: ... Click to create a new album to hold your images Name the album and save it to wherever you want in your PC 3 Hightlight the favorite images and click the button to create a movie clip avi le with all the selected images 4 Select the video compression format Full Frames Uncompressed format is recommended 5 The movie clip created will appear on the right panel and it will be saved to the album you ...

Page 12: ...face will show up To capture image s from your Pocket C m select the wanted image s and click Capture If you don t want to use the images in your Pocket C m click Cancel or x to close Using live images Pause icon Record icon Live icon 4 If you want to capture live video make sure your Pocket C m is connected to your PC Click the Live icon and preview the live video on screen Click the Record butto...

Page 13: ...WWL Mac Installer Or you can use the Digital Camera INSTALLER if you want the resolution remain unchanged 6 13 How to Install Digital Camera Driver Software Notes Important Macintosh users may only choose one type of driver at a time to install digital camera driver without enhancement The driver cannot run properly if both driver are installed 6 13 1 How to Install Digital Camera Driver without e...

Page 14: ...r in System Folder WWL Mac Import in Plug ins Folder in the PhotoStudio 2000 and movies 6 13 4 How to Uninstall Digital Camera Driver with enhancement To uninstall the Digital Camera Driver with enhancement you have to remove 3 les located in different folders and restart your Mac The 3 les are listed below WWL Mac in Control Panel Folder WWL Mac in Extensions Folder in System Folder WWL Mac Impor...

Page 15: ...d then click Import Click Close to leave the capture interface You can now edit your image s with PhotoStudio s features 4 For further help on how to use PhotoStudio 2000 go to Help to access the Help Topics Visit http www arcsoft com for all your FAQ s tips and technical support See Section 8 for more details Import le the without enhancement Import le the with enhancement 6 20 How to use ArcSoft...

Page 16: ...vie le will appear in the album and when you click save the movie clip will be saved in the Movie Folder under the VideoImpression Folder If you want to get an existing movie le and to get and nd the movie le which already saved in your hard disk 5 For further help on how to use ArcSoft VideoImpression 1 5 click the at the top right hand corner to access the Help topics 6 23 How to use CU SeeMe Wa...

Page 17: ...5256 Fremont California CA Fax 81 03 5816 4730 Tel 1 800 762 8657 toll free number Web http www mds2000 co jp arcsoft Fax 1 510 440 1270 E mail japan arcsoft com and E mail support arcsoft com support mds2000 com For China For South Central America ArcSoft China Support Centre Beijing Tel 1 510 979 5520 Tel 8610 6849 1368 Fax 1 510 440 1270 Fax 8610 6849 1367 E mail latinsupport arcsoft com E mail...

Page 18: ...amera driver capture device I cannot upload images to the PC Please also refer to the help les User Guides that accompany the enclosed applications For further information and support please visit our website http www coolicam com For Macintosh Users MAC Symptom Problem Solution I receive an error message when I am installing the Digital Camera Manager STV0680 Capture WWL Mac Import plug in le and...

Page 19: ...or Progressive 1 3 CMOS with 640x480pixels Color Filter Array RGB Bayer matrix Recording Image 352 x 288 pixels High Resolution 176 x 144 pixels Low Resolution Exposure Automatic Optical View nder Built in Lens Focal length 5mm equivalent to 52mm on 135 camera Working Range Normal 0 5m in nity File Format Typical image les supported by bundled software program Data Transfer True RGB data Self time...

Page 20: ...t installed and used in accordance with the instructions may cause harmful interference to radio communications However there is no guarantee that interference will not occur in a particular installation If this equipment does cause harmful interference to radio or television reception which can be determined by turning the equipment off and on the user is encouraged to try to correct the interfer...

Reviews: