background image


6


B422806 - 191115 

GROUNDING INSTRUCTIONS 

This appliance must be grounded while in use to protect the operator 
from electrical shock. The appliance is equipped with a 3-conductor 
cord and a 3-prong grounding-type plug to fit the proper grounding-
type receptacle. 

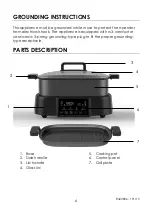
PARTS DESCRIPTION 


1.


Base 

2.


Side handle 

3.


Lid handle 

4.


Glass lid 

5.


Cooking pot 

6.


Control panel 

7.


Grill plate


Summary of Contents for B422806-00003-00000

Page 1: ...1 B422806 191115 Save These Instructions For Household Use Only 6 5 QT 2 IN 1 MULTI COOKER Owner s Manual...

Page 2: ...o not use with damaged cord or plug Do not use if it has been dropped damaged left outdoors or dropped in water Return it to the service center for examination repair or adjustment 7 It is recommended...

Page 3: ...explosive and or flammable fumes 22 Extreme caution should be exercised when using or moving the appliance containing food or other hot liquids 23 Do not move the appliance during cooking 24 Use only...

Page 4: ...lid placed correctly into position on the removable cooking bowl throughout operation of the appliance unless stated in the recipe to have it removed 38 Do not place the removable cooking bowl when ho...

Page 5: ...en checking the food Do not use Multi Cooker near or under surfaces that are heat sensitive or those that may be damaged by steam To prevent burns remove lid slowly and with the underside of lid angle...

Page 6: ...otect the operator from electrical shock The appliance is equipped with a 3 conductor cord and a 3 prong grounding type plug to fit the proper grounding type receptacle PARTS DESCRIPTION 1 Base 2 Side...

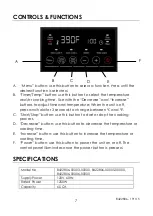
Page 7: ...conds to change between and C Start Stop button use this button to start or stop the cooking process D Decrease button use this button to decrease the temperature or cooking time E Increase button use...

Page 8: ...liance OPERATION Before placing the removable cooking pot or grill plate always ensure the exterior is clean and dry This will ensure proper contact with cooking surface When use grill function place...

Page 9: ...go into keep warm mode Remark Do not place the glass lid on grill plate when cooking 3 SLOW COOK H FUNCTION Place the ingredients in the cooking pot Press the Power button to turn on the unit Press t...

Page 10: ...uttons Time range is 1 min to 2 hours Press the Start Stop button to start the cooking process This function works best with lid placed on the multi cooker After cooking is complete the unit will beep...

Page 11: ...e is no temperature displayed with this function and cooking time is automatically calculated Time will appear on the display and count down for the last 10 minutes of the cooking process Press the St...

Page 12: ...12 B422806 191115 Any other servicing should be performed by an authorized service representative...

Reviews: