background image

Power and Network Installations

Choose one of these six (6) options to connect the 
Door Station’s wiring:

•  Ethernet with PoE (preferred)
•  Ethernet with AC
•  Ethernet with DC
•  WiFi with AC
•  WiFi with DC
•  WiFi with PoE

Option 1 (Preferred): Ethernet Connection with a 
PoE Injector or a Third-Party Injector or Switch

This option sets up Ethernet with PoE.

PoE injects electrical current into the Ethernet cable 
using a PoE Injector (model #AC-POE1-B) or a third-
party PoE solution to provide the Door Station with 
power and a network connection. 

To install the Door Station with a PoE and Ethernet 
connection using a PoE Injector:

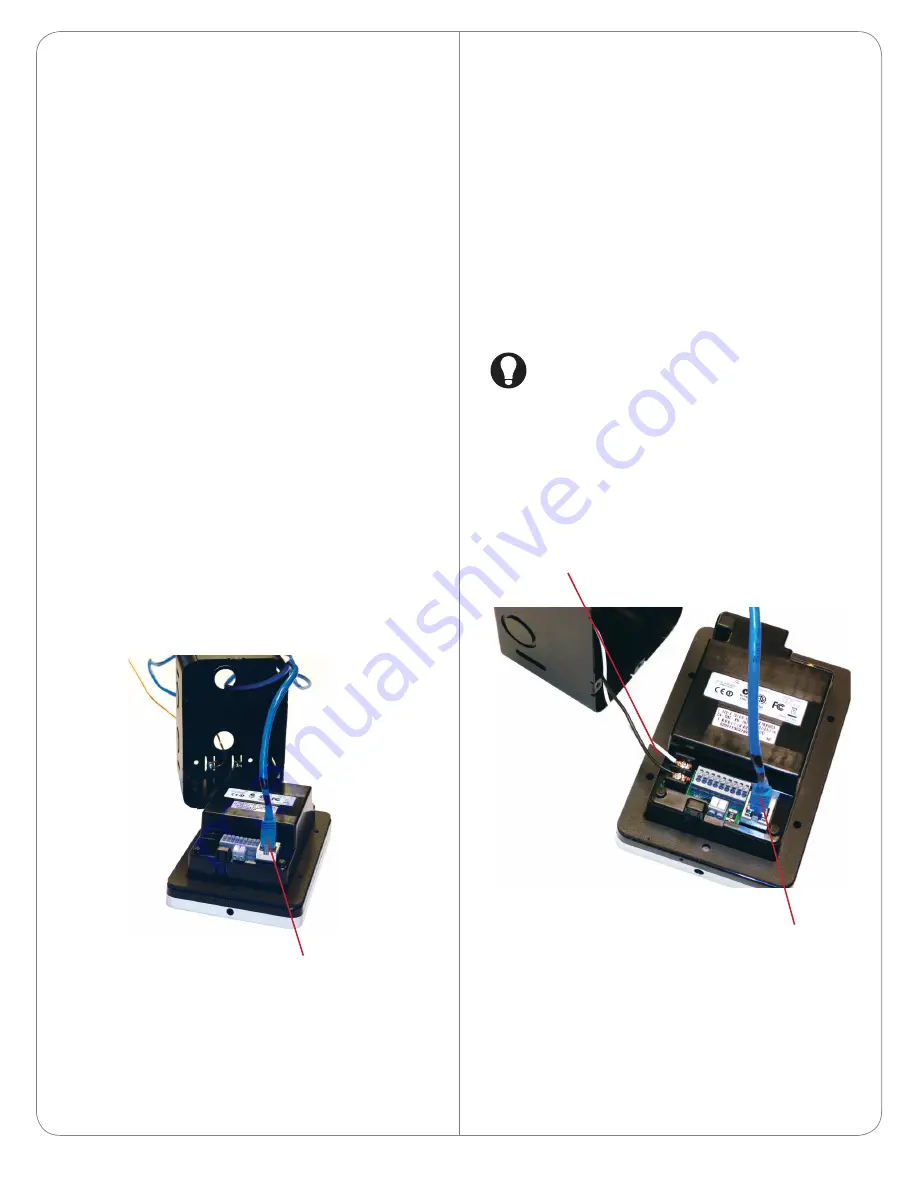
Plug the Ethernet cable into the Door Station 
(see Figure 3).

Figure 3. Ethernet with PoE Injector

Option 2: Ethernet Connection with AC Power

This option sets up Ethernet and AC power.

To install the Door Station with Ethernet and AC 
power:

Plug the Ethernet cable into the Door Station 
(see Figure 4). 

Connect the neutral (N) (-) and hot (L) (+) wires 
to the AC power source for the Door Station 
according to the national and local electrical 
codes. 

TIP

: The hot or ‘L’ (+) wire’s connector is 

closest to the bottom of the Door Station’s 
plate. 

Your installation may require alternative wires and 
the use of a terminal block. Strip the power wires 
to 1/4” on the end if necessary.

Figure 4. Ethernet with AC Power

Option 3: Ethernet Connection with DC Power

This option sets up Ethernet and DC power.

4

Ethernet Connection

Ethernet Cable

AC Connections  

(Hot and Load)

Summary of Contents for C4-DSC-EN-INT

Page 1: ...er room 3 Speaker Used for Audio and video intercom 4 Microphones 2 Used for audio and video intercom Supported Models C4 DSC EN INT Door Station Interior AC DC POE WiFi Satin Black Box Contents Caref...

Page 2: ...strength in Composer Pro s System Manager a strong robust signal is required See the Composer Pro User Guide for details This device uses an Ethernet or WiFi network connection and can be powered usin...

Page 3: ...estore process the button will blink rapidly Mounting Tips Follow these tips for the best results 1 Install the Door Station in a place where it will be protected from water For interior use only 2 Do...

Page 4: ...rnet cable into the Door Station see Figure 3 Figure 3 Ethernet with PoE Injector Option 2 Ethernet Connection with AC Power This option sets up Ethernet and AC power To install the Door Station with...

Page 5: ...To install the Door Station with WiFi and AC power 1 Connect the neutral N and hot L wires to the AC power source for the Door Station according to the national and local electrical codes TIP The hot...

Page 6: ...the antenna wire through the back box hole see Figure 12 Ensure that the wire doesn t touch the back box 5 Align the antenna vertically to the wall outside the back box 26cm antenna or run the antenn...

Page 7: ...estore the Door Station 1 Remove the faceplate and pull the Door Station out from the back box just enough to expose the Reset button see Figure 2 2 While powered press the Reset button on the bottom...

Page 8: ...e antenna s plug to the RSMA connector on the Door Station see Figure 11 Figure 11 Antenna to RSMA Connector 3 Thread the other end of the antenna through the back wall of the back box see Figure 12 F...

Page 9: ...normally closed or normally opened switchable connection for doorbell control see Figure 15 or gate control The set contains a connection for Normally Opened NO Normally Closed NC and Common COM 9 Fig...

Page 10: ...d provide access to the dwelling s Ethernet network and corresponding personal data There are alternatives to mitigate this risk The Dealer should consider the following options Running Control4 on an...

Page 11: ...isant ce produit en quelque sorte autre que d crit dans ce document vide votre garantie De plus Control4 n est pas responsable d aucun dommage encouru avec l abus de ce produit Voyez que Warranty WARN...

Reviews: