background image

21

20

Flight Modes Continued

Flight Modes Continued

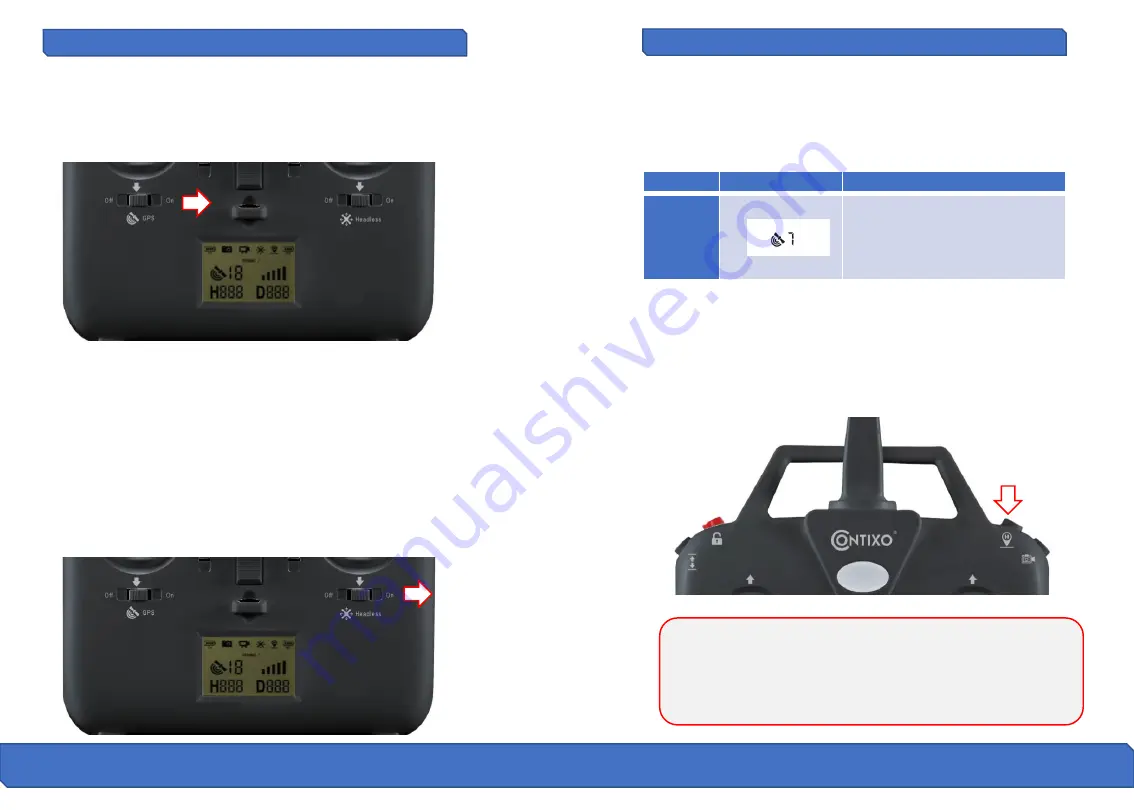
GPS Mode

GPS mode enables precise positioning and prevents drone loss. 
Simply move the GPS switch to the on position before operating the 
drone to use all of the GPS features such as 

Return to Home and 

Low Voltage Return To Home. You must wait approximately 1-2 
minutes until you achieve a GPS signal of at least 7.

Headless Mode

Headless Mode will cause the flight controller to “remember” which 

direction is "forward" when the drone is ready to fly, and use that 

direction as "forward“, “backward”, “left”, or “right” regardless of the 

current orientation of the drone.

To enable headless mode move the headless mode switch to the on 

position before the drone takes off. Next, you’re required to position the 
drone in such a way that it’s front end faces away from you and the 
drone’s back end is facing you. You can give up worrying about 

orientation altogether with headless mode enabled and it is a great way 
for novice pilots to get used to flying a drone. 

The Return-to-Home(RTH) procedure brings the drone back to the last 
recorded Home Point. There are 3 types of RTH procedures: smart RTH, 
failsafe RTH and low battery RTH.

The following section describes the home point and GPS signal in detail.

Smart RTH

If a strong GPS signal is available (more than 7 satellites on the LCD 
screen) and the home point is recorded at takeoff, press the return 
home button. The drone will fly back to the home point. You can use the 
remote controller to guide the drone around obstacles during the smart 
RTH procedure. You can press the RTH button again to exit RTH 
procedure and regain the control of the drone.

GPS

Description

Home 

Point

The Home Point is the location from 
where the drone takes off. A strong 
signal of at least 7 must be present 
prior to take off in order for the drone 
to remember the home point.

Please not that the drone does not have sensors allowing it to avoid 
obstacles. The drone must always be flown in a wide open area and 
must be manually controlled to avoid obstacles. Use caution when using 
the return home function and make sure the drone does not end up on 
a rooftop, a tree, or any other obstacle that may be in the way during 
return and descent. 

Summary of Contents for F18

Page 1: ... instruction manual prior to first flight Please keep this manual for future use CONTACT CONTIXO support contixo com www contixo com CONTIXO is a trademark of Contixo Inc 2017 Contixo Inc All Rights Reserved F18 GPS DRONE www contixo com ...

Page 2: ...ycle the drone as per local laws and regulations dictate 01 CAUTION AII instructions and warnings must be followed exactly Mishandling of LI Po batteries can result in a fire personal injury and or property damage 1 By handling charging or using the included Li Po battery you assume all risks associated with lithium batteries 2 If at any time the battery begins to balloon or swell discontinue use ...

Page 3: ...l Diagonal 12 2 inches Overall Height 2 95 inches Drone Weight included battery approximately 1 lb Brushless Motors 1806 KV1800 Battery 7 4 V 2100 mAh Li polymer Charging Time about 5 hours Maximum Flying Time approximately 18 minutes Technical Parameters of the Drone Drone Diagram 1 Screwdriver 1 Mobile Phone Clip 1 Quick Start Installation Guide 1 Warranty Card 1 Instruction Manual Thank you for...

Page 4: ...t the charger plug to the power outlet the charger indicator light will turn green 2 Connect the triple line plug of the battery with the charger cable 3 The charger indicator light will stay solid red while charging and turn solid green once the battery is completely charged Full charge time takes about 5 hours Attention Adult supervision is required when charging the batteries Only batteries of ...

Page 5: ... battery into battery compartment Listen for a clicking sound indicating battery is firmly installed Locate the lock located on the bottom of the drone and turn it 90 degrees to the LOCK position Attention Failure to properly secure the battery before flight engagement may result in battery dislodgment and drone malfunction How to remove the battery Turn the lock located on the bottom of the drone...

Page 6: ...d and new batteries Do not mix alkaline standard carbon zinc or rechargeable nickel cadmium batteries If using rechargeable batteries remove prior to charging Children should handle rechargeable batteries under adult supervision only Exhausted batteries are to be removed from the remote The supply terminals are not to be short circuited 1 2 3 4 5 6 7 8 9 10 11 GPS Icon Altitude from Home Point in ...

Page 7: ...ontrol options Attention Any interruption during pairing process will disrupt pairing You must not turn on the drone prior to this step otherwise you will not be able to connect the drone and the remote successfully This is the only time you can change between Remote Control Throttle modes if you wish to change modes after pairing you must turn off the drone and the remote and repeat this process ...

Page 8: ...le Control Fly Left Right Controls MODE 1 MODE 2 Throttle Control Turn Left Right Controls Forward Control Backward Control Fly Left Right Controls MODE 3 MODE 4 Forward Control Backward Control Fly Left Right Controls Throttle Control Turn Left Right Controls Throttle Control Fly Left Right Controls Forward Control Backward Control Turn Left Right Controls ...

Page 9: ...troller is so long that the signal is weak 2 The battery is removed nearly after the drone connects to the remote controller Drone Initialization Detection After signal connection has been successful the drone enters into initialization detection procedure The front and rear lights on the drone will flash red light green and green alternately Make sure that the drone is set on a flat and level sur...

Page 10: ... magnetic field such as A parking place or construction area with underground reinforcement Gyroscope Calibration Once drone is calibrated set drone on a flat surface push down both of the control sticks to the lower left corner and release indicated as below photo Once the front and rear lights are both green and flashing rapidly it means that gyroscope is under calibration status When the lights...

Page 11: ...Operation Mode 2 Flight Modes Manual Controls Slide the GPS button to the off position The drone s GPS function is now turned off and the drone will be operated manually You will see the GPS Icon disappear from the LCD display Lock the drone Pull down the throttle stick to the bottom position long press the red button for 3 seconds the motors will stop immediately The remote will beep indicating t...

Page 12: ...he Return to Home RTH procedure brings the drone back to the last recorded Home Point There are 3 types of RTH procedures smart RTH failsafe RTH and low battery RTH The following section describes the home point and GPS signal in detail Smart RTH If a strong GPS signal is available more than 7 satellites on the LCD screen and the home point is recorded at takeoff press the return home button The d...

Page 13: ...er 45 ft away the drone will automatically fly back to the original Home Point If the drone flying altitude is less than 45 ft or the flying distance is less than 45 ft the drone will automatically land to the ground Attention When drone is in low voltage RTH status you can not regain control of the drone by pressing the RTH button Photo To capture breath taking photos simply short press the photo...

Page 14: ...attery from battery compartment of the drone and store or recharge it for your next flight Pre Flight Preparation Before you take off make sure that 1 The drone and the remote controller are completely charged 2 The propellers are installed correctly 3 The motors work normally after unlocking Mobile Device Application The Contixo F18 mobile APP is essential to operate your F18 Drone Please make su...

Page 15: ...ed Gallery Viewer You can view all of your captured files via the App interface Simply press the Gallery icon to enter the gallery interface Attention Please make sure that your mobile device supports 5G WIFI before linking to the Contixo F8 App Hide Buttons Press this icon to hide the icons on the app Icon will turn red while activated Return button Press this icon to return to the previous menu ...

Page 16: ...ow please replace the battery 2 The drone is in initialization status please re calibrate the gyroscope No Status Meaning 1 Front and rear lights flash green light rapidly Signal between drone and transmitter has been interrupted 2 Front and rear lights flash red light green and solid green alternately Drone initializing and pairing 3 Front light glows solid red rear light glows solid light green ...

Reviews: