


7
5.
Testing the Smoke Detector
a)
Firmly push the TEST button, and the smoke detector alarm will sound a loud beep. The alarm
will stop sounding after releasing the TEST button.
b)
If the smoke detector does not sound, please retest the detector again.
6.
HUSH Feature
This button on the smoke detector is a combined Test/Hush button to silence false alarms.
a)
To cancel a false alarm, press the Test/Hush button located on the cover. The alarm will
automatically switch to a reduced sensitivity condition. This reduced sensitivity will last for 10
minutes. The unit will flash the red light every 10 seconds (instead of the normal 40 seconds)
to indicate the sensitivity has been reduced.
b)
The unit will reset to normal sensitivity at the end of the silenced period. If additional silenced
time is required, simply push the Test/Hush button again.
7.
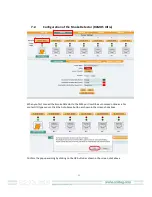
Configuring the Smoke Detector
a)
Plug the sensor into one of the RJ45 ports on the rear panel of the unit.
b)
Now point your browser to the IP address of the unit (default, 192.168.0.100). Next you need
to login as the administrator using your administrator password (default is “public”). You will
then be taken to the summary page.
c)
From the summary page you need to select the sensors tab. The layout of the next page will
vary depending on your unit so please refer to your units manual.
Status:
If the sensor is offline the status is No Status. If the sensor is online and there is no Smoke
detected, the status is Normal. If Smoke is detected then the status is Critical. If at any time
communications with the Smoke Detector are lost, the status of the Smoke Detector is changed to
sensorError.
When a smoke detector is connected, the unit will sense it as dry-contact sensor. The user can change
the description of the sensor to a Smoke Detector.
Summary of Contents for RMS-I-DE-01
Page 1: ...RMS I DE 01 Smoke Detector...


