Conteg RMS-I-DE-01 User Manual Download Page 6


3.


Smoke Detector Placement 

It is recommended that you install one detector in each room and in separate hallways. If the hallway 
is over 12 meters long, install a detector at each end. They should be located at the top levels of first-
to-second floor stairwells. 

Install  the  smoke  detectors  as  close  to  the  center  of  the  ceiling  as  possible.  If  this  is  not  possible, 
mount no closer than 4 inches from a wall or corner. 

DO NOT install the smoke detectors: 

o


Near  appliances  or  areas  where  normal  combustion  regularly  occurs  (cooking  areas, 
furnaces, hot water heaters, florescent lighting etc.). 

o


Near air returns or heating and cooling supply vents. Install at least 3 feet away from these 
areas. The air could blow the smoke away from the detector, interrupting the alert. 

o


In rooms where temperatures may fall below 5 degrees C or rise above 45 degrees C. 

o


In  extremely  dusty,  dirty,  or  insect-infested  areas  where  loose  particles  interfere  with  the 
smoke detectors alarm operation 

IMPORTANT! 

Specific requirements for Smoke Alarm installation vary from country to country. Check with your local 
Fire Department for current requirements in your area. 
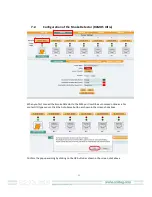
4.


Installing the Smoke Detector 

a)


From the back of the smoke detector, remove the mounting plate by turning it 
counterclockwise. (To later engage the tamper-resist feature, twist out and set aside one of 
the pins molded into the plate. Both pins are exactly the same.) 

b)


Secure the plate to the ceiling or wall with the mounting screws. 

c)


Lift open the battery pocket door. 

d)


Connect the new 9-Volt battery to the battery connector inside the battery pocket. Be sure 
the battery is securely connected. The red LED may blink briefly when the battery is installed. 

e)


Close the battery picket door, snapping it into place. 

f)


Position the smoke detector to the mounting plate and turn it clockwise to lock it into place. 
To engage the tamper-resist feature, insert the pin into the notch on the edge of the smoke 
detector after the detector is properly positioned in the base. 

g)


Push the test button to test the smoke detector. (see below). 

Summary of Contents for RMS-I-DE-01

Page 1: ...RMS I DE 01 Smoke Detector...

Page 2: ...h this manual was prepared and checked with the best care CONTEG spol s r o cannot accept any liability for omissions or errors in this publication Due to the continuous development and progress CONTE...

Page 3: ...a 11 8 Additional Information on the Smoke Detectors 14 8 1 Test Button Testing 14 8 2 Connecting via dry contact inputs 14 8 3 Cleaning and Problems with Smoke Detectors 14 1 Introduction Smoke detec...

Page 4: ...the Smoke Detector as Dry Contact sensor o Disconnect alarm Note that the smoke detector will be detected as a Dry Contact sensor See more on this in the configuration of the sensor o Accurate cost e...

Page 5: ...ch the smoke detector for many reasons For example if a fire starts in a remote part of a building or home on another level wall roof or on the other side of a closed door smoke may not reach the smok...

Page 6: ...e with the smoke detectors alarm operation IMPORTANT Specific requirements for Smoke Alarm installation vary from country to country Check with your local Fire Department for current requirements in y...

Page 7: ...required simply push the Test Hush button again 7 Configuring the Smoke Detector a Plug the sensor into one of the RJ45 ports on the rear panel of the unit b Now point your browser to the IP address...

Page 8: ...reen shot above In the Smoke Sensors settings page you will rename your Smoke Sensor as you wish in the Description field We can also rename our sensors descriptions in the Descriptions fields then tu...

Page 9: ...f No Smoke Now if we navigate back to the Summery page we can see the sensor is present there showing the correct status Note Please see the Siren Strobe Sensor User Manual for the step by step instru...

Page 10: ...ar florescent lighting these may have an effect on the sensors and cause false alerts You can use the Continuous Time feature shown in the above screen shot to eliminate these false alerts These setti...

Page 11: ...first connect the Smoke Detector to the RJ45 port is will be auto sensed online as a Dry contact I O type sensor Click the Auto Sense button as shown in the screen shot above Confirm the popup warning...

Page 12: ...link for manually configuring the sensor so you will now click on this as shown in the screen shot above Now you will click on the down arrow button which will display the list of sensors to choose f...

Page 13: ...ontact CONTEG Support a RAMOS support conteg com for more assistance and please include the details of the problem and serial of the sensor in your email Again as we mentioned before at the end of the...

Page 14: ...ou do have to keep in mind that when the sensors are connected to the extra dry contacts and not the RJ 45 sensors ports if the 9Volt battery that powers the smoke detector runs out then you will not...

Page 15: ...e optical chamber You just need to open the optical chamber so the dust particles can be flushed out properly If you don t have a compressor or canned compressed air you can use a lint free cloth or t...

Reviews: