background image


PT-S959SDLX / PT-S959SDLXC Series User’s Manual 

19 


When use VESA standard 75mm mounting holes 

The main body has mounting holes according to VESA standard 75mm. When using a VESA 

standard 75mm stand or the like, attach it as shown the following figure.  


Figure 3.9.  Installation of VESA metal fittings 


Summary of Contents for PT-S959SDLX Series

Page 1: ...PANEL PC for S Series PT S959SDLX PT S959SDLXC Series User s Manual CONTEC CO LTD...

Page 2: ...itting 1 1 1 1 1 None CFast card removal prevention fitting 2 None None None None 1 USB removal prevention fitting angle 4 4 4 4 4 Washer assembled screw M3x6 4 4 4 4 4 Screws for attachment HDD or SS...

Page 3: ...1 1 1 1 1 Contact 4 4 4 4 4 Cable clamp 3 3 3 3 3 DVI analog RGB conversion adapter 1 1 1 1 1 Product guide 1 1 1 1 1 1 Please confirm User Manual in a website 2 Please using the HDD Operation Tempera...

Page 4: ...relevant issues have been considered in the preparation of this document Should you notice an omission or any questionable item in this document please feel free to notify CONTEC Co Ltd Regardless of...

Page 5: ...e 3 Limited One Year Warranty 3 How to Obtain Service 3 Liability 4 Safety precaution 4 Safety information 4 Caution on the PT S959SDLX Series 4 2 SYSTEM REFERENCE 7 Specification 7 Power Management F...

Page 6: ...9 CFast Card Connector CFast1 2 30 Serial Port Interface SERIAL A B C D 31 DIO Port DIO 33 5 BIOS SETUP 35 Introduction 35 Starting Setup 35 Using Setup 36 Getting Help 36 In Case of Problems 36 A Fin...

Page 7: ...Series User s Manual vii LAN Configuration 59 Security 60 Boot Configuration 61 Save Exit 63 6 APPENDIX 64 POST Codes 64 SERIAL I O Address and Register Function 67 Watch Dog Timer 73 Battery 76 7 LIS...

Page 8: ......

Page 9: ...ontributing to reduction of running cost and promotion of energy efficiency It adopts the low power platform with Intel AtomTM Processor E3845 that realizes lower power consumption while ensuring suff...

Page 10: ...sy disk replacement Safety design required for embedded applications For Windows Embedded Standard installed model it is possible to use the EWF 2 function of OS It is designed for safety required for...

Page 11: ...efects in material and workmanship for up to one year from the date of purchase by the original purchaser Repair will be free of charge only when this device is returned freight prepaid with a copy of...

Page 12: ...potentially hazardous situation which if not avoided may result in minor or moderate injury or in property damage Caution on the PT S959SDLX Series Handling Precautions WARNING Always check that the...

Page 13: ...r To prevent corruption of files always shutdown the OS before turning off this product CONTEC reserves the right to refuse to service a product modified by the user In the event of failure or abnorma...

Page 14: ...ifetime of the backlight is 50 000 hours the time until the brightness is lowered to 50 of the initial value Replacement of expendables is handled as a repair there will be a charge Component life is...

Page 15: ...ctive Area DLX Series 306 30 x 230 30 mm 0 20mm DLXC Series 249 50 x 188 00 mm 0 30mm Total Thickness DLX Series 2 10mm 0 20mm DLXC Series 2 70mm 0 15mm Connection Internal RS 232 connection System re...

Page 16: ...nterface External Display DVI I x 1 29pin DVI I connector Audio LINE OUT 3 5 Stereo mini jack Full scale output level 1 4Vrms Typ MIC IN 3 5 Stereo mini jack Full scale input level 1 4Vrms Typ CFast c...

Page 17: ...vel 3 EN61000 4 4 Level 3 Static electricity resistance Contact discharge 4kV IEC61000 4 2 Level 2 EN61000 4 2 Level 2 Atmospheric discharge 8kV IEC61000 4 2 Level 3 EN61000 4 2 Level 3 Vibration resi...

Page 18: ...Monochrome 70deg 80deg x 90 70deg 80deg Viewing Angle Vertical y 90 60deg 70deg y 90 60deg 70deg Luminance of gray level 63 Contrast Ratio CR Luminance of gray level 0 Figure 2 1 Definition of viewin...

Page 19: ...PU on the product the quality of the power supply is even more important For the best performance makes sure your power supply provides a range of 10 8 V minimum to 31 2 V maximum DC power source Powe...

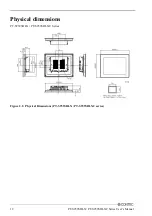
Page 20: ...12 PT S959SDLX PT S959SDLXC Series User s Manual Physical dimensions PT S959SDLX PT S959SDLXC Series Figure 2 2 Physical Dimensions PT S959SDLX PT S959SDLXC series...

Page 21: ...priate cables STEP3 Turn on the Power After verifying that you have correctly followed steps 1 and 2 turn on the power If you find any abnormality after turning on the power turn it off and check to s...

Page 22: ...s be sure to use the optional CFast card To prevent potential damage caused by static electricity take appropriate anti static measures for example wearing an anti static wristband when inserting or r...

Page 23: ...acket with the hard disk attached into the main body and secure it by tightening the screw 4 When attaching the SSD the first to change HDD Tray for aluminum and it s must use thermal sheet in the bet...

Page 24: ...re 3 3 Attaching the FG The FG pin of this product is connected to the GND signal of the DC power connector DC IN Note that the connection cannot be cut off Screw holes may be damaged if screws are ti...

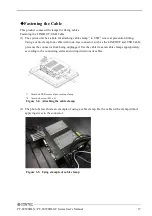
Page 25: ...ock less connector such as the LINEOUT and USB Cable prevents the connector from being unplugged Use the cable ties and cable clamps appropriately according to the connecting states and wiring directi...

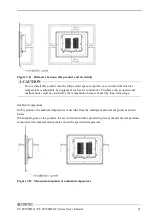
Page 26: ...oof rubber is setup in the groove of the panel back of the main body and insert the main body into the panel from the external side Figure 3 7 Confirm the waterproof rubber 3 Hold the attachment fitti...

Page 27: ...9 When use VESA standard 75mm mounting holes The main body has mounting holes according to VESA standard 75mm When using a VESA standard 75mm stand or the like attach it as shown the following figure...

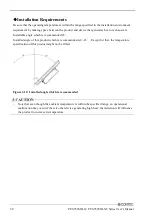
Page 28: ...air Installable angle which is recommended 45 Installed angle of this product which is recommended is 0 45 Except for that the temperature specification of this product might not be filled Figure 3 10...

Page 29: ...r Troubles such as operational malfunctions could be occurred by the temperature increase caused by long term usage Ambient temperature In this product the ambient temperature is decided from the mult...

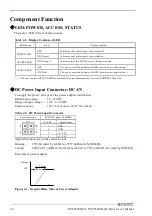
Page 30: ...ATUS LED Status LED DC IN DC power input connector LINE OUT Line out 3 5 PHONE JACK MIC IN Mic in 3 5 PHONE JACK USB 3 0 USB 3 0 port connector x 1 USB 2 0 USB 2 0 port connector x 6 LAN A B Ethernet...

Page 31: ...PT S959SDLX PT S959SDLXC Series User s Manual 23 System Configuration Figure 4 2 System Configuration...

Page 32: ...ED from the user application 1 1 API that controls STATUS LED is available For more information visit the CONTEC s Web site DC Power Input Connector DC IN To supply the power always use the power adap...

Page 33: ...INE OUT Interface LINE OUT The product is equipped with a connector for line output As such headphones or an amplified speaker can be connected MIC IN Interface MIC The product is equipped with a conn...

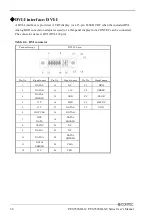
Page 34: ...ONTEC can be connected The connector name is DVI DVI I 29 pin Table 4 4 DVI connector Connector type DVI I 29 pin Pin No Signal name Pin No Signal name Pin No Signal name 1 DATA2 13 N C C1 RED 2 DATA2...

Page 35: ...y displayed in full screen mode This is because the frequency and resolution of Windows and MS DOS full screen display are the same due to the screen settings while the display parameters are differen...

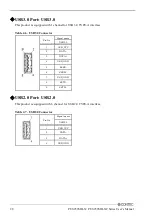
Page 36: ...0 TYPE A interface Table 4 6 USB3 0 Connector Pin No Signal name USB3 0 1 USB_VCC 2 DATA 3 DATA 4 USB_GND 5 SSRX 6 SSRX 7 USB_GND 8 SSTX 9 SSTX USB2 0 Port USB2 0 This product is equipped with 6 chann...

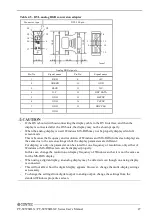
Page 37: ...5 N C TRD 2 6 RX TRD 1 7 N C TRD 3 8 N C TRD 3 LEDs for display of network statuses Right LED Link LED Normal connection Green ON Operation Green Blinking Left LED Operation LED 10M Off 100M Green 100...

Page 38: ...nal name Pin No Signal name PC1 CDI S1 GND PC2 GND S2 TX PC3 N C S3 TX PC4 N C S4 GND PC5 N C S5 RX PC6 N C S6 RX PC7 GND S7 GND PC8 LED PC9 N C PC10 N C PC11 N C PC12 N C PC13 3 3V PC14 3 3V PC15 GND...

Page 39: ...e for each of the ports independently The same I O address and IRQ cannot be shared with any other device Table 4 10 SERIAL A B C D I O Addresses and Interrupts SERIAL I O address Interrupt A 3F8h 3FF...

Page 40: ...eries User s Manual Table 4 12 RS 232C 422 485 SERIAL Port Connector Connector type 9 pin D SUB MALE Pin No RS 232C RS 422 RS 485 1 DCD TX TX RX 2 RX TX TX RX 3 TX RX 4 DTR RX 5 GND GND GND 6 DSR RTS...

Page 41: ...ntacting and performs the same operation as in POWER SW 2 POWER SW 3 GND Ground 4 GPIO0 General purpose I O Input and output can be selected respectively 5 GPIO1 6 GPIO2 7 GPIO3 8 GPIO4 9 GPIO5 Item S...

Page 42: ...D3 D2 D1 D0 w IOR5 IOR4 IOR3 IOR2 IOR1 IOR0 02AAh port General purpose I O register D7 D6 D5 D4 D3 D2 D1 D0 R W GPIO5 GPIO4 GPIO3 GPIO2 GPIO1 GPIO0 Figure 5 4 General purpose I O 02AAh Input mode Rea...

Page 43: ...ation contained in the FLASH ROM and begins the process of checking out the system and configuring it When it finishes the BIOS will seek an operating system on one of the disks and then launch and tu...

Page 44: ...s F2 key Load the previous settings F3 key Load the optimal defaults from the BIOS default table F4 key Save all the changed settings to the FLASH ROM and exit Getting Help Press F1 to pop up a small...

Page 45: ...s Manual 37 Main Menu When the setup program Aptio Startup Utility is started the main menu will be displayed Navigate through the various tabs by pressing the right and left arrow keys Figure 5 1 Ma...

Page 46: ...nu Item Indication example Explanation nnn BIOS Vendor American Megatrends Displays the BIOS manufacturer Core Version 5 010 Displays the BIOS core version Compliancy UEFI 2 4 PI 1 3 Displays the UEFI...

Page 47: ...lable ACPI Settings Configure the ACPI settings Super IO Configuration Configure the Super IO settings H W Monitor View such information as the CPU temperature CPU Configuration Configure the CPU sett...

Page 48: ...ion settings Resume on RTC Alarm Disabled Enabled Enable or disable the function for automatically turning on the system at the specified date and time When enabled use the following items to set the...

Page 49: ...ion Table 5 6 Super IO Configuration Item Option Description Serial Port A Configuration Refer to Table 5 7 Serial Port B Configuration Refer to Table 5 8 T P Serial Configuration Refer to Table 5 9 D...

Page 50: ...Change Settings IO 2F8h IRQ 3 IO 2A0h IRQ 3 4 5 6 IO 2E8h IRQ 3 4 5 6 IO 2F8h IRQ 3 4 5 6 IO 3E8h IRQ 3 4 5 6 IO 3F8h IRQ 3 4 5 6 IO 2D0 2F8h IRQ 3 4 5 6 Do not change this setting Table 5 9 T P Seria...

Page 51: ...ration Item Option Description Serial Port Disabled Enabled Enable or Disable Serial Port COM Device Settings IO 2D0h IRQ 10 Table 5 12 Ext Serial Port B Configuration Item Option Description Serial P...

Page 52: ...44 PT S959SDLX PT S959SDLXC Series User s Manual H W Monitor View hardware monitor information such as the CPU temperature Figure 5 5 H W Monitor Actual Display May Vary...

Page 53: ...n Configure the operation settings for CPU Figure 5 6 CPU Configuration Table 5 13 CPU Configuration Item Option Description Execute Disable Bit Disabled Enabled Do not change this setting Intel Virtu...

Page 54: ...the power saving function settings Figure 5 7 PPM Configuration Table 5 14 PPM Configuration Item Option Description EIST Disabled Enabled Do not change this setting CPU C state Report Disabled Enable...

Page 55: ...is setting Change switch of SATA Port 0 1 2 5inch SATA HDD SSD CFast1 Do not change this setting SATA Speed Support Gen1 Gen2 Do not change this setting SATA ODD Port Port0 ODD Port1 ODD No ODD Do not...

Page 56: ...port Disabled Enabled Do not change this setting GateA20 Active Upon Request Always Do not change this setting Option ROM Messages Force BIOS Keep Current Do not change this setting Boot option filter...

Page 57: ...Manual 49 Chipset Specify the detailed chipset functions Figure 5 10 Chipset The following items are available North Bridge Configure the operation settings for North Bridge South Bridge Configure th...

Page 58: ...or North Bridge Figure 5 11 North Bridge Table 5 17 North Bridge Item Option Description Intel IGD Configuration Refer to Table 5 18 LCD Control Refer to Table 5 19 Max TOLUD 2 GB 2 25 GB 2 5 GB 2 75...

Page 59: ...configured before shipment Figure 5 12 Intel GOP Configuration Table 5 18 Intel GOP Configuration 1 2 Item Option Description GOP Driver Enabled Disabled Do not change this setting PAVC Disabled LITE...

Page 60: ...r s Manual Table 5 18 Intel GOP Configuration 2 2 Item Option Description DVMT Total Gfx Mem 128MB 256MB Max Do not change this setting Aperture Size 128MB 256MB 512MB Do not change this setting GTT S...

Page 61: ...re the settings for the port that will be output as the main display at start up Only the main display is displayed during OS recovery Change the settings to suit the type of connected display Seconda...

Page 62: ...0 LVDS 800x600 LVDS 1024x768 LVDS1 1280x1024 LVDS 1400x1050 RB LVDS1 1400x1050 LVDS2 1600x1200 LVDS 1366x768 LVDS 1680x1050 LVDS 1920x1200 LVDS 1440x900 LVDS 1600x900 LVDS 1024x768 LVDS2 1280x800 LVDS...

Page 63: ...isabled Configure the high precision event timer settings Restore AC Power Loss Power Off Power On Last State Set whether to start the system at the same time the power supply starts Power OFF Press t...

Page 64: ...Azalia HD Audio Configuration Configure the Azalia HD Audio settings Figure 5 15 Azalia HD Audio Configuration Table 5 21 Azalia HD Audio Configuration Item Option Description Audio Controller Disable...

Page 65: ...PT S959SDLX PT S959SDLXC Series User s Manual 57 USB Configuration Configure the USB settings Figure 5 16 USB Configuration...

Page 66: ...Enabled Configure the USB storage support settings with BIOS Device power up delay Auto Manual Do not change this setting USB Overcurrent Enabled Disabled Do not change this setting USB3 0 XHCI Suppo...

Page 67: ...re 5 17 LAN Configuration Table 5 23 LAN Configuration Item Option Description Onboard LAN A Controller Enabled Disabled Can not change this setting Onboard LAN B Controller Enabled Disabled Configure...

Page 68: ...assword at least 3 characters long twice To disable the password enter the Administrator Password entry screen again User Password Set the user password Press Enter to display the following screen for...

Page 69: ...abled Enabled Do not change this setting Fast Boot Enabled Disabled Do not change this setting Boot Option x XXXXXXXX Specify any device Set the start order of the connected USB floppy drives 1 CD DVD...

Page 70: ...a legacy boot is performed under the assumption the disk is MBR formatted If 2 is selected a UEFI boot is performed under the assumption the disk is GPT formatted Make sure to specify 1 as the boot se...

Page 71: ...PT S959SDLX PT S959SDLXC Series User s Manual 63 Save Exit Load save setup items and exit the setup menu Figure 5 20 Save Exit menu...

Page 72: ...RI memory South Bridge initialization Specific South Bridge 1Dh 2Ah OEM PRI memory initialization code 2Bh Memory initialization Serial Presence Detect SPD Data loading 2Ch Memory initialization Memor...

Page 73: ...S Phase 91h Driver connection start 92h PCI bus initialization starts 93h PCI bus hot plug controller initialization 94h Enumerate PCI bus number 95h PCI bus resource requests 96h PCI bus resource all...

Page 74: ...1h S1 sleep system during migration 02h S2 sleep system during migration 03h S3 sleep system during migration 04h S4 sleep system during migration 05h S5 sleep system during migration 10h From S1 slee...

Page 75: ...ng register THR R Receive buffer register RBR 1 W Divisor latch register LSB DLL 03F9H 1 W Divisor latch register MSB DLM 0 W Interrupt enable register IER 03FAH X R Interrupt ID register IIR 03FBH X...

Page 76: ...Holding Register DLAB 0 Register dedicated to write transmitted data to 03F8H RBR Reciever Buffer Register DLAB O Register dedicated to read received data from 03F8H DLL Divisor Latch LSB DLAB 1 Baud...

Page 77: ...PT S959SDLX PT S959SDLXC Series User s Manual 69 Table 6 3 Function of Each Register 2 4 I O address Description 03FAH IIR Interrupt Identification Register 03FBH LCR Line Contror Regester...

Page 78: ...70 PT S959SDLX PT S959SDLXC Series User s Manual Table 6 3 Function of Each Register 3 4 I O address Description 03FCH MCR Modem Control Register 03FDH LSR Line Status Regester...

Page 79: ...l 71 Table 6 3 Function of Each Register 4 4 I O address Description 03FEH MSR Modem Status Register 03FFH SCR Scratchpad Register This is an 8 bit readable writable register which is available to the...

Page 80: ...es and their respective values to be written to the divisor latch register LSB MSB Table 6 4 Baud Rate Settings Baud rate to be set SERIAL PORTS Clock input 1 8432MHz Value to be set in the divisor re...

Page 81: ...onds of timeout intervals for the watchdog timer There is also a 2 second tolerance for timeout intervals To maintain normal system operation trigger the watchdog timer again using a user written prog...

Page 82: ...EQU 5 BEGIN Init NCT610xD IO mov dx IO_Port mov al 087h out dx al out dx al Set Logical Device 8 mov ch 007h mov cl 008h call Set_IO WDT Function Active mov ch 030h call Get_IO or cl 001h call Set_IO...

Page 83: ...Manual 75 out dx al mov dx IO_Port 1 in al dx mov cl al ret Get_IO Endp Set_IO Proc Near mov dx IO_Port mov al ch out dx al mov dx IO_Port 1 mov al cl out dx al ret Set_IO Endp END BEGIN The timer s i...

Page 84: ...Lithium primary battery Model BR 1 2AA Maker Panasonic Nominal voltage 3V Nominal capacity 1000mAh Lithium content 1g or less Removing the battery Remove the battery according to the following figure...

Page 85: ...16GB A 16GB CFast Card CFast 32GB A 32GB CFast Card CFast 64GB A 64GB CFast Card Hard Disk MQ01AAD032C 2 5 inch SATA HDD 320GB TS128GSSD370 SSD 128GB Precautions when using products other than our opt...

Page 86: ...Nishiyodogawa ku Osaka 555 0025 Japan Japanese http www contec co jp English http www contec com Chinese http www contec com cn All rights reserved This product and this document are protected by copy...

Reviews: