Constellation audio Cygnus Owner'S Manual Download Page 7


Source components 
 

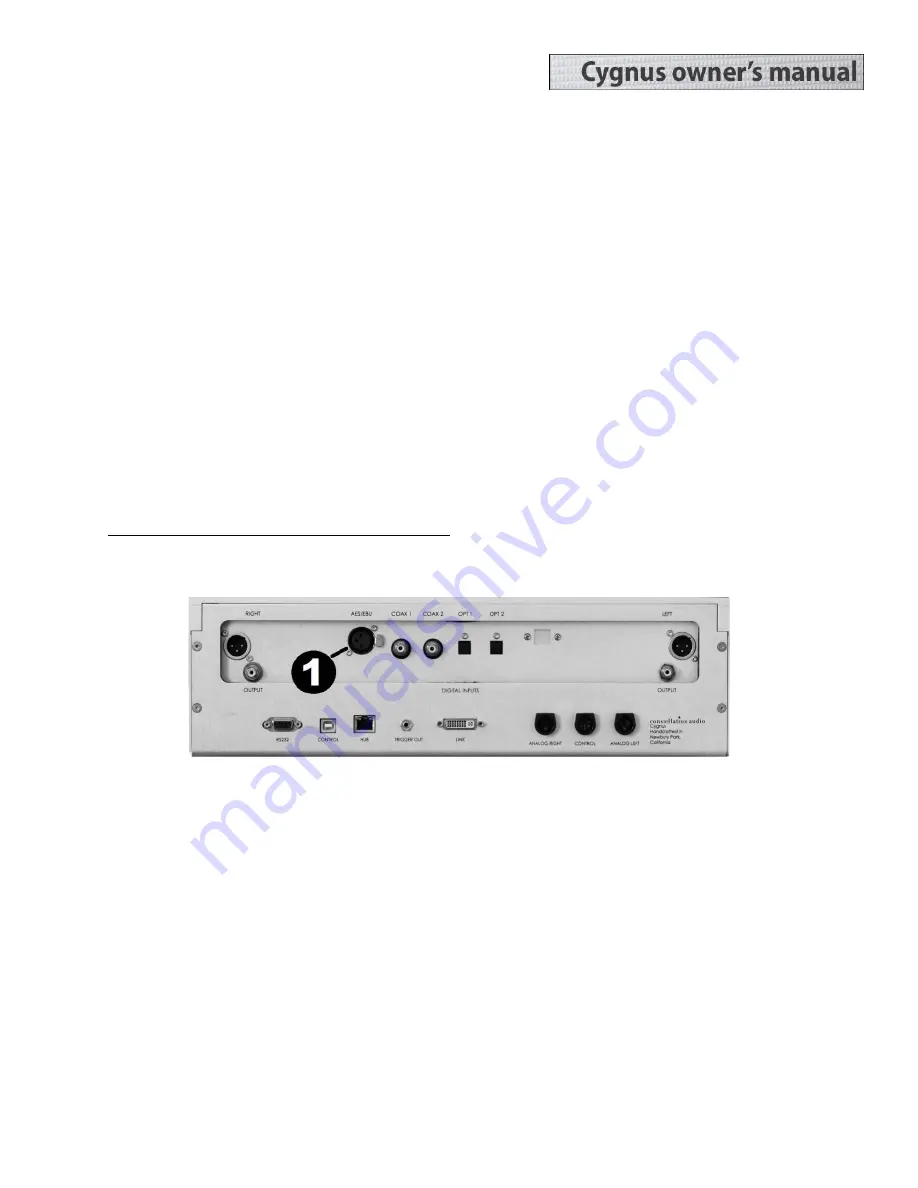
The Cygnus DAC section has five digital audio inputs (AES/EBU, two coax, two Toslink optical). We 
recommend you use the highest quality connection that your digital source device provides. In order of 
preference, we recommend AES/EBU, then coax, then Toslink. 

 
In the event of malfunction 
 

Do not under any circumstances open the chassis of the Cygnus. There are no user-serviceable parts inside. 
Opening the chassis can present a shock hazard even if the AC power is disconnected. Any alteration or 
modification of the Cygnus’s internal parts or circuit will immediately void your warranty. 
 
If your Cygnus does not function correctly, refer to the Troubleshooting section at the end of this manual. If 
you are still unable to resolve the problem, contact your Constellation Audio dealer. 
 
If any liquid is spilled on the digital file player/DAC, or if any metal object (such as a staple or a paper clip) is 
inadvertently forced inside, immediately disconnect the AC power and contact your Constellation Audio 
dealer.  
 

Source device and output connections 


1. AES/EBU digital input 


Use this connection if your digital source device has an AES/EBU output, because it delivers the best possible 
sound quality. This connection accepts PCM digital audio signals in resolution up to 32 bits/192 kilohertz. 
This jack accommodates a standard XLR plug. To remove the XLR plug, push on the tab on the right side of 
the jack (viewed from the rear) and pull the plug out. 


Summary of Contents for Cygnus

Page 1: ......

Page 2: ...sture rain or excessive humidity The lightning flash with arrowhead within an equilateral triangle is intended to alert the user to the presence of uninsulated dangerous voltage within the product s e...

Page 3: ...ustrating complexities of digital audio and in the process achieves a level of fidelity no other digital audio source device can match Please read this manual in full before you operate the Cygnus so...

Page 4: ...power supply Do not attempt to replace them The cables are long enough to allow separation of the two components so you can for example place the power supply at the bottom of your equipment rack wit...

Page 5: ...onnect the Link cable by gently pushing the plug onto the connector on the Cygnus main chassis Make sure the plug is oriented correctly with the connector Then tighten the two mounting screws on the p...

Page 6: ...F 21 C plus or minus 10 F 5 C Never install the Cygnus in a place where it may be exposed to direct sunlight and do not install it next to a room heater radiator air conditioner etc Do not install th...

Page 7: ...nction correctly refer to the Troubleshooting section at the end of this manual If you are still unable to resolve the problem contact your Constellation Audio dealer If any liquid is spilled on the d...

Page 8: ...he cable 3 Toslink optical digital inputs Use one of these connections if your digital source device does not have AES EBU or coax These inputs accept PCM digital audio signals in resolution up to 32...

Page 9: ...al audio files up to up to 32 bits 192 kilohertz Note that these inputs DO NOT accept signals from the USB outputs on computers tablets or smartphones You can connect two USB devices simultaneously Th...

Page 10: ...hose from AMX Crestron and Control4 It can also be used to update the Cygnus s firmware For more information contact your dealer 9 USB control This USB jack is used to interface the Cygnus with third...

Page 11: ...if you wish 14 Link power supply This jack carries audio and control signals between the Cygnus main chassis to the power supply It uses a DVI digital cable which is provided with the Cygnus 15 Antenn...

Page 12: ...19 Standby power Push this button to turn the Cygnus on and off When you turn the unit on it will take a few seconds for the unit to warm up When the Cygnus is ready for use its screen will illuminat...

Page 13: ...and the unit will emit no sound Input selector or home screen This screen appears when the power is on and the unit is warmed up Touching any input button onscreen will switch to that input The Scree...

Page 14: ...ry settings but only temporarily the Cygnus will return to the previous user settings when the power is shut off Screen setup screen Pressing the Setup button while on the Home screen brings up this s...

Page 15: ...e browser you re using We recommend bookmarking this page in your browser to make it easier to access Step by step operating process Here s how to perform the basic operations of turning the unit on s...

Page 16: ...buttons under the front touchscreen to bring up the Input Select screen or tap the Input Select up down scroll buttons on the remote STEP 6 To mute the Cygnus output press the Mute button under the f...

Page 17: ...the three columns The music you selected will begin playing TO BROWSE BY GENRE Click on the Genre button in the left column of the browser window You ll see a list of genres appear in the left most of...

Page 18: ...e queue You may also click Queue Album to add an entire album Any tune on either of the two USB memory sticks connected to the Cygnus can be added to a playlist but the stick must be in the player If...

Page 19: ...you perform each step touch the Standby button on the front of the unit and see if the screen lights up If any one of the steps restores the power i e allows the Standby button to turn the unit on the...

Page 20: ...ntact your Constellation Audio dealer Web browser control does not work 1 Make sure the Cygnus is powered up and finished with its warm up mode Tap the front touchscreen to make sure it s on 2 Check t...

Page 21: ...on of the unit won t be as fast For more information Your Cygnus preamplifier should give you many years of trouble free maintenance free service If you encounter any problems you cannot solve or have...

Reviews: