23
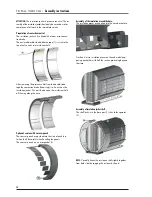
First the loading and unloading loading pipes are inserted
without the extension (1), then the extension pipe is screwed
on (2) and then the entire tube is pushed further in to place
ATTENTION:
The extensions must be screwed as far as they
will go without sealing compound.
Repeat the same steps for each successor module:
Insert 5 sealing sleeves, lubricate the opposing seals with
the enclosed grease and push them into the seals until they
stop.
Place the next module on to the rails and slide slowly up
to the previous module. Keep straight when entering the
sleeves.
The modules must be centered and connected with 2 x M20
screws and nuts (1) on both sides.
NOTE:
Optionally fit pipes early if space is constricted.
There might be not enough space in front of the store for
the pipes to fit in (see technical data, minimum room size)
after installation of all store modules. In this case it is possi-
ble to insert the 5 loading and unloading pipes (1) into the
modules at this point. Make sure to observe the distance D
to the face side.
NOTE:
From 6 modules, the loading and unloading loading
pipes are supplied in 2 parts.
NOTE:
Follow instructions for installation with insertion and
carrying aid further back.
T D M A - VA R I C A L :
Assembly instructions


